


13
I.S.E. S.r.l.
Via Dell’artigianato 1/3
00065- Fiano Romano (RM)
Tel. 076540191-Fax 0765455386
www.irritrol.it
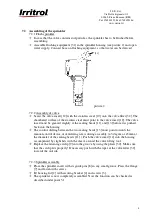
4. Adjustments
4.1 Sectors
The sectors of the reference part circle of sprinklers are adjusted by pushing the spring stop
at the end, which expand the spring. You achieve a crude adjustment before installation,
the fine adjustment should be done on the working sprinkler.
4.2 Casting range
The casting range is regulated through the application of different nozzles and pressures.
(Further information see catalogue)
4.3 Jet deflector screw (type SIS120P no adjustment available
)
The jet deflector screw is for adjustment of the near irrigation around the sprinkler. If you
screw in further the screw in the water jet, the „rainfall“ consistency around the sprinkler
increases, the casting range decreases. If you unscrew the interruption screw the irrigation
around the sprinkler decreases and the casting range increases.
5. Maintenance / Cleaning / Repair
To clean or suction the housing you must lift the sprinkler by hand or remove the cover
from time to time.
Examine function of gravel package
In case that the sprinkler insert or nozzle head is dirty, only clean it with water.
Do not use lubricants or grease, other wise the gliding plate in the sprinkler might be
damaged!!!
Please dismount defect parts immediately and repair them or send them to repair.
6. Preparation for winter time
Before winter the pipe system and the pumping station are to be drained. The drainage valve
must be open until the next in commissioning.
By sprinklers with a stop valve (H), the water above the stop valve cannot discharge itself.
Because of that reason the sprinkler insert of the installation are to be lift on the cover ( e.g. for
winterising). When the sprinkler insert are lift, the water can flows out off the guiding housing
and air can enter into the conductions.
Therefore it is the best to put a piece of wood with approximately 2 cm between cover and
housing until the installation is empty.


