background image

Page      of 11 


MAINTENANCE 


Maintain your Rotary Hammer. 

It is recommended that the general condition of any Rotary 

Hammer be examined before it is used. Keep your Rotary Hammer in good repair by adopting a 
program of conscientious repair and maintenance. Have necessary repairs made by qualified 
service personnel. 


•  The  grease  in  the  gearbox  will  require  replenishment  after  approximately  50  hours 

accumulative use. After this time add approximately 50 grams of the grease (supplied), into 
the  gearbox.  First  remove  the  cap  from  the  tool  by  using  the  pin  spanner  (supplied).  Once 
removed add the grease through this hole. Ensure the cap is secured back into position prior 
to operation. 

•    After each use, blow air through the tool housing to ensure it is free from all dust particles that 

may build up. Build up of dust particles may cause the tool to overheat and fail. 

•    If the housing of the tool requires cleaning do not use solvents but a moist soft cloth only. 

  Never let any liquid get inside the tool; never immerse any part of the tool into a liquid. 

•    When the carbon brushes wear out the tool will spark and/or stop. The brushes are a wearing 

component of the tool and should be replaced prior to the carbon wearing out fully. Brushes 
will wear out after many uses. Always replace both brushes at the same time. 

Note: 

The distributor is not responsible for any damage or injuries caused by the repair of the tool 

by an unauthorized person or by mishandling of the tool. 


Summary of Contents for 46478

Page 1: ...S MANUAL WARNING Read carefully and understand all ASSEMBLY AND OPERATION INSTRUCTIONS before operating Failure to follow the safety rules and other basic safety precautions may result in serious personal injury Item 46478 ...

Page 2: ...the product For technical questions please call 1 800 222 5381 INTENDED USE The Rotary Hammer Drill is specifically designed for fast impact drilling of anchor holes and through holes for concrete and masonry TECHNICAL SPECIFICATIONS Description Specifications Motor 120V 60Hz 7 6 Amps No load speed 800 RPM Impacts 3100 BPM GENERAL SAFETY RULES WARNING Read and understand all instructions Failure t...

Page 3: ...r use the cord for carrying pulling or unplugging the power tool Keep cord away from heat oil sharp edges or moving parts Damaged or entangled cords increase the risk of electric shock e When operating a power tool outdoors use an extension cord suitable for outdoor use Use of a cord suitable for outdoor use reduces the risk of electric shock f If operating a power tool in a damp location is unavo...

Page 4: ...ool for operations different from those intended could result in a hazardous situation 5 Service a Have your power tool serviced by a qualified repair person using only identical replacement parts This will ensure that the safety of the power tool is maintained b If the supply cord is damaged it must be replaced by the manufacturer its service agent or similarly qualified persons in order to avoid...

Page 5: ...tact hidden wiring or its own cord Use thick cushioned gloves and limit the exposure time by taking frequent breaks Vibration caused by the hammer action may be harmful to your hands and arms When removing an accessory from the tool avoid contact with skin and use proper protective gloves when grasping the bit or accessory Accessories may be hot after prolonged use Always wear eye protection and a...

Page 6: ...Page of 11 6 ...
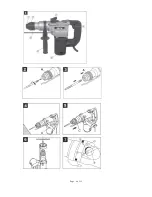
Page 7: ... a safe body position during operation by rotating the handle attachment Loosen and turn the handle attachment in counterclockwise direction Then tighten the handle attachment Depth stop Fig 5 Loosen the handle attachment and place the straight part of the depth stop into the hole Adjust the depth stop and re tighten the handle attachment Dust collection device Fig 6 Before doing any overhead hamm...

Page 8: ...is secured back into position prior to operation After each use blow air through the tool housing to ensure it is free from all dust particles that may build up Build up of dust particles may cause the tool to overheat and fail If the housing of the tool requires cleaning do not use solvents but a moist soft cloth only Never let any liquid get inside the tool never immerse any part of the tool int...

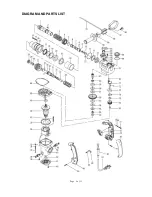
Page 9: ...Page of 11 9 DIAGRAM AND PARTS LIST ...

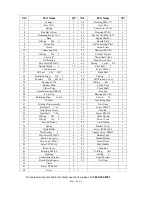
Page 10: ... 68 Oil Window Cover 1 20 Bearing 61907 1 69 O Ring 42x 2 1 21 Rubber Ring 1 70 Crank Case 1 22 Plastic Pipe 1 71 Crank Shaft 1 23 Needle Bearing HK0818 2 72 Key 4x8 1 24 Front Cap 1 73 Bearing 6202 2Z 1 25 Retaining Ring 16 5x2 1 74 Circlip 35 1 26 Washer 1 75 Insulating Ring 1 27 Sliding Clip Assembly 1 76 First Gear 1 28 Steel Ball 7 14 5 77 Screw M5x25 2 29 Guide Ring Sleeve 1 78 Handle 1 30 S...

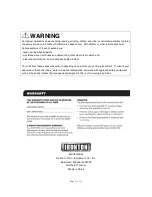
Page 11: ...ilica from bricks and cement and other masonry products and arsenic and chromium from chemically treated lumber Your risk from these exposures varies depending on how often you do this type of work To reduce your exposure to these chemicals work in a well ventilated area and work with approved safety equipment such as those dust masks that are specially designed to filter out microscopic particles...

Reviews: