background image


English

Uploading notes 

-


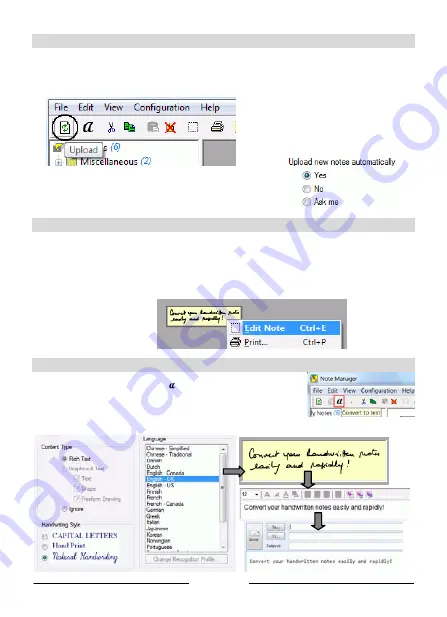
Connect the receiver unit to your PC (using the USB cable) and start 

Easy Note Taker

.  

-


In the 

Note Manager

, click on 

Upload

 on the main toolbar. All the notes get uploaded 

from the receiver to your computer and can be viewed on screen.  

You can select other preferences 
for the upload. Select Preferences 
from the Configuration menu and 
get to the Mobile tab:  


Managing notes 

-


The uploaded notes are available in the 

Mobile Notes

 folder. They can be edited using 

the 

Note Editor

. By means of Note Editor you can sort, save and export your notes, and 

also e-mail them as JPEG files. 

-


To open the Note Editor, right-click a note and select 

Edit Note


Converting notes 

-


In 

Note Manager

 click on


 to convert your selected notes.  

-


MyScript Notes Lite

 starts up. Choose the conversion settings.  

The conversion will be performed instantly. 

-


The resulting text can be sent to other applications or sent by e-mail. 


Summary of Contents for IRISNotes 1.0

Page 1: ...re edit save and export your handwritten notes and drawings Your notes can be instantly converted into editable text in a wide range of languages IRISNotesTM also allows you to annotate any JPEG photo...

Page 2: ...minutes before using the product full charge time is 3 5 hours plug the USB cable to the unit and connect it to your PC USB port The LCD screen displays the following status indications Bluetooth acti...

Page 3: ...ctions When the installation is complete click on Finish then remove the CD ROM from the CD ROM drive How to use IRISNotesTM Writing notes Position the receiver unit at the top center of your A4 paper...

Page 4: ...d get to the Mobile tab Managing notes The uploaded notes are available in the Mobile Notes folder They can be edited using the Note Editor By means of Note Editor you can sort save and export your no...

Page 5: ...n once in the small area located in front of the receiver unit Annotating photos Connect the receiver unit to your PC using the USB cable and start Photo Sketcher Load any JPEG photo Hover the pen to...

Page 6: ...e installation is complete remove the CD ROM from the CD RM drive 2 Click on the Digital Pen installer icon Digital Pen pkg The Digital Pen Installer opens a standard Mac installer Figure 1 Digital Pe...

Page 7: ...rmat images in the receiver unit memory Before you can work with your text on your Mac you first need to transfer the TIFF images from the Digital Pen to your Mac s hard drive When you connect the Dig...

Page 8: ...s will be saved To choose a different path click the ellipsis button to open the Finder window Figure 3 Digital Pen Preferences Finder window 3 Choose where on your Mac you want to save TIFF images by...

Page 9: ...ew the note Step 3 While being connected to the Mac via the USB port the Digital Pen can be used as a Mouse and as a Tablet input device for Mac ink applications Use the digital pen in applications su...

Page 10: ...Blackberry device you first need to install the NoteTaker for Blackberry application You can either install it from the Note Manager CD ROM delivered with your product or use your Blackberry Browser t...

Page 11: ...In order to use the Digital Pen with your Blackberry the pen s receiver unit must first be paired with your Blackberry s Bluetooth function You need to go through this procedure only once 1 Turn on th...

Page 12: ...he receiver button each time you want to write a new note Now use the pen to start writing notes or making drawings You ll see the pen move on the Blackberry screen 7 To save the results press and sel...

Page 13: ...s and network Bluetooth settings 4 Activate the Bluetooth function and then press Scan devices 5 Select Mobile Pen 6 You are prompted to enter pin number Enter 0000 Your Blackberry is now successfully...

Reviews: