21
Chapter 6 – Replacing Filters
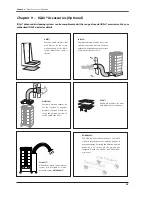
6. With the palm of the hand, press down
on the filter and loosen the frame.
5. Turn the frame upside down.
4. Remove the filter clamps that secure
the filter in the frame by pulling these
out of the sliding grooves.
9.
Turn the frame around and insert the
new filter. Ensure that the arrows on
the filter label point upward.
11. Put the frame back into the housing.
For details on how to close the hou-
sing, please refer to section 6.3.
8.
Dispose of the used filter by placing it
into the plastic bag in which the new
filter is supplied.*
7.
Lift the frame from the filter.
10. Make sure that the filter is inserted all
the way into the frame. Insert the
clamps into the sliding grooves inside
the frame and push them down.
* If known harmful substances are
filtered,
please refer to local
regulations or laws for proper filter
disposal.
TOP
TOP
TOP
TOP
6.4 Replacing the Pre-Filter (Filter 1)
1.
Open the locking arms, making sure
they are fully extended outward. For
details, refer to the section 6.3.
2. Opening the arms will cause the upper
part of the housing to separate from
frame 1. This will leave a narrow gap.
3. Place your hands on opposite sides of
frame 1, lift it slightly and pull it out
slowly. As the frame is withdrawn from
the system, tilt it progressively upward
to remove it completely.
gap
Summary of Contents for Cleanroom H13
Page 1: ...User s Manual Cleanroom H13 ...
Page 3: ......


