background image

4

RECORDING MANAGEMENT

4

RECORDING MANAGEMENT

4.6 Factory Reset

4.6 Factory Reset

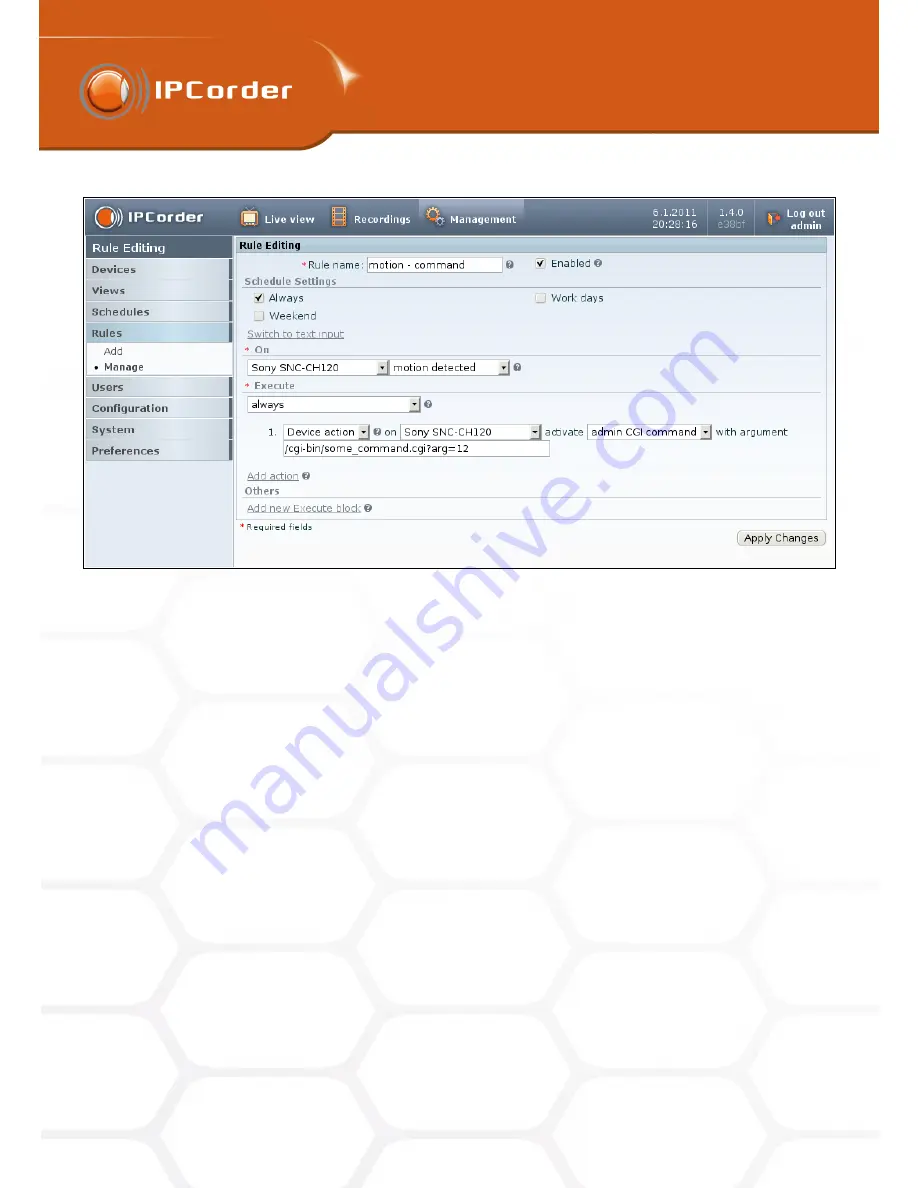
Figure 35: Rule with cgi command

by clicking

Download

. Use the downloaded repaired key to upgrade the firmware as described in chapter 4.5

Firmware update

using the Updates page to download an updated firmware.

The second line informs on firmware status. If you see

Bad

, you need to download a new firmware from

http://updates.ipcorder.com

, select the downloaded firmware in the selection field and by clicking

Upload FW

button install the new firmware to fix the issue.

4.6

Factory Reset

It is possible to reset IPCorder to its factory defaults in section

Settings – System – Factory reset

. This can be

useful in situations when the device cannot be accessed by other means or when it is sold. The factory reset
erases all data on disk/disks and all settings are reset to their default values

Before you start the process of

Factory reset

you should make sure that the power supply for the device is

stable as the device must be on for the duration of reset process. A power failure before the reset is finished
can cause damage to the device.

By clicking the

Factory reset

the system is restarted in rescue mode. In the rescue mode navigate to the

Factory Reset

page. Select reset options as required:

Preserve network configuration

to preserve network

settings and

Preserve storage configuration

to preserve disk storage.

When you click the

Factory Reset

button the systems starts with erasing data. This can take a while and you

45

Summary of Contents for KNR-090 4

Page 1: ......

Page 2: ...IPCorder User Manual 1 4 Copyright c KOUKAAM a s 2011...

Page 3: ...age Space Settings 10 2 6 FTP 11 2 7 Remote Access 12 2 8 User Account Management 16 2 9 User Settings 17 2 9 1 Changing the Password 17 3 Device Management 19 3 1 Adding a Device 19 3 2 Managing Devi...

Page 4: ...dings 32 4 2 1 Video Export 35 4 3 Rules 35 4 3 1 Rule Examples 38 4 4 System Log 40 4 5 Firmware upgrade 41 4 5 1 Firmware repair 43 4 6 Factory Reset 44 4 7 Power off Restart and LED signalisation 4...

Page 5: ...ponses to the events A simple interface which allows the user to define them in a few clicks or the script language incorporated in the interface which as the more experienced users will find is a rat...

Page 6: ...ata from the sensors can be exported as tables in html format Videos or pictures from cameras can be saved to file by just one click Access to saved data is dealt with in the chapter Recordings The li...

Page 7: ...processor and 1GB RAM It is also necessary to count with large amounts of data that need to be transferred while downloading the video from the camera to the computer In case of downloading a bigger n...

Page 8: ...the basic network parameters chapter 2 2 set the correct time and date chapter 2 4 and if necessary also to allow remote access to the device chapter 2 7 All these attributes can be set up in the menu...

Page 9: ...hin the local network Net Mask Is the mask of the local network or a segment of it to which the device belongs for example 255 255 255 0 Gateway Is an IP Address at which a Gateway or a Router is avai...

Page 10: ...This might be especially helpful when you are experiencing problems with restarting the device into the Normal Mode 2 3 E mail The IPCorder offers the option to inform the user about basic system even...

Page 11: ...d the IPCorder automatically synchronizes time with chosen NTP Network Time Protocol server It is necessary to insert the IP Address or the DNS name of a NTP server for example pool ntp org which shou...

Page 12: ...eos Status In use for KNR 090 and KNR 100 if the disk is ok Failed if the disk has problems Tray always 1 for KNR 090 The system is constantly monitoring the available disk space If it is running out...

Page 13: ...e disk The device will boot into the rescue mode and unless the disk was already formatted you will need to set up the disk by clicking the Setup disk tool The device will then restart to normal mode...

Page 14: ...e function Purge data older than available in the Storage section 2 7 Remote Access If you want to access the IPCorder and its subordinate devices remotely from other networks i e via Internet it is n...

Page 15: ...er for accessing the IPCorder remotely will be http 194 114 132 12 1024 the link is displayed in a public URL format The Port Range then specifies the scale of available ports the IPCorder can allocat...

Page 16: ...base which is being used On routers it is usually labelled as Protocol Port on Gateway Is the port on the outer side of the router Gateway where the data from the outside should be sent This port bel...

Page 17: ...in IPCorder s viewing applet and what is more the assigned ports differ with each access The IPCorder with the remote access enabled is automatically attempting to distinguish whether the user is con...

Page 18: ...ws with info about their layout for example 2x2 will appear in the Management menu Similarly only the list of devices with their IP addresses will be accessible in the menu Devices In the default sett...

Page 19: ...user can alter only the settings for his her own account i e the account he she is logged into For changing these go into the menu Management Preferences User Preferences Figure 12 To confirm the chan...

Page 20: ...2 FUNCTIONS OVERVIEW AND MANAGEMENT 2 FUNCTIONS OVERVIEW AND MANAGEMENT 2 9 User Settings 2 9 User Settings Figure 13 Changing the password 19...

Page 21: ...ce Figure 14 Automatic discovery of devices To be able to operate a device the IPCorder first needs to become aware of it The devices that are switched on and connected in the same segment of the loca...

Page 22: ...th an IP address from the scale on the top of the page Otherwise its original IP address will be used In the section Port numbers it is possible to redefine the ports IPCorder should use for the commu...

Page 23: ...irm adding the devices into the system by clicking the Activate button at the end of the list The alternative to the automatic detection of the connected devices is the possibility of adding the devic...

Page 24: ...tomatic rules see the chapter 4 3 Rules This code is also used for naming of the directories on the hard drives where the data from the device are stored and that are accessible through the FTP access...

Page 25: ...c can be found next to the Live view checkbox If the camera supports multiple streams the user can choose which should be displayed The recording modes can be configured in the section Recording The I...

Page 26: ...a is recording continually and then splits the video signal into files The length of the files may be configured in the lower part of the form If the camera supports multiple streams the user can furt...

Page 27: ...the option Daily Working days and Weekend to specify the Period If you need to specify more than one recording period in one day Figure 18 it is necessary to specify every period individually For ins...

Page 28: ...cess Administrator Account Here you can change the Login and Password that allow editing the camera settings Correct setting of the administrator account is essential for any changes to the device set...

Page 29: ...ntication in general and particular passwords set on the camera and on the IPCorder e g if a password has been changed directly in the camera s web interface In this case it is necessary to fill in th...

Page 30: ...he outputs from multiple cameras on the Live View page Figure 20 is defined by so called Views see bellow For viewing the live stream it is necessary to configure at least one view in the menu Managem...

Page 31: ...er is required for both watching the Live View and browsing the recordings we recommend downloading the Sun JAVA JRE Version 6 Update 11 or newer from http www java com for MS Windows and Linux When u...

Page 32: ...on the Live View page To change the view settings go into the menu Management Views Manage or click the View Settings link located just above the User Buttons on the Live View page The Settings link...

Page 33: ...creating a new view The user must also specify at least one pair of Device Variable To add more variables to the new monitor click the Add Next button To erase one use the Delete button in the approp...

Page 34: ...ing a status monitor Figure 24 List of status monitors 4 2 Recordings The system stores the recorded outputs from devices onto the hard drive either continually or when triggered by events as defined...

Page 35: ...he Delete button at the time axis to remove all graphs at once The displayed graphs constitute a so called Graph Set This set can be saved by clicking the Add button blue plus located under the Graph...

Page 36: ...most applications of this type Figure 26 Figure 26 From left previous video rewind previous picture pause next picture play next video speed of recording menu Holding the mouse cursor over a button w...

Page 37: ...w codec alone go for example to http www free codecs com download FFDshow htm Some of the anti virus software products the AVG for example label the FDDShow codec as a Trojan horse type virus 4 3 Rule...

Page 38: ...uted and the set of actions that should be carried out Always The simplest condition type Block of this type will be executed every time the triggering event occurs When Allows the user to create a si...

Page 39: ...er variable and set its value This might be useful for testing the value of the variable in other rules Wait Allows the user to set a delay before another action or block is executed Add more actions...

Page 40: ...e form will appear for the ones created using the text mode the text mode form will appear Confirm the changes by clicking the Apply Changes button The Remove button located next to the Edit button i...

Page 41: ...motion detected by some other camera it turns the camera in chosen direction records the video waits and than turns the camera back As in previous example we assume to have predefined positions Defau...

Page 42: ...IPCOrder will send and email with this information To make this rule work properly you have to set up the email address and other properties in Management Configuration E mail Hint It is possible to...

Page 43: ...sion of firmware will appear after you log in Figure 38 You can refresh the list by clikcing the Check for new updates or display all available versions of firmware by selecting Show all versions When...

Page 44: ...ices Figure 39 After logging in go to the page with the list of your devices Figure 40 You can use the link list of your devices or my devices Figure 39 If your device is already registered on http up...

Page 45: ...e its result You can now switch to normal mode by clicking the Restart to normal mode button 4 5 1 Firmware repair In some rare cases an issue related to firmware the device key or with other upgradab...

Page 46: ...ctory reset This can be useful in situations when the device cannot be accessed by other means or when it is sold The factory reset erases all data on disk disks and all settings are reset to their de...

Page 47: ...In this case the device will enter the rescue mode as if it was the first time the device was connected to the network When the Factory reset is finished the device can be powered down and disk s can...

Page 48: ...r a Reset buttons on its back side Pushing the power button shortly will shut down the IPCorder application running on the device Holding the power button for more than 5 seconds will power down the w...

Page 49: ...s to signal the Factory reset in progress by flashing red and blue You may need to hold it for up to 3 minutes When performing the factory reset this way you cannot preserve the network or storage set...

Page 50: ...4 RECORDING MANAGEMENT 4 RECORDING MANAGEMENT 4 7 Power off Restart and LED signalisation 4 7 Power off Restart and LED signalisation Figure 40 List of registered devices 49...

Page 51: ...4 RECORDING MANAGEMENT 4 RECORDING MANAGEMENT 4 7 Power off Restart and LED signalisation 4 7 Power off Restart and LED signalisation Figure 41 Registering a new device 50...

Page 52: ...4 RECORDING MANAGEMENT 4 RECORDING MANAGEMENT 4 7 Power off Restart and LED signalisation 4 7 Power off Restart and LED signalisation Figure 42 List of the available firmware versions 51...

Page 53: ...4 RECORDING MANAGEMENT 4 RECORDING MANAGEMENT 4 7 Power off Restart and LED signalisation 4 7 Power off Restart and LED signalisation Figure 43 Firmware upgrade page in rescue mode 52...

Page 54: ...ANAGEMENT 4 RECORDING MANAGEMENT 4 7 Power off Restart and LED signalisation 4 7 Power off Restart and LED signalisation Figure 44 Page firmware repair in rescue mode Figure 45 Factory Reset page in r...

Page 55: ...uggestions seriously and consider all ideas for improvements in our future releases Before posting the comment make sure to upgrade to the latest stable firmware to see whether your problem is not alr...

Reviews: