background image


18 

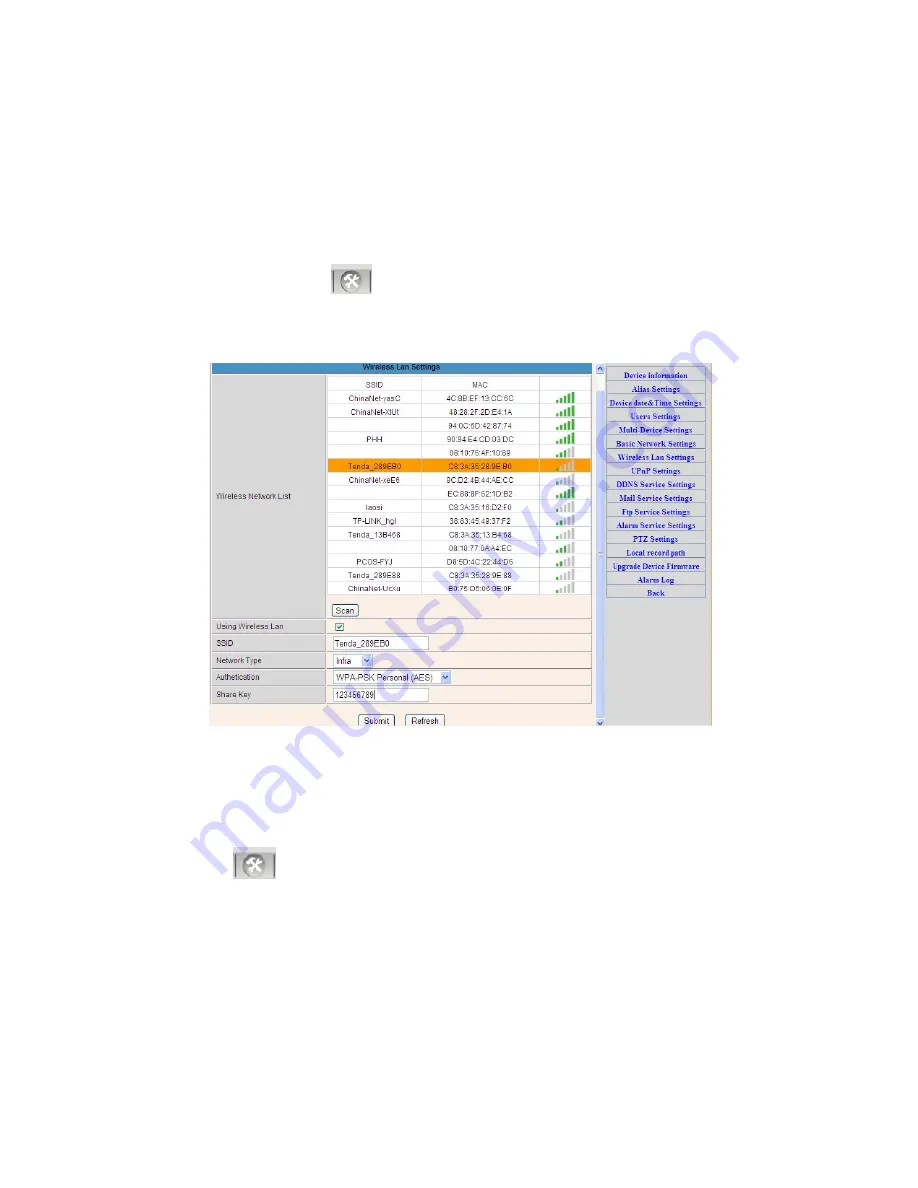
3.5.3 Wireless Settings


1. Make sure the router is a wireless router. 
2. Make sure the Wi-Fi antenna installed. 
3. Make sure whether there is encryption of the WLAN of the router, if there is encryption, 
keep the key. 

4. Login the camera, click 

 >“Wireless Lan Settings”>”Scan”, please scan 2times, then 

you will find the WLAN from the list, choose the one you use. 
5. If there is no encryption, just click “Submit”, if there is encryption, please input the key, 
then click “Submit”. 
6. Wait about 30 seconds, the camera will reboot, then unplug the network cable. 


Figure 3.12 

3.5.4 Dynamic DNS Setting (DDNS)


3.5.4.1 DDNS Setting: 


(1): Click 

 > “DDNS Service Settings”. 

Summary of Contents for JW0004

Page 1: ...0 Wireless Network IP Camera For PC View Night Vision Remote Operation User Manual Applicable models JW0004 JW0005 JW0006 JW0008 JW0011 JW0012...

Page 2: ...the pack and check the items contained against the following list IP Camera X1 Warranty Card X1 DC Power Supply X1 CD X1 Certificate of Quality X1 Mounting bracket X1 NOTE Please contact us immediatel...

Page 3: ...in 9 3 2 View via IE Browser 10 3 3 View via Safari Firefox Google Browser 13 3 4 Main Menu interface Introduction 14 3 5 Administer Setting Instruction 15 3 5 1 Multi Device Settings 16 3 5 2 Basic N...

Page 4: ...d CE Rules Operation is subject to the following two conditions 1 This device may not cause harmful interference 2 This device must accept any interference received including interference that may cau...

Page 5: ...SNTP BOOTP DHCP FTP SNMP WIFI 802 11b g Parts of modes products support one two way audio talkback Support motion detection alarm function area sensitivity Configurable Support image snapshot Abnormal...

Page 6: ...e Installation Follow the steps below to set up your camera hardware Make sure to follow each step carefully to ensure that the camera operates properly 1 Install the Wi Fi antenna For wireless model...

Page 7: ...rch Tool Open the CD click The Search Tool will run automatically No need to install You can copy this software to your desktop Figure 1 5 2 Software operation 2 1 Search Tool Software 2 1 1 Search th...

Page 8: ...n indicates the IP camera s IP Address information 3 If you find that the camera s Subnet Mask Gateway DNS Server is not as some as your current computer s You need try to change the camra s IP addres...

Page 9: ...the Search Tool software Http Port LAN port assigned for the equipment default is 99 You can change the port number to any one you want such as 98 211 9999 etc 3 Real time Video Demonstration 3 1 Cam...

Page 10: ...ailable in smart phone browser 4 SD card video playback online 3 2 View via IE Browser Choose Active Mode For IE Browser and sign in The first time login the camera maybe get ActiveX prompt as the pic...

Page 11: ...10 Figure 3 3 After Download Ocx Setup oPlayer Software Click and install it untill finished Figure 3 4...

Page 12: ...lease do the follow steps 1 Close the firewall of your computer 2 Change the ActiveX settings IE browser Tool Internet Options Security Custom Level ActiveX control and Plug ins all the ActiveX option...

Page 13: ...ty setting 3 If there is still no image please close your anti virus software and then try step 1 2 again 4 If you allowed the Active X running But still could not see live video Only a Red Cross in t...

Page 14: ...oftware and try again 3 3 View via Safari Firefox Google Browser Choose Server Push Mode For Safari Firefox Google Browser and sign in Server Push Mode doesn t support ActiveX so some functions are no...

Page 15: ...14 3 4 Main Menu interface introduction Take the Active Mode For IE Browser For example Figure 3 8...

Page 16: ...ow the date and time This setting changes the image resolution This setting changes the image frequency This setting changes the image brightness This setting changes the image contrast This option re...

Page 17: ...s IPCAM to ensure that the state is successful UPnP Device Firmware Upgrade The system firmware update the device firmware and application of Restore factory settings When there is not a response when...

Page 18: ...10 3 5 2 Network Settings Figure 3 11 This sector is for DHCP and IP configuration port forwarding is needed If you choose to set IP address please fill in the relative IP address subnet mask gateway...

Page 19: ...Login the camera click Wireless Lan Settings Scan please scan 2times then you will find the WLAN from the list choose the one you use 5 If there is no encryption just click Submit if there is encrypt...

Page 20: ...lank and you want use the manufacturer s free DDNS Please Choose vipcam org and fill in the DDNS User and DDNS Password with which you can find from a mark on the botton of your camera Figure 3 14 2 T...

Page 21: ...ufacturer s one won t work 3 5 4 2 Port forwarding settings 1 Setting the IP address of the camera The default IP address of the camera is Http 192 168 1 99 99 The default IP address of camera you can...

Page 22: ...amera correctly then the DDNS will work Because there are so many kinds of routers from all over the world so it s difficult to show a fix steps but there are some samples of different routers port fo...

Page 23: ...address should be the same as Camera BELKIN 1 Login the router Common address is http 192 168 1 1 2 Choose Firewall select Virtual Servers 3 Input the port except 80 and IP address then click save Not...

Page 24: ...ote The public port private port should be the same as camera s port choose the protocol to be both Figure 3 29 After all these 4 steps done then you can use the DDNS freely check the DDNS status from...

Page 25: ...or example you can go to Dyndns website to register a free account http www dyndns org http www dyndns com Step1 enter http www dyndns com and Create Account Figure 3 21 Step2 Set the username and pas...

Page 26: ...give you a confirmation address e g https www dyndns com confirm create ONMzltcCBk6mcHJI5MhVD0g Figure 3 23 Figure 3 24 Step4 When the Account Confirmed login and start using your account Choose Add...

Page 27: ...Add New Hostname page 1 input your Hostname 2 choose Host with IP address 3 click Use auto detected IP address xxx xx xx xxx Then click Create Host 4 after you have added a New Hostname you need Proc...

Page 28: ...ined a Dynamic Domain Name Figure3 30 and can use it in the DDNS Service Settings details 3 5 5 Notice If you have a dynamic IP address Make sure you have download the DynDNS s Update Client And insta...

Page 29: ...63 com Generally SMTP port is 25 do no need to change when needs to check just tick it and enter SMTP user and SMTP password both of them are provided by Email provider and test according to reference...

Page 30: ...the users requirement the higher the number is the lower sensitivity is Another mode is input alarm when connected it triggers alarm through alarm input signal which connects to linkage alarm GPIO Whe...

Page 31: ...checking function here but you will also lose presetting bit function PTZ speed can be adjusted here Figure 3 11 3 5 9 Record Capture Path This sector is for Record Capture Path in your computer It in...

Page 32: ...o following operations Figure 3 35 3 5 10 1 Restore Factory Settings When users forget password we can restore ex factory settings when click a picture will pop up Click ok and wait for 1 minute and y...

Page 33: ...h SD card recording function This sector is for SD card recording settings When the SD card has been inserted it will show the capacity of the card But at first you need to format it It include Record...

Page 34: ...33 You will see 3 5 12 Back When settings are finished click back to see camera video...

Page 35: ...maintenance charge is free c When the products need maintenance hand up the card with products to the manufacture or local distributor d Take apart item crust tear up the sealing label privately this...

Page 36: ...35 We are always in service That s all thank you...

Reviews: