background image

RU-1 

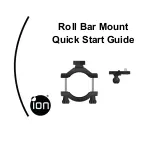
Крепление

 Roll Bar Mount   

Руководство


по


быстрому


запуску


1. 

Главные


функции


Установите


камеру


на


рулях


велосипедов

водных


мотоциклов

квадроциклов

мотоциклов

бамперах


внедорожников


или


лыжных


палках

Крепится


на


любые


трубы


или


брусья


от

 30

мм


до

 65 

мм


в


диаметре


Легко


снимать


и


устанавливать


камеру


Захват


нескольких


ракурсов

 (

передние

боковые

задние

и


т

.

д

.), 

без


дополнительного


монтажа


камеры


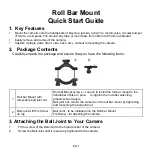
2. 

Комплектация


Осторожно


вскройте


упаковку


и


убедитесь


в


наличии


следующих


предметов


3. 

Крепление


шарового


шарнира


к


Вашей


камере


1. 

Установите


винт


шарового


шарнира


в


гнездо


для


штатива


камеры

2. 

Затяните


шаровой


шарнир

пока


он


не


будет


надежно


закреплен


к


камере

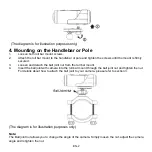
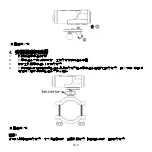
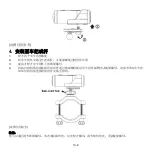
Крепление


на


трубы


со


съемным


шаровым


шарниром


Ослабить


винты


крепление

 Roll bar Mount 

для


установки


на


руль


или


другой


круглый


профиль

зятяните


гайки


после


выбора


позиции


крепления

Шаровой


шарнир

 – 

установите


камеру


на


крепление


затягивая


и


ослабляя


гайку


крепления


шарового


шарнира

Шаровой


шарнир


с


фиксирующим


винтом


Установите


шаровой


шарнир


в


крепление

 Roll bar Mount      

Фиксирующий


винт

 – 

для


фиксации


положения


камеры


Summary of Contents for Roll Bar Mount

Page 1: ...Roll Bar Mount Quick Start Guide...

Page 2: ......

Page 3: ...the following items 3 Attaching the Ball Joint to Your Camera 1 Fit the screw of the Ball Joint to the tripod socket of the camera 2 Screw the Ball Joint until it is securely tightened to the camera...

Page 4: ...osen and detach the ball joint nut from the roll bar mount 4 Insert the ball joint with camera into the roll bar mount through the ball joint nut and tighten the nut For details about how to attach th...

Page 5: ...eh r erhalten ist 3 Das Kugelgelenk an Ihrer Kamera anbringen 1 Bringen Sie die Schraube des Kugelgelenks an der Stativ ffnung der Kamera an 2 Schrauben Sie das Kugelgelenk fest bis es sicher an der K...

Page 6: ...ter von der Montierung f r berrollb gel l sen und abnehmen 4 Das Kugelgelenk mit Kamera mithilfe der Kugelgelenkmutter an der Montierung f r berrollb gel anbringen und die Mutter anziehen Wie das Kuge...

Page 7: ...ence des l ments suivants 3 Fixer la jointure bille sur votre cam ra 1 Placez la vis de la jointure bille dans le tr pied de support de la cam ra 2 Vissez la jointure bille jusqu fixation compl te la...

Page 8: ...ure de barre anti tonneau 4 Ins rez la jointure bille avec la cam ra sur la monture de barre anti tonneau via l crou de jointure bille et serrez l crou Pour obtenir plus de d tails sur comment fixer l...

Page 9: ...enti elementi 3 Fissaggio dello snodo sferico alla videocamera 1 Inserire la vite dello snodo sferico alla presa del treppiede della videocamera 2 Avvitare lo snodo sferico fino a quando non fissato i...

Page 10: ...o snodo sferico dall attacco per sbarre 4 Inserire lo snodo sferico con la videocamera nell attacco per sbarre attraverso l apposito dado quindi serrare il dado Per i dettagli su come fissare lo snodo...

Page 11: ...s siguientes art culos 3 Acoplar la r tula a la c mara 1 Fijar el tornillo de la r tula al soporte del tr pode de la c mara 2 Ajustar la r tula hasta que est acoplada con seguridad a la c mara 1 Sopor...

Page 12: ...gurado 3 Aflojar y separar la tuerca de r tula del soporte 4 Insertar la r tula con la c mara en el soporte con la tuerca de r tula y ajustar la tuerca Para una informaci n m s detallada de c mo acopl...

Page 13: ...ique se tem os seguintes itens 3 Colocar a r tula de jun o na sua c mara 1 Colocar o parafuso da r tula de jun o no lugar da sapata de trip na c mara 2 Apertar o parafuso at estar bem apertado e segur...

Page 14: ...s at que a montagem esteja firme 3 Solte e retire a r tula do suporte 4 Fixe a r tula com a c mara no suporte com a porca de fixa o e apertar a mesma Para obter detalhes na fixa o da r tula sua c mara...

Page 15: ...RU 1 Roll Bar Mount 1 30 65 2 3 1 2 1 Roll bar Mount 2 Roll bar Mount...

Page 16: ...RU 2 4 1 roll bar mount 2 3 roll bar mount 4 roll bar mount 3...

Page 17: ...1 1 4x4 ATVs SUVs 30mm 65mm 2 3 1 2 1 2...

Page 18: ...2 4 1 2 3 4 3...

Page 19: ...1 1 4x4 ATVs SUVs 30mm 65mm 2 3 1 2 1 2...

Page 20: ...2 4 1 2 3 4 3...

Page 21: ......

Page 22: ...AM QG ROLL 9L EU1...

Reviews: