4
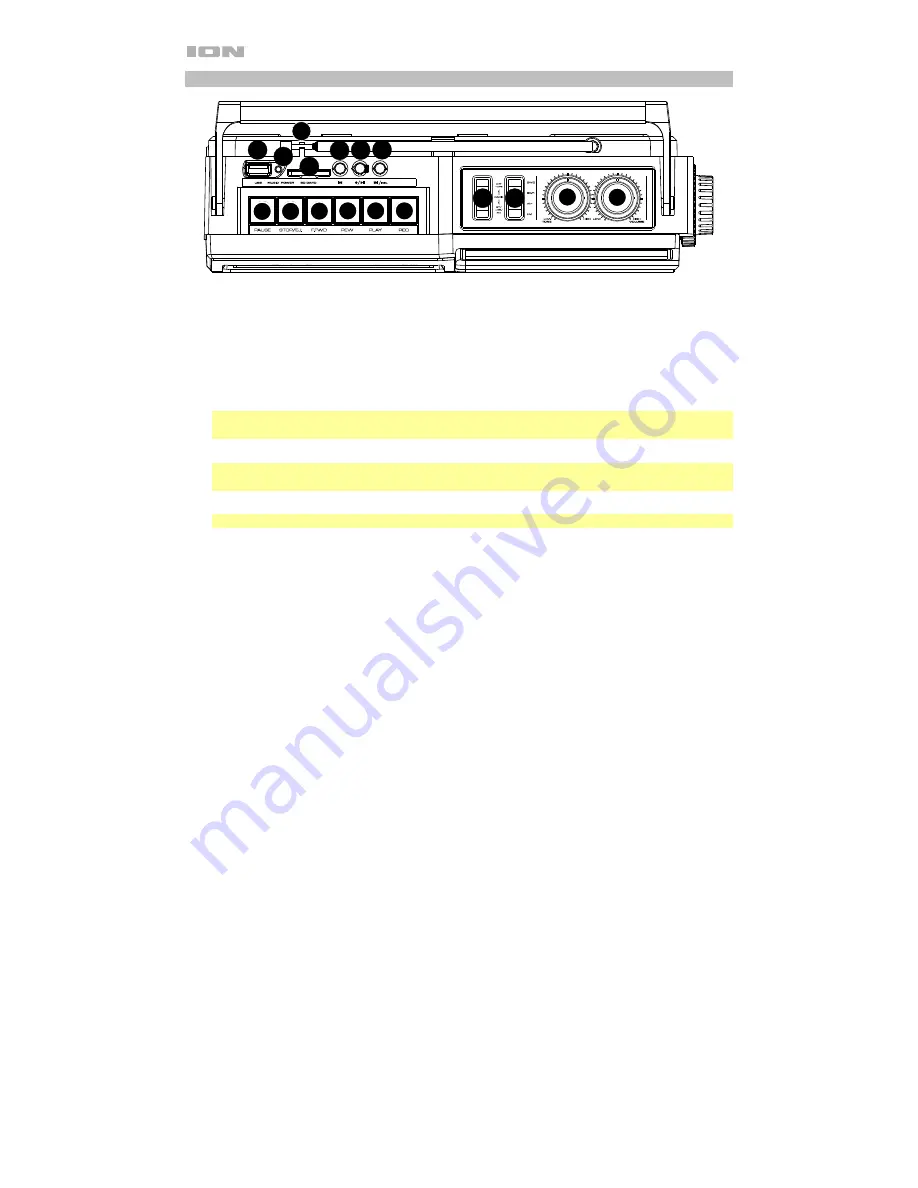
Top Panel
1.
Antenna:
Adjust the antenna to get the best radio station reception.
2.
Volume:
Adjust this to control the overall playback volume.
3.
Tone:
Turn this knob to left of the center position to increase the bass frequencies. Turn this
knob to right of the center position to increase the high frequencies.
4.
Pause:
In Tape mode, press this button to pause the tape playback.
5.
Stop/Eject:
In Tape mode, press this button to stop or eject a tape.
6.
Fast Forward:
In Tape mode, press this button to fast forward the tape.
Note:
The cassette mechanism will not auto-stop when fast forwarding. Press the
Stop
button
after fast forwarding is completed.
7.
Rewind:
In Tape mode, press this button to rewind the tape.
Note:
The cassette mechanism will not auto-stop when rewinding. Press the
Stop
button after
rewinding is completed.
8.
Play:
In Tape mode, press this button to play the tape.
Note:
There will be a delay in playback for a few seconds after the
Play
button is pressed.
9.
Record:
In Tape mode,
press the
Record
button to record to a tape.
10.
Mode:
Adjust this switch to change the mode from Tape, Radio, and BT (Bluetooth)/USB/SD.
11.
Band:
Adjust this switch to select AM, FM, SW1, or SW2.
12.
USB Port:
Connect your USB flash drive here to play music or record the audio from a tape,
radio, or the internal microphone.
13.
SD Card Slot:
Insert your SD card here to play music or record audio from a tape, radio, or the
internal microphone.
14.
LED:
The LED will illuminate solid blue when an SD card or USB flash drive is connected. The
LED will flash blue when USB media is playing. The LED will be lit solid blue during Bluetooth
playback.
15.
Previous Track:
Press this button to go to the previous track.
16.
Record/Play/Pause:
Press this button to play/pause a USB or SD card track. Press and hold
this button to record the radio, tape, or internal mic source to a USB flash drive or SD card.
17.
Next Track/Delete Track:
Press this button to go to the next track. Press and hold the
Next
Track
button to delete the current USB or SD track.
1
2
3
4
5
6
7
8
9
12
13
14
15 16 17
11
10
Summary of Contents for Retro Rocker
Page 31: ...31 ...


