background image


BOX CONTENTS 


DOCUSCAN 


SD card  


Mini-USB cable 


Power adapter 


Protective photo sleeve 


Calibration & cleaning paper 


Cleaning strip 


Quickstart Guide 


User Manual 


Safety & Warranty Information Booklet 


SAFETY INFORMATION 


Keep scanner away from water or moisture and dusty areas. 


Never store scanner in hot and very cold areas. 


Only use attachments/accessories specified by the manufacturer. 


No objects filled with liquids, such as vases, should be placed on the scanner. 


Avoid dust contamination when the scanner is not in use. 


When left unused for a long period of time, disconnect the scanner from the power supply. 


Avoid environments where the scanner would be exposed to direct sunlight (or any other source of excessive heat) for 
long periods of time. 


Protect the scanner from potential liquid spills such as soda, coffee, tea, etc. 


Do not drop the scanner. 


Operate the scanner on a level, stable work surface, free of excessive vibration. 


Do not open the scanner case without technical support.  Doing so risks electrical shock. 


Position the scanner near a power outlet where it can be easily accessed when plugged in. 


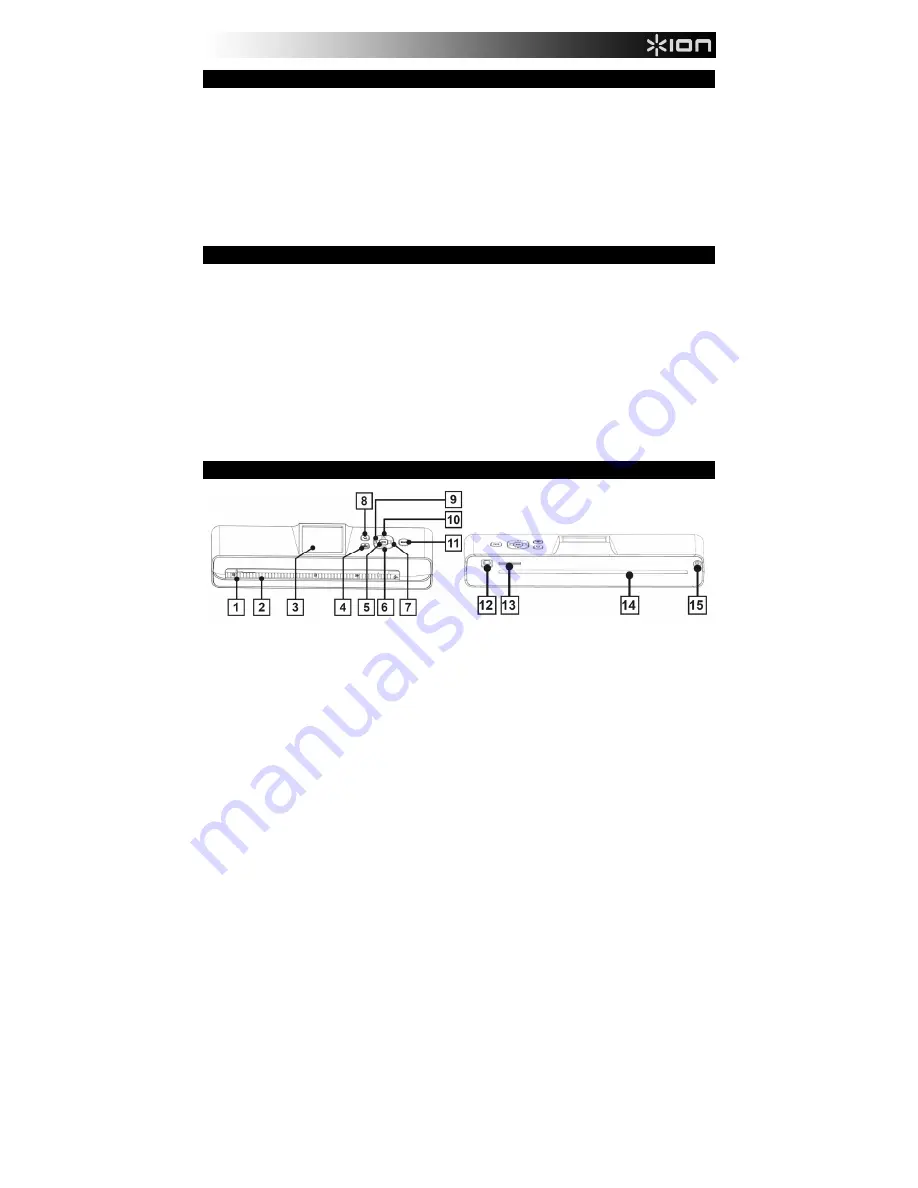
FEATURES 


1.


PAPER GUIDE –

 This piece adjusts to help guide the paper into the scanner. 

2.


FEED SLOT –

 Insert your paper or photo into this slot when scanning. 

3.


LCD –

 Displays scanned images and other information about the scanner's operations. 

4.


POWER / MENU –

 Press and hold this button for 3-5 seconds to turn the scanner on/off.  Press the button to display the 

setting menu. 

5.


OK –

 Press this button to confirm selections in menus shown in the LCD. 

6.


DOWN –

 Moves down in menus shown in the LCD. 

7.


RIGHT –

 Moves right in menus shown in the LCD or moves to the next scanned image. 

8.


ZOOM – 

Zooms into the current scanned image. 

9.


LEFT –

 Moves left in menus shown in the LCD or moves to the previous scanned image. 

10.


UP –

 Moves up in menus shown in the LCD. 

11.


SCAN –

 Press this button to enter Scan Mode. 

12.


MINI-USB PORT –

 Use the included mini-USB cable to connect this port to a free USB port on your computer. 

13.


SD/MMC SLOT –

 Insert an SD/MMC card here (with the gold contacts facing upward). 

14.


PAPER EXIT SLOT –

 Outputs the paper or photo after scanning. 

15.


POWER IN – 

Connect this input to the included adapter then connect the adapter to a power source. 

Summary of Contents for DocuScan

Page 1: ...OCUSCAN USER MANUAL ENGLISH 3 6 MANUAL DEL USUARIO ESPAÑOL 7 10 MANUEL D UTILISATION FRANÇAIS 11 14 MANUALE UTENTE ITALIANO 15 18 BEDIENUNGSANLEITUNG DEUTSCH 19 22 GEBRUIKERSHANDLEIDING NEDERLANDS 23 26 ...

Page 2: ......

Page 3: ...Position the scanner near a power outlet where it can be easily accessed when plugged in FEATURES 1 PAPER GUIDE This piece adjusts to help guide the paper into the scanner 2 FEED SLOT Insert your paper or photo into this slot when scanning 3 LCD Displays scanned images and other information about the scanner s operations 4 POWER MENU Press and hold this button for 3 5 seconds to turn the scanner o...

Page 4: ...own on the LCD Wait until scanning is completed Notes By default the folder DCIM 100NVtim will be created in the inserted memory card All scanned images will be saved in the 100NVTIM folder When the counter reaches 9999 it will be automatically generated another new folder in a sequential order When the memory card is full a Memory Full warning will appear When scanning images with a dark backgrou...

Page 5: ...Rotate the scanned images 0 90 180 or 270 degrees Note The orientation of the scanned images will remain unchanged when transferring them to your computer even if they have been rotated with this setting Language English German French Italian Spanish Dutch Portuguese Polish Format Deletes all the data on the SD MMC card Calibration Select OK to recalibrate the scanner Please see the CALIBRATION se...

Page 6: ... one side to the other slightly a few times then remove it Note Do not insert the cleaning strip into the FEED SLOT at the front side of the scanner This may damage the internal components 5 Replace the FEED SLOT cover by aligning the edge s two latching tabs with the mounting holes on the scanner and pushing the cover in until it clicks back into place CALIBRATION 1 Insert the calibration paper w...

Page 7: ...mente cuando está enchufado CARACTERÍSTICAS 1 GUÍA DEL PAPEL Esta pieza se ajusta para ayudar a guiar el papel hacia dentro del escáner 2 RANURA DE ALIMENTACIÓN Inserte en esta ranura el papel o la foto cuando va a escanear 3 PANTALLA LCD Muestra las imágenes escaneadas y otra información acerca de las operaciones del escáner 4 ENCENDIDO MENÚ Pulse y retenga este botón durante 3 a 5 segundos para ...

Page 8: ... la carpeta DCIM 100NVtim en la tarjeta de memoria creada Todas las imágenes escaneadas se guardan en la carpeta 100NVTIM Cuando el contador llega a 9999 se genera automáticamente una nueva carpeta en orden secuencial Cuando se llena la tarjeta de memoria aparece la advertencia Memory Full Memoria llena Cuando se escanean imágenes con fondo oscuro el escáner puede no ser capaz de detectarlas o pue...

Page 9: ... 90 180 ó 270 grados Note La orientación de las imágenes escaneadas no cambia cuando se transfieren a la computadora aunque hayan sido rotadas con este ajuste Language Idioma Inglés alemán francés italiano español holandés portugués y polaco Format Formateo Elimina todos los datos de la tarjeta SD MMC Calibration Calibración Seleccione OK Aceptar para recalibrar el escáner Consulte las instruccion...

Page 10: ...e un lado a otro unas cuantas veces y retírela Nota No inserte la tira de limpieza en la RANURA DE ALIMENTACIÓN por la parte de adelante del escáner Si lo hace podría dañar los componentes internos 5 Vuelva a colocar la cubierta de la RANURA DE ALIMENTACIÓN alineando las dos lengüetas de alineación del borde con los orificios de montaje del escáner y empujando la cubierta hasta que calce con un cl...

Page 11: ...e d alimentation facilement accessible CARACTÉRISTIQUES 1 GUIDE PAPIER Dispositif permettant de guider le papier dans le numériseur 2 FENTE D INSERTION Emplacement où insérer le papier ou la photo à numériser 3 Écran ACL Écran permettant l affichage des images numérisées et des informations concernant le fonctionnement du numériseur 4 TOUCHE D ALIMENTATION MENU Maintenez cette touche enfoncée pend...

Page 12: ...t complétée Remarques Par défaut le dossier DCIM 100NVtim est créé sur la carte mémoire insérée Toutes les images numérisées sont sauvegardées dans le dossier 100NVTIM Lorsque le compteur atteint 9999 un nouveau dossier séquentiel est créé Lorsque la carte mémoire est remplie un message Carte mémoire pleine s affiche Lors de la numérisation d image avec fond foncé le numériseur peut ne pas détecte...

Page 13: ...voter l image numérisée de 0 90 180 ou 270 degrés Remarque L orientation des images numérisées demeure la même lorsque vous les transférez sur un ordinateur même si cette fonction a été utilisée Langue Anglais allemand français italien espagnol néerlandais portugais et le polonais Formatage Supprime toutes les données de la carte mémoire SD MMC Étalonnage Sélectionnez OK afin d effectuer l étalonn...

Page 14: ... retirez la Remarque N insérez pas la bande nettoyante dans la fente d insertion à l avant du numériseur car cela pourrait endommager les composantes internes 5 Replacez le couvercle de la fente d insertion en prenant soin d aligner les deux languettes de verrouillage aux orifices du numériseur et en appuyant sur le couvercle jusqu à ce qu il retourne en place ÉTALONNAGE 1 Placez le papier d étalo...

Page 15: ...R LA CARTA Questa parte offre una regolazione che aiuta a guidare la carta nello scanner 2 SLOT DI INSERIMENTO Inserire il foglio ola fotografia in questo slot al momento di effettuare la scansione 3 LCD Mostra le immagini scannerizzate ed altre informazioni circa le operazioni dello scanner 4 POWER accensione spegnimento MENU Tenere premuto questo tasto per 3 5 secondi per accendere spegnere lo s...

Page 16: ...moria inserita Tutte le immagini scannerizzate verranno salvate nella cartella 100NVTIM Quando il numero di file raggiungerà 9999 verrà automaticamente generata una nuova cartella in ordine sequenziale Quando la scheda di memoria è piena comparirà l avviso Memory Full memoria piena Quando si effettua la scansione di immagini dallo sfondo scuro lo scanner potrebbe non essere in grado di individuare...

Page 17: ... l immagine selezionata un immagine 1 o tutte le immagini All Playback riproduzione Rotate ruota Ruota le immagini scannerizzate di 0 90 180 o 270 gradi Nota bene l orientamento delle immagini scannerizzate rimarrà immutato al momento di trasferirle sul computer anche se sono state ruotate servendosi di questa funzione Language lingua Inglese tedesco francese italiano spagnolo olandese portoghese ...

Page 18: ...i rimuoverla Nota bene non inserire la fascetta di pulizia nello SLOT DI INSERIMENTO sul lato anteriore dello scanner Questo potrebbe danneggiare i componenti interni 5 Riposizionare il coperchio dello SLOT DI INSERIMENTO allineando le linguette di bloccaggio sui bordi ai rispettivi fori sullo scanner e premendo il coperchio fino a che non scatta in posizione CALIBRAZIONE 1 Inserire la carta di ca...

Page 19: ...er in der Nähe einer Steckdose auf sodass auf das eingesteckte Geräte leicht zugegriffen werden kann FUNKTIONEN 1 PAPIERFÜHRUNG Dieses Teil hilft Ihnen dabei das Papier in den Scanner zu führen 2 EINZUG Führen Sie beim Scannen Ihr Papier oder Foto in diesen Einzug 3 LCD Zeigt gescannte Bilder und andere Informationen über den Scanner Betrieb an 4 EIN AUS MENÜ Halten Sie diese Taste 3 5 Sekunden la...

Page 20: ...Sie bis der Scanvorgang abgeschlossen ist Hinweise Standardmäßig wird ein Ordner mit dem Namen DCIM 100NVtim auf der eingelegten Speicherkarte erstellt Alle gescannten Bilder werden im Ordner 100NVTIM gespeichert Wenn der Zähler 9999 erreicht wird automatisch ein neuer fortlaufender Ordner erstellt Wenn die Speicherkarte voll ist scheint die Warnung Speicher voll auf Beim Scannen von Bildern mit e...

Page 21: ...oder alle Bilder Alle Wiedergabe Drehen Drehen der gescannten Bilder 0 90 180 oder 270 Grad Hinweis Die Ausrichtung der gescannten Bilder bleibt unverändert wenn sie die Bilder auf Ihren Computer übertragen auch wenn sie mit dieser Funktion gedreht wurden Sprache Deutsch Englisch Französisch Italienisch Spanisch Niederländisch Portugiesisch Polnisch Formatieren Löscht alle Daten auf der SD MMC Kar...

Page 22: ...nd entfernen ihn anschließend Hinweis Führen Sie den Reinigungsstreifen nicht in den EINZUG an der Vorderseite des Scanners ein Dies könnte zur Beschädigung der internen Komponenten führen 5 Ersetzen Sie die Abdeckung des EINZUGS indem Sie die beiden Einrastpunkte an der Kante mit den Befestigungslöchern am Scanner ausrichten Schieben Sie die Abdeckung dann hinein bis Sie hörbar wieder einrastet K...

Page 23: ...de buurt van een stopcontact en waar deze na aansluiting gemakkelijk kan worden bereikt FUNCTIES 1 PAPIERGELEIDER Dit onderdeel stuurt en geleidt het papier naar de scanner 2 PAPIERINVOER Plaats het te scannen papier of foto in deze sleuf 3 LCD Toont gescande afbeeldingen en andere informatie over de activiteiten v d scanner 4 AAN UIT KNOP MENU Houd deze knop in voor 3 5 seconden om de scanner aan...

Page 24: ...is voltooid Opmerking Bij de standaardinstelling zal de map DCIM 100NVtim worden aangemaakt in de ingestoken geheugenkaart Alle gescande afbeeldingen zullen worden opgeslagen in de 100NVTIM map Wanneer de teller 9999 heeft bereikt zal er automatisch een nieuwe folder worden aangemaakt in opeenvolgende volgorde Wanneer de geheugenkaart vol is zal een Memory Full melding verschijnen Wanneer afbeeldi...

Page 25: ...fbeelding 1 of alle afbeeldingen All Weergave Draaien Draai de gescande afbeeldingen 0 90 180 of 270 graden Opmerking De oriëntatie van de gescande afbeeldingen zal onveranderd blijven wanneer deze naar uw computer worden overgezet zelfs als ze al binnen deze instelling zijn gedraaid Taal Engels Duits Frans Italiaans Spaans Nederlands Portugees Pools Formaat Verwijdert alle data op de SD MMC kaart...

Page 26: ... van de ene naar de andere kant en verwijder deze vervolgens Opmerking Plaats de reinigingsstrip niet in de PAPIERINVOER aan de voorzijde van de scanner Dit kan de interne onderdelen beschadigen 5 Vervang het deksel van de PAPIERINVOER door de twee vergrendeltabs aan de randen gelijk te zetten met de montage gaten op de scanner en het deksel induwen totdat deze weer terug op de plaats klikt KALIBR...

Page 27: ...an speed A4 size 10 sec grayscale 300 dpi 15 sec color 300 dpi Supported OS for mass storage Windows XP Vista 7 Mac OS X 10 4 10 5 10 6 Memory card slot SD or SDHC MMC I O DC in 5 V USB mini B USB port mass storage power supply File format JPEG OSD language English German French Italian Spanish Dutch Portuguese Polish Dimensions 280 mm x 75 6mm x 58 8 mm Weight 446 5 g ...

Page 28: ...www ionaudio com 7 51 0322 MANUAL VERSION 1 3 ...

Reviews: