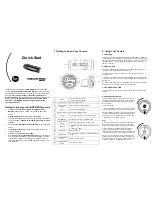

2.5 Recording Video
Before starting recording, select the video resolution by switching the Video
Resolution Switch. Defaults are FHD=1080p,30fps, HD=720p,60fps
There are two methods available for starting the video record function. When
starting a video recording, a short vibration indicates recording started. The LED
indicator is RED during recording.
1. Slide the Recording Slide Switch
from STOP to REC. Works
whether the camera power is ON or OFF.
2. When your camera is OFF and the Recording Slide Switch
is in the
REC position, press and hold the Power
button to turn the camera ON and it
will start recording.
Move the Recording Slide Switch
from REC to STOP to stop recording.
The camera will vibrate and the LED indicator will change to GREEN to indicate
that recording has stopped. The camera will then enter Standby mode.
An additional option is to hold the Power
button to stop the recording and
turn the camera off. The camera will vibrate two seconds and the Red LED light
will turn off.
Notes
1. An additional 432x240 (w/ 1080p/720p) or 320x240 (w/ 960p) video file will be
created simultaneously with the recording of an HD/FHD video file. The smaller
video file size allows for more efficient uploading of content to social media sites
and email.
2. Changing video resolution is disabled during video recording.
3. There will be around 1-2 seconds delay before the camera starts recording.
4. The various video resolution options for HD and FHD can be changed under
the “Settings” selection in the ION software application. See Section 4.
2.6 Taking Photos
1. Turn on the camera by pressing the Power
button until it vibrates briefly
and the LED turns green.
2. After the camera power has been turned on, press the Power
button
briefly to take a photo. A short vibration and a flash of Green LED will indicate the
action was successful.
Notes:
1. The Still Photo function is disabled during video recording.
2. Change photo resolutions and shot mode (Single Shot, Burst Mode and Time
Lapse) through the “Settings” section ION software application.
2.7 CamLOCK Mount System
ion’s versatile CamLOCK Mount System allows you to attach the AIR PRO
camera to any type of helmet (bike, motorcycle, ski, skydive etc.), pole, board
(surf, skate, ski etc) and handlebar (bike and motorcycle).
Please refer to the specific mounting guides for instructions on how to mount the
camera for a particular activity.
3. WiFi
3.1 Install Your WiFi PODZ
1. Remove your PODZ and press the WiFi PODZ into the PODZ socket.
2. Seal the camera by rotating the WiFi PODZ until the dots are aligned and
sliding the latch to lock it in place.
3. Press and hold the Power
button to turn the camera on.
4. Press the WiFi PODZ power button to turn on WiFi. The LED will be a solid
blue for about 15 seconds while WiFi is initializing. The LED will change to a slow
blue flash when WiFi is ready.
5. Press the WiFi power button to turn off WiFi at anytime.
Notes:
WiFi will drain your camera battery more rapidly when activated. Turn the WiFi off
if you are not using it to preview or manage file content.
3.2 Mobile Device App (iPhone, iPad, iPod Touch)
1. Search for the iontheaction App at the App store.
2. Download and install the ION App to your mobile device.
3. Turn on the camera and WiFi PODZ.
4. When the WiFi LED changes to a slow blue flash, go to the network settings
of your mobile device and choose WiFi. Search the network, find and click
“WiFiPODZ.”
5. Enter password “123456789” to connect to your camera.
6. Open the ION App.
Once you open the App you can:
1. View the photos and videos on your camera. (ION)
2. Save the photos and videos on your camera to an ION Album on your mobile
device. (ION/Select)
3. View the progress of a video transfer from your camera to the ION Album
(Dashboard)
4. Access your iON Album files to upload to Face Book, attach to Email or save to
the iOS Library (Album/Select)
5. Live stream to preview the field of view when attaching the camera to a mount
point. (Remote)
Notes:
1. If live streaming or return to file mode does not begin within about 5 seconds,
press the power button once quickly to initiate the mode switch.
2. 3G/4G and internet WiFi connections are disabled when you are connected to
the camera by WiFi. Turn the camera WiFi off to re-enable your automatic
internet WiFi connection for upload of files from the ion Albums.
3. Be sure to reselect WIFIPODZ in WiFi settings when turning camera WiFi back
on, as the mobile device may have automatically connected with another WiFi
service in the mean time.
4. If the App does not operate correctly after changing modes, try restarting the
App and/or using network settings to Forget and re-establish the connection.
3.3 Browser WiFi Connection
1. Turn on the Camera and WiFi PODZ.
2. When the WiFi LED changes to a slow blue flash, go to the network settings of
your computer or mobile device and choose WiFi. Search the network, find and
click “WiFi PODZ.”
3. Enter password “123456789” to connect to your camera.
4. Open your Internet browser and enter “192.168.1.2” or “WIFI.PODZ” to
connect to your camera.
You can use the browser connection to:
1. Live stream to preview the field of view when attaching the camera to a mount
point.
2. View the photos and videos on your camera.
3. Save photos to your computer or mobile device.
4. Change the camera’s WiFi SSID (name) and/or password.
Notes:
1. Computers require any wired connection to be disabled or unplugged before a
WiFi connection can be established.
2. Please use the ion WiFi App to view and save videos to an iOS device.
3. Please use the ion Software Application to save videos to your Computer.
4. Check our website for updates. We will continually enhance the ION
connectivity capabilities, including switching directly to record from the live
streaming preview.
4. ION Software Application
4.1 Windows Software Application
The Windows ion.exe Software Application comes installed on the camera.
To
run the application:
1. Insert a Micro SD card with at least 2MB free space into the camera.
2. Press the Power
button to turn the camera on.
3. Connect your camera to the PC via the camera’s USB cable.
4. Open the MicroSD folder and you will find the file “ion.exe”.
5. Double click the file to open
4.2 Mac Software Application
1. Visit the ion website (www.iontheaction.com) to download the latest Mac
software application version.
2. Insert a Micro SD card with at least 2MB free space into the camera.
3. Press the Power
button to turn the camera on.
4. Connect your camera to the Mac via the camera’s USB cable.
4. Locate and open the new device “No Name” (You should see a folder “DCIM”
and the file ion.exe when you open it.)
6. Drag the downloaded file to the device in the same folder as ion.exe.
7. Double click the newly loaded file to run the Mac Application.
4.3 Software Application Features
Once you open the software application you can:
1. View and copy the files stored on the camera
2. Change the camera settings
3. Set the Date & Time
4. Format the camera's card
5. Link to the ion website and cloud service
6. Check the firmware update
Notes:
The camera can be connected to any plug & play Windows or Mac system and
accessed as a removable disk drive. Files can be viewed and copied without the
use of the application.


