Check mounting requirements:
Your drive bay may require
side rails.
(HINT: Use the same
side rails as on similar drives in your system. See your
computer dealer for any special hardware.)
Slide the Jaz drive into the drive bay.
3
1
/
2
-inch
Installations
5
1
/
4
-inch Installation
IMPORTANT!
If your Jaz drive will be part of a
SCSI chain, check the
SCSI ID
BEFORE sliding the
drive into the drive bay. (See
Jaz User's Guide.)
Connect a computer power supply cable.
Power Supply Cable
Jaz Drive
If your computer has no
spare power supply cable,
you will need to use a power
Y-cable. Call your dealer or
1-800-MY-STUFF to order.
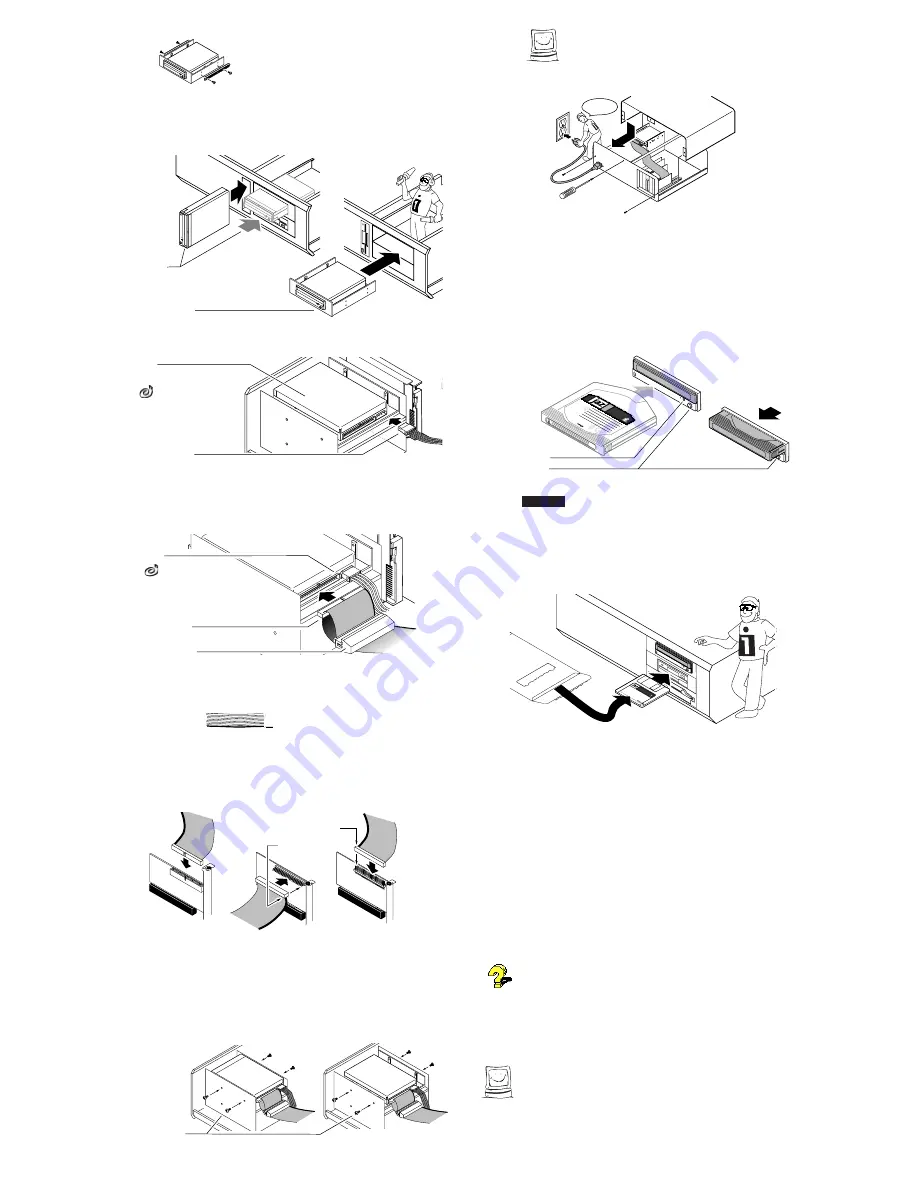
Connect the data cable connector that is closest to
the termination block to your Jaz drive.
(Connector
fits only one way.)
Jaz Drive
Cable Connector
Termination Block
Pin One
If there is more than one
internal drive in the SCSI chain, you
will need to use a different data cable
in order to daisy-chain your internal
devices. Call 1-800-MY-STUFF to order.
Find the colored stripe (or printing) on one side of
the data cable, showing PIN 1.
Stripe or printing shows the
PIN-ONE side of the data cable.
Connect the PIN 1 side of the data cable to
PIN 1 on the SCSI adapter (or other SCSI
connector).
(Check the adapter documentation to
identify PIN 1 position.)
PIN 1
PIN 1
Some adapters have a
keyed connector to help
PIN 1 connection.
Some adapters have PIN 1
toward rear of computer.
Some adapters have PIN 1
toward front of computer.
S
ecure drive in drive bay using the screws included
in the 3.5" Universal Installation Kit.
(If necessary,
refer to your computer manual for instructions on how
to access drive bay mounting holes.)
3
1
/
2
-inch Drive Bay
5
1
/
4
-inch Drive Bay with Bracket
Drive Bay Metric
Mounting Screws
Good job! Now check all connections,
arrange the cables to fit under the cover, and
replace the computer cover
.
Reconnect
power
Reconnect power cord, turn ON power switch, and
wait for DOS or Windows to come up.
Gently insert the 1GB Jaz "tools" disk into the
Jaz drive.
The drive status light on the Jaz drive flashes as the disk spins up
and glows steadily while it acquires. When the light goes out, the
drive is ready to use. To eject a Jaz disk, push the disk eject button.
The drive will take a few seconds to spin down and eject the disk.
Drive-Status Light
Disk Eject Button
Disk shown
ejected from drive
Disk shown
fully inserted
1
GB
1
GB
tools
CAUTION
Never put anything except Jaz disks into the Jaz drive as
this could damage your drive.
M
Insert the Install diskette for your system into your
computer's floppy drive.
Use Disk 1 if your computer is running Windows 95, Windows 3.1,
or DOS. Use Disk 2 if your computer is running Windows NT.
Install
Windows/
DOS
Start the Setup or Install program as described
below and follow the screen instructions to install
your Jaz Tools software.
Windows
®
95 Users:
Open
My Computer
and double click
on the floppy drive icon to open a window for Install Disk 1.
Double click on the
Setup
icon to install Tools 95 on your system.
Windows NT Users:
Run
SetupNT
from Install Disk 2 to
install your ToolsNT software package.
Windows 3.1 Users:
Start Windows. In the Windows
Program Manager, select the File menu and choose
Run
. In the
Command Line box, type
a:setup
if Install Disk 1 is in drive
a:
(or
b:setup
if it is in drive
b:
), then click
OK
or press the Enter key.
DOS Users:
Run
GUEST.EXE
from the DOS prompt for Install
Disk 1, then run
INSTALL.EXE
from the
DOSSTUFF
directory on
the Jaz "tools" disk. After the software installation is complete, run
RECLAIM.EXE
from the
DOSSTUFF
directory. If you need detailed
instructions, refer to
MANUAL.EXE
on Install Disk 1.
If you need help
,
refer to "Troubleshooting" in the
Jaz User's
Guide
. The electronic manual (
MANUAL.EXE
) located on Install
Disk 1 also includes problem solving information for software
installations under Windows 95, Windows 3.1, and DOS.
M
IMPORTANT!
Your 1GB Jaz "tools" disk contains installation
files for your Jaz Tools software. Avoid deleting the installation files
for your system in case you need to reinstall your software.
M
Congratulations! When the software installation
is complete, your Jaz drive will be ready to use.
Use your Jaz drive just like any other drive on your system.
You can store
and copy files to and from the Jaz drive using the same methods you use
for your other drives. For more information about using your new drive
and Jaz Tools software, refer to the
Jaz User's Guide
.
13
6
7
8
9
10
11
12
17
16
15
14
EN143604


