Iomega 100D Quick Start Manual Download Page 4

4

Quick Install

For best performance and easiest configuration, Iomega recommends connecting the Iomega NAS 100d to 

a wired network. For instructions on configuring the Iomega NAS via a wireless connection, see the user's 

manual on the Solutions CD.

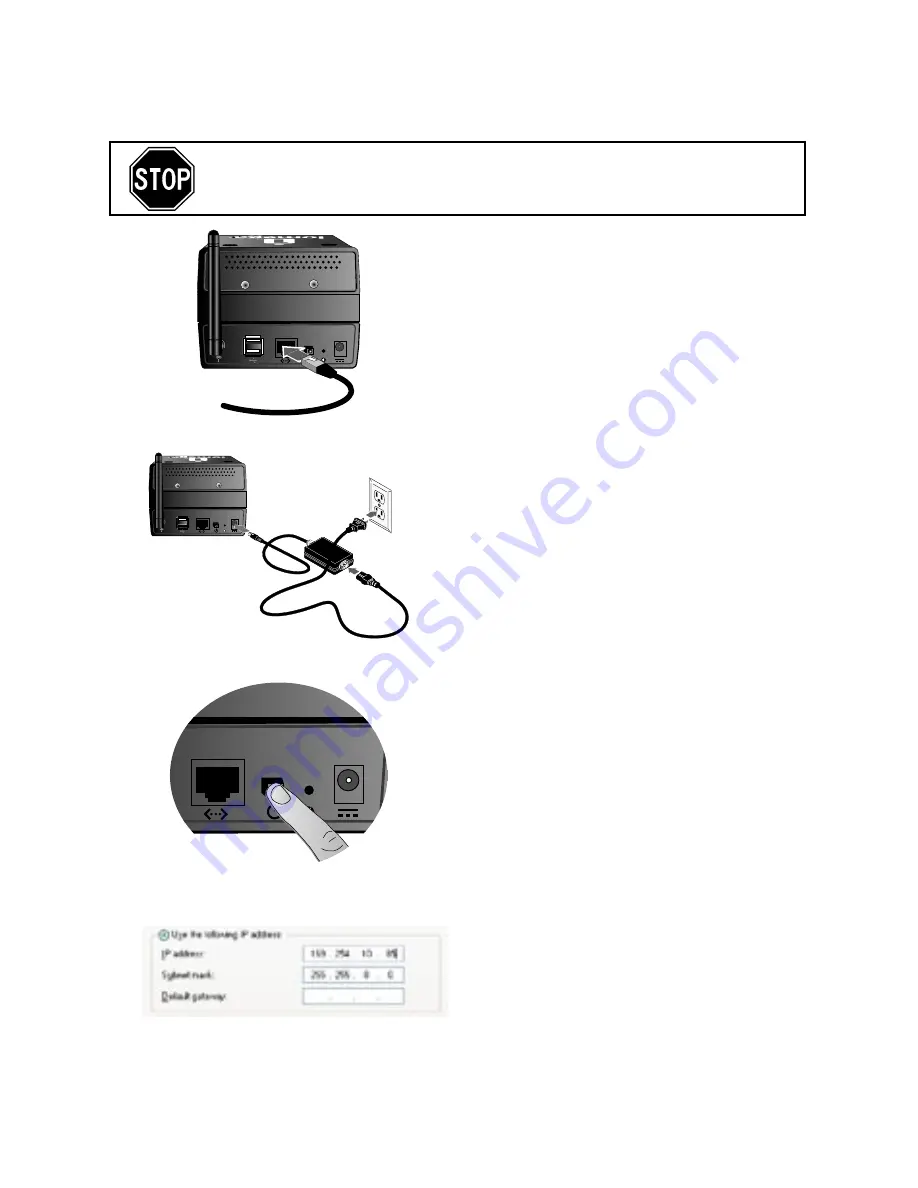
Connect the included Ethernet cable to the Iomega 

NAS and to an open network port on your router, 

switch, or hub.

Connect the power supply to the Iomega NAS and 

then to a power strip or outlet.

Press the power button on the back panel of the 

Iomega NAS.

NOTE:

 The Iomega NAS will take a couple of 

minutes to start up. Please wait until the Power 

LED changes to solid blue before proceeding.

If your network does not have a DHCP 

server, change your computer’s IP address 

to 169.254.10.85 with a subnet mask of 

255.255.0.0. The default IP address of the Iomega 

NAS is 169.254.10.10. For more information on 

changing your computer’s IP address, see page 7.

If you have a problem, we can help. Please do 

NOT

 return this product to the store!

Your answer is on the web. Visit our award-winning web support site  

www.iomega.com

Select your region, then select 

Support

.

Summary of Contents for 100D

Page 1: ...Network Attached Storage Server 100d Quick Start Guide ...

Page 2: ...Contents Package Contents 3 Default Settings 3 Quick Install 4 Troubleshooting 7 Customer Support 7 ...

Page 3: ...es Server Quick Install Installation rapide Schnellstart Installazione rapida Instalación rápida Default Settings 100 d DHCP client enabled Default IP Address on networks without DHCP 169 254 10 10 Wireless access point enabled Default wireless SSID IOMEGA_NAS ...

Page 4: ...he power button on the back panel of the Iomega NAS NOTE The Iomega NAS will take a couple of minutes to start up Please wait until the Power LED changes to solid blue before proceeding If your network does not have a DHCP server change your computer s IP address to 169 254 10 85 with a subnet mask of 255 255 0 0 The default IP address of the Iomega NAS is 169 254 10 10 For more information on cha...

Page 5: ...ws only If you are using a Macintosh to configure the Iomega NAS please see the user s manual on the Solutions CD Select your Iomega NAS in the Discovery window If your NAS is not listed see Troubleshooting on page 7 Click the Manage button then log into the Iomega NAS for advanced configuration User name admin case sensitive Password Leave the password blank Click on Configuration then select NAS...

Page 6: ...dy have a wireless access point no change is necessary however you will need to connect the antenna to the Iomega NAS Make any other desired configuration changes See the user s manual on the Solutions CD or the help system for more information on Iomega NAS 100d configuration options If you already have a wireless access point or do not wish to allow wireless clients to connect to the NAS click o...

Page 7: ...wer LED is solid blue If your network is not running DHCP assign your client computer an IP address in the 169 254 range with a subnet mask of 255 255 0 0 Disable any personal firewall software on the client computer If you have multiple network connections disable all but one network connection on the client computer Enter the IP address of your Iomega NAS in your web browser s URL line http 169 ...

Page 8: ...ates and or other countries Microsoft and Windows are either registered trademarks or trademarks of Microsoft Corporation in the United States and or other countries Apple and Macintosh are either registered trademarks or trademarks of Apple Computer Inc in the United States and or other countries Certain other product names brand names and company names may be trademarks or designations of their ...

Reviews: