background image

8

Front

Back

Setup and Installation

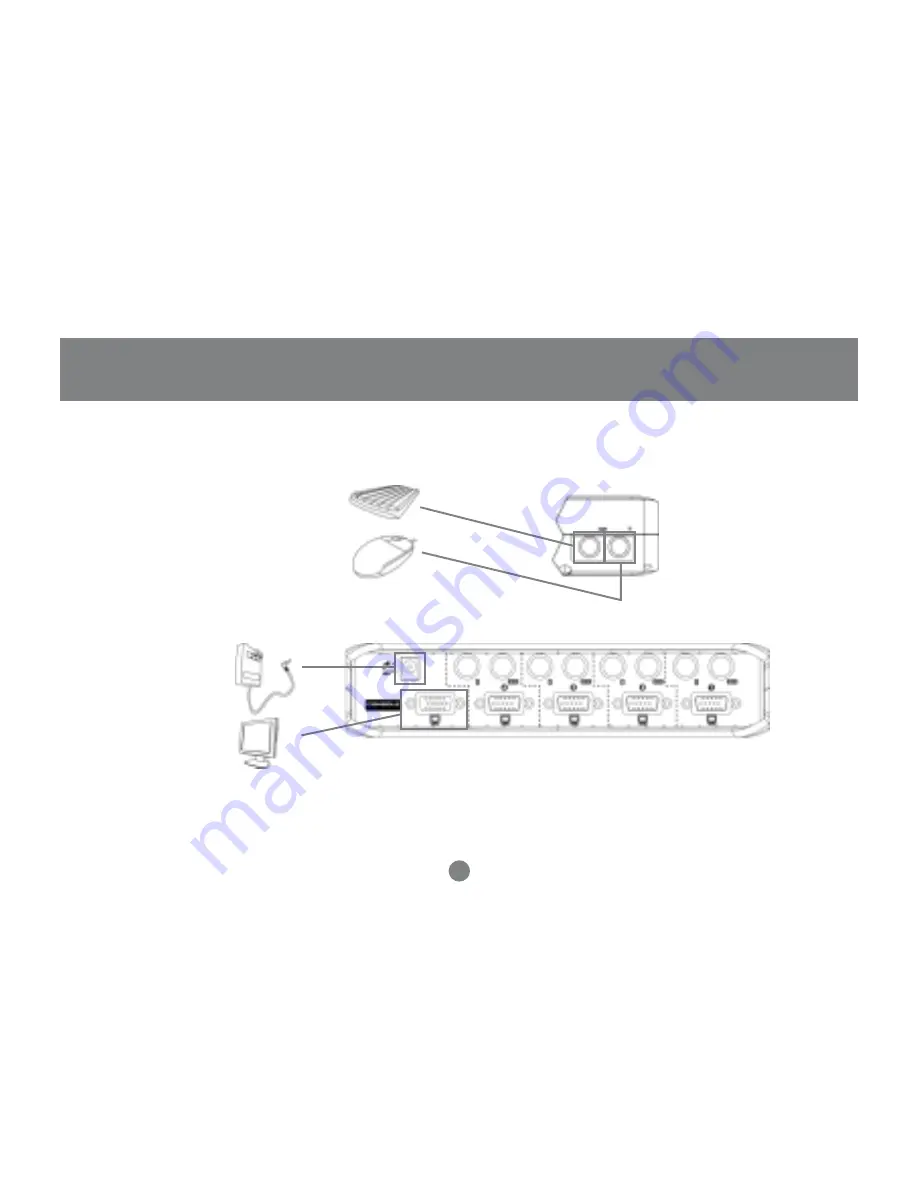
Step. 1

* Before you begin, please make sure that the power to all devices has been turned off.

•  Plug your Mouse, Keyboard, and Monitor into the console area on the KVM.  Then plug the power adapter port (optional).

Installation

optional

Summary of Contents for 84B

Page 1: ...MiniView SE 2 4 Port Desktop KVM Switch User Manual GCS82B GCS84B...

Page 2: ......

Page 3: ...is a registered trademark of International Business Machines Inc Macintosh G3 G4 and iMac are registered trademarks of Apple Computer Inc IOGEAR makes no warranty of any kind with regards to the info...

Page 4: ...tiple computers from a single console keyboard monitor and mouse The MiniViewTM SE provides two conve nient methods to access connected computers Change ports easily using the push button selection sw...

Page 5: ...tents Table of Contents Package Contents Overview Features Requirements Introduction Installation Operation Appendix Specification Radio TV Interference Statement Limited Warranty 02 03 04 05 06 08 11...

Page 6: ...MiniViewTM SE KVM Switch GCS82B or GCS84B 1 User Manual 1 Warranty Registration Card 4 6 Premium Bonded KVM Cables GCS84B 2 6 Premium Bonded KVM Cables GCS82B 1 Quick Start Guide If any items are mis...

Page 7: ...n routines or be concerned with incompat ibility problems Since the MiniViewTM SE GCS82B GCS84B intercepts keyboard input directly it works on any hardware platform and with all operating systems The...

Page 8: ...Software Required Computer Selection Via Push Button Switches or Keyboard Hot Keys Auto Scan Function for Monitoring Computer Operation Support up to 2048 x 1536 LED for Easy Status Monitoring Follow...

Page 9: ...GEAR PART NUMBER GCV160 For SUN systems Additional SUN to PS 2 adapter required IOGEAR PART NUMBER GCV130 Note MiniView SE does not support serial mice Accessories USB to PS 2 adapter GUC100KM ADB to...

Page 10: ...hat the computer connected to the port it corresponds to is up and running The Selected LED lights GREEN when the port it corresponds to is the currently selected port Depending on the port s status t...

Page 11: ...ower Port Note 1 In order to have the console s keyboard and mouse control notebook computers that only have one PS 2 port you can use a two PS 2 port to USB adapter such as the IOGEAR GUC100KM where...

Page 12: ...ation Step 1 Before you begin please make sure that the power to all devices has been turned off Plug your Mouse Keyboard and Monitor into the console area on the KVM Then plug the power adapter port...

Page 13: ...9 Setup and Installation Step 2 Connect the cables that came with the MiniView SE KVM Switch to the KVM s computer ports Installation...

Page 14: ...tion Step 3 1 Connect the other end of the cables that came with the MiniView SE KVM to your computers 2 Once complete turn the KVM switch on 3 Then turn on the power of connected computers 4 You are...

Page 15: ...rt selection you simply press the appropriate button to select your desired CPU The front LED lights indicate which computers are in use and which ones are selected This makes for easy port navigation...

Page 16: ...irectly access any computer connected to the KVM with a hot key combination that specifies the ID of the CPU port Press each of the following keys in order holding them down until all three are depres...

Page 17: ...succession of each other GCS84B To invoke the Auto Switch feature perfom the following key sequence Press each of the following keys in order holding them down until all three are depressed Alt Ctrl S...

Page 18: ...active one and pressing RShift switches to the next computer in the installation Press spacebar to end the Last Next mode Note 1 There is another shorter HotKey combination to produce Last Next Mode...

Page 19: ...n a c s o t u a e t a v i t c a o T y l n o B 2 8 S C G r e t n E 0 t f i h S r t c t l a n a c s o t u a e t a v i t c a o T y l n o B 4 8 S C G r a b e c a p s n a c s o t u a d n e o T h t o b r e...

Page 20: ...a e t S n O C P e v i t c a n a o t d e t c e n n o c s i t r o P l a u q e f f O d n a n O g n i h s a l F o t u A n i d e s s e c c a g n i e b s i d n a C P e v i t c a n a o t d e t c e n n o c s...

Page 21: ...d e e n E S w e i V i n i M w e i V i n i M e h t m o r f s e l b a c r e d n e t x e e h t g u l p n U s C P e h t f f o n r u T s C P e h t n r u t d n a n i k c a b s e l b a c e h t g u l p n e h...

Page 22: ...XT 84 key and some older AT keyboards those with the function keys on the side will not work 2 Some Notebook computers noteably the IBMThinkpad andToshibaTecra have trouble working with the MiniView...

Page 23: ...2 S P e l a m e f N I D i n i m n i p 6 x 1 B 2 8 S C G s t r o p U P C e l y t s 2 S P e l a m e f N I D i n i m n i p 6 x 2 B 4 8 S C G s t r o p U P C e l y t s 2 S P e l a m e f N I D i n i m n i...

Page 24: ...5 1 x 8 4 0 2 e r u t a r e p m e T g n i t a r e p O C 0 4 5 e r u t a r e p m e T e g a r o t S C 0 6 0 2 y t i d i m u H H R 0 8 0 g n i s u o H l a t e M t h g i e W B 4 8 S C G s b l 7 1 B 2 8 S...

Page 25: ...quipment has been tested and found to comply with the limits for a Class B computing device pursuant to Subpart J of Part 15 of FCC Rules which are designed to provide reasonable protection against su...

Page 26: ...warranty or representation expressed implied or statutory with respect to the contents or use of this documentation and especially disclaims its quality performance merchantability or fitness for any...

Page 27: ......

Page 28: ...23 Hubble Irvine CA 92618 P 949 453 8782 F 949 453 8785 www iogear com Contact info...

Reviews: