inventum HK II M/W Instruction Manual Download Page 23

  making coffee prematurely, press any button.

• If you want to make more cups of coffee, you have to 

  wait until the green pilot lamp 

10

 doesn’t blink any 

  longer. you can than open the drawer to place new 

  coffeepads.

to make tea with your coffeepadmachine it is necessary 

that you replace the coffeepadholder with the enclosed 

teapadholder 

16

. the teapadholder is enclosed in the 

box. you will recognize the teapadholder from the 

different color and the teamaker (with a “t”) in the 

middle of the holder. for making tea with teapads follow 

the previous step for making coffee.

We advise to clean the coffeepadmachine on a regular 

bases. regular cleaning will prolong the life of your 

appliance and will guarantee optimal brewing results.

please do as follows: 

check 

before

 cleaning if the coffeepadmachine is 

switched off und unplugged. clean the outside of the 

appliance with only a damp cloth and dry it with a 

dry cloth. 

never

 use any abrasives! 

never place the 

appliance in or under running water.
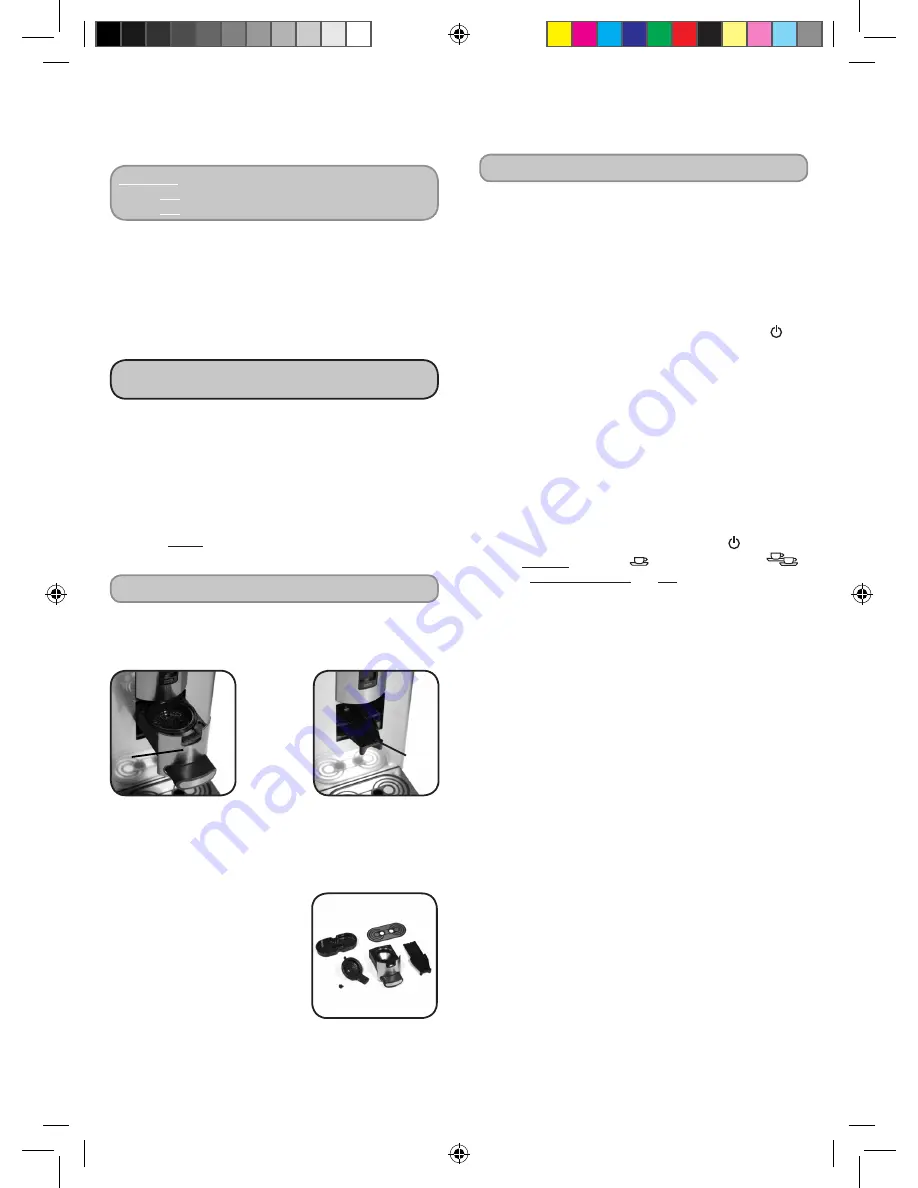
• remove the drawer 

8

 by pulling and slightly lifting it 

  towards you. 

This movement unlocks the drawer and 

  you can take it out of the machine.

• remove the coffee outlet 

7

 the same way as the drawer.

  To place the coffee outlet and the drawer back, all you 

  need to do is to place the items correctly on the 

  sliders. Push the drawer back in the machine. A “click” 

  indicates that the drawer is placed correctly in the 

  guides.

• clean the separate parts: the multi-padholder 

14

  the cremamaker 

15

, the drawer 


  8

, the coffee outlet 

7

  the grid 

5

 and the driptray 

6

 with 

  warm water and some 

  washing-up liquid or in the 

  dishwasher and make sure that 

  the parts are dry before next use.

• pay attention to clogging the 

  small drains in the middle of the 

  padholder 

14

 and the outside of the cremamaker 

15


Remove the cremamaker 15 by pushing it out, 

  from below, with a blunt object like a pen or the back 

  of a teaspoon. This also concerns the teamaker in the 

  teapadholder 16.

• check every day if the driptray 

8

 is empty and there 

  are no used coffeepads in the appliance. 

If the driptray 

  is full, it will overflow and the liquid will flow under 

  the appliance.

We advise to descale your coffeepadmachine on a regular 

bases. the period depends on the condition of your 

water and the frequency of use. We advise to descale the 

coffeepadmachine approx. every three months. you can 

use a special descalingproduct for coffeemachines.

When you use a descalingproduct especially for 

coffeemachines, you will have to follow the instructions 

on the package of the descalingproduct accordingly.

• Switch off the coffeepadmachine with the on/off   

  button.

• fill the reservoir according the instructions on the 

  package of the descalingproduct.

• place a large mug or bowl under the coffee-outlet to 

  collect the descalingmixture.

• Open the drawer for the coffeepadholder by pulling the 

  handle on the side of the drawer outwards gently. the 

  drawer will now slide open.

• place a new or used coffeepad in the multi-padholder 

  with the bulging side down and press it lightly. the 

  coffeepadmachine will be better descaled when you do 

  this and it cannot be clogged with descalingbits.

• Slide the drawer gently inwards until it can’t go further.
• Switch the coffeepadmachine on with the  -button and 
  press 

directly

 the 1-cup 

 - button and 2-cups 

  button 

at the same time

. do 

not

 let the machine heat 

  up.

• the coffeepadmachine will now rinse with the 

  descalingmixture.

• the coffeepadmachine will automatically switch itself 

  off when the rinsingprocess is ended. repeat the 

  process until the waterreservoir is empty. after the 

  descaling you will have to rinse the machine upto 

  3 times with 1 liter of fresh cold water to make sure 

  that there is no descalingproduct left behind in the 

  coffeepadmachine to avoid a bad taste to the coffee.

Attention!

 If you haven’t used the coffeepadmachine for 

a while, for instance if you have been away on a holiday, 

you should remove all the separate parts for cleaning and 

rinse the coffeepadmachine with fresh water. place the 

cleaned parts in the machine. this prevents an additional 

taste.

23

WArning! As long as the pilot lamp 

10

 blinks, you 

should not remove the water reservoir and you 

should not open the drawer.

cLeAning sePArAte PArts

descALing

6 | cLeAning & MAintenAnce

8

7

6

7

8

15

5

14

10HK11_GA.indd   23

3-11-2008   10:57:48

Summary of Contents for HK II M/W

Page 1: ...KOFFIEPADMACHINE KAFFEEPADMASCHINE MACHINE CAF DE DOSETTES COFFEEPADMACHINE GEBRUIKSAANWIJZING GEBRAUCHSANLEITUNG MODE D EMPLOI INSTRUCTION MANUAL 10HK11_GA indd 1 3 11 2008 10 57 37...

Page 2: ...2 10HK11_GA indd 2 3 11 2008 10 57 37...

Page 3: ...erdelen reinigen PAGINA 6 ontkalken PAGINA 6 7 storingen oplossingen pagina 7 Garantie Service pagina 26 ENGLISH 3 beschreibung des ger ts seite 10 1 sicherheitshinweise seite 10 2 VOR DER inbetriebna...

Page 4: ...ren beseffen de gevaren niet die kunnen ontstaan bij het omgaan met elektrische apparaten Laat kinde ren daarom nooit zonder toezicht met elektrische apparaten werken Zorg ervoor dat het apparaat alti...

Page 5: ...e boiler vol laten lopen en de machine doorspoelen De koffiepadmachine schakelt automatisch uit zodra het spoelproces be indigd is Uw koffiepadmachine is nu klaar voor gebruik De smaakselector 11 geef...

Page 6: ...fieuitloop om het ontkalkingsmengsel op te vangen Open de lade door deze aan de inkepingen rustig recht gezet worden Plaats n of twee kopjes onder de koffieuitloop 7 Zet de smaakselector 11 voor de ko...

Page 7: ...n en spoel de machine door zoals omschreven in het hoofdstuk Machine doorspoelen 7 naar voren te trekken De lade zal nu open schuiven Plaats eventueel een nieuwe of gebruikte koffiepad in de multi pad...

Page 8: ...uggepompt in het waterreservoir en het display weer goed weergegeven wordt Let op het water dat wordt teruggepompt is heet Het apparaat is nu ontlucht Nadat u de koffiepadlade weer kunt openen moet u...

Page 9: ...9 10HK11_GA indd 9 3 11 2008 10 57 40...

Page 10: ...Erfahrung oder Kenntnis haben bestimmt Es sei denn sie werden durch eine Person die f r deren Sicherheit verantwortlich ist begleitet und in dem sicheren Umgang mit dem Ger t unterwiesen Wenn das Ger...

Page 11: ...Boiler mit Wasser Die Kaffeepadmaschine schaltet sich automatisch nach dem Durchsp lens aus Die Kaffeepadmaschine ist jetzt gebrauchsbereit Der Geschmackseinsteller 11 erm glicht Ihnen Ihre individuel...

Page 12: ...h beim Entkalken des Ger ts ein Kaffeepad in den Multi Padhalter zu legen Dieses Pad dient als Filter und verhindert dass Kalkr ckst nde 12 Stellen Sie ein oder zwei Tassen unter den Kaffeeauslauf 7 S...

Page 13: ...Schublade nicht ffnen diese ist noch verriegelt Warten Sie einige Sekunden bis die Kontrolllampe konstant aufleuchtet 10 aus aus Die Schublade ist nicht verriegelt ffnen und schlie en Sie die Schubla...

Page 14: ...ums nicht gel st und kann beim n chsten Gebrauch des Apparates wieder entstehen Cremamacher reinigen Entfernen Sie den Cremamacher mit einem stumpfen Gegenstand indem Sie den Cremamacher aus dem Padha...

Page 15: ...l avec des pi ces qui ne soient pas recommand es ou livr es par le fabricant Si vous n utilisez pas votre appareil ou si vous devez le nettoyer teignez totalement l appareil et retirez la fiche de l a...

Page 16: ...ir 8 s ouvrira maintenant en coulissant Placez une dosette de caf dans le porte dosettes 13 avec le c t bomb vers le bas et appuyez l g rement dessus la dosette pour que le caf se r partisse r guli re...

Page 17: ...oulez faire vous pouvez mettre une ou deux dosettes de caf dans le porte dosettes Cette cafeti re dosettes a t con ue pour pratiquement toutes les dosettes qui existent Dans le porte dosette 14 on peu...

Page 18: ...es en appuyant sur la touche marche arr t Remplissez le r servoir d eau amovible avec de le m lange de d tartrage Placez une grande tasse ou un bol sous l coulement du caf pour recueillir le m lange d...

Page 19: ...e Continuer d appuyer sur ce bouton jusq ce qu il n y ait plus d eau pomper dans le r servoir eau et tant que le display est en mode normal Attention l eau qui est pomp e est br lante Votre cafeti re...

Page 20: ...20 10HK11_GA indd 20 3 11 2008 10 57 46...

Page 21: ...to understand potential risks Teach children a responsible handling of electrical appliances Children should be supervised to ensure that they do not play with the appliance This appliance is not int...

Page 22: ...maller amount of water Place the taste selector in the middle and you will get a standard amount of coffee When you slide the taste selector completely upwards the coffee will get thinner because the...

Page 23: ...driptray is full it will overflow and the liquid will flow under the appliance We advise to descale your coffeepadmachine on a regular bases The period depends on the condition of your water and the f...

Page 24: ...hine This will ensure a better transit of the water and will give a finer layer of coffeecrema Cause Coffeepaddrawer won t open vacuum Solution You can solve the vacuum yourself by decompressing the a...

Page 25: ...25 10HK11_GA indd 25 3 11 2008 10 57 49...

Page 26: ...der Rechnung des gekauften Ger tes Bewahren Sie deshalb die Rechnung sorgf ltig auf Die Garantie gilt ab dem Kaufdatum Die Garantie gilt nicht im Falle von normalem Verschlei mangelhafter Wartung uns...

Page 27: ...conserver bien pr cieusement votre bon d achat Le d lai de garantie commence partir de la date d achat La garantie n est pas assur e dans les cas suivants usure normale emploi inad quat ou utilisation...

Page 28: ...LH Veenendaal Nederland Tel 0318 54 22 22 Fax 0318 54 20 22 Mail helpdesk inventum eu Inventum Belgium BVBA Lindenstraat 32 3140 Keerbergen Belgi Tel 015 512 653 Fax 015 529 718 Mail info inventumbelg...

Reviews: