background image

Contents

1 General . . . . . . . . . . . . . . . . . . . . . . . . . . . . . . . . . . . . . . . .

5

1.1 Symbols . . . . . . . . . . . . . . . . . . . . . . . . . . . . . . . . . . . . .

5

1.2 Intended Use . . . . . . . . . . . . . . . . . . . . . . . . . . . . . . . . .

5

1.3 Dealer/Technician Information . . . . . . . . . . . . . . . . . . . . .

5

1.4 Disposal Information . . . . . . . . . . . . . . . . . . . . . . . . . . . .

5

2 Safety . . . . . . . . . . . . . . . . . . . . . . . . . . . . . . . . . . . . . . . . .

6

2.1 Safety Information . . . . . . . . . . . . . . . . . . . . . . . . . . . . . .

6

2.2 Safety/Handling of Wheelchairs . . . . . . . . . . . . . . . . . . . . 10
2.3 Stability and Balance . . . . . . . . . . . . . . . . . . . . . . . . . . . . 11
2.4 Reaching, Leaning and Bending . . . . . . . . . . . . . . . . . . . . . 12
2.5 Coping with Everyday Obstacles . . . . . . . . . . . . . . . . . . . 12
2.6 A Note to Wheelchair Assistants . . . . . . . . . . . . . . . . . . . 13
2.7 Tipping . . . . . . . . . . . . . . . . . . . . . . . . . . . . . . . . . . . . . . 13

2.7.1

Method 1 — Wheelchair With Step Tubes . . . . . . 13

2.7.2

Method 2 — Wheelchair Without Step
Tubes . . . . . . . . . . . . . . . . . . . . . . . . . . . . . . . . . 13

2.8 Stairways . . . . . . . . . . . . . . . . . . . . . . . . . . . . . . . . . . . . 14
2.9 Escalators . . . . . . . . . . . . . . . . . . . . . . . . . . . . . . . . . . . . 15
2.10 Transferring To and From Other Seats . . . . . . . . . . . . . . . 15

3 Overview. . . . . . . . . . . . . . . . . . . . . . . . . . . . . . . . . . . . . . . 17

3.1 Label Locations . . . . . . . . . . . . . . . . . . . . . . . . . . . . . . . . 17
3.2 Typical Product Parameters . . . . . . . . . . . . . . . . . . . . . . . 18
3.3 Safety Inspection Checklist. . . . . . . . . . . . . . . . . . . . . . . . 20

4 Operation . . . . . . . . . . . . . . . . . . . . . . . . . . . . . . . . . . . . . . 22

4.1 Folding/Unfolding the Wheelchair. . . . . . . . . . . . . . . . . . . 22
4.2 Installing/Removing the Front Rigging/Eleveating

Legrests . . . . . . . . . . . . . . . . . . . . . . . . . . . . . . . . . . . . . 23

4.3 Raising/Lowering the Elevating Legrests . . . . . . . . . . . . . . 23
4.4 Using the Flip-Back Armrest . . . . . . . . . . . . . . . . . . . . . . 24

4.5 Installing/Removing Anti-Tippers . . . . . . . . . . . . . . . . . . . 25
4.6 Using the Patient Operated Wheel Locks . . . . . . . . . . . . . 27

5 Service. . . . . . . . . . . . . . . . . . . . . . . . . . . . . . . . . . . . . . . . . 28

5.1 Adjusting Footplate Height. . . . . . . . . . . . . . . . . . . . . . . . 28
5.2 Installing/Removing the Heel Loop . . . . . . . . . . . . . . . . . . 28
5.3 Replacing the Flip-Back Armrest. . . . . . . . . . . . . . . . . . . . 29
5.4 Installing/Removing/Adjusting the Back Canes . . . . . . . . . . 29
5.5 Replacing Seat Upholstery . . . . . . . . . . . . . . . . . . . . . . . . 30
5.6 Replacing Back Upholstery . . . . . . . . . . . . . . . . . . . . . . . . 30
5.7 Removing/Installing the Rear Wheels . . . . . . . . . . . . . . . . 31
5.8 Replacing Rear Wheel Handrim . . . . . . . . . . . . . . . . . . . . 32
5.9 Replacing Front Fork/Caster . . . . . . . . . . . . . . . . . . . . . . 32
5.10 Adjusting Front Forks/Caster . . . . . . . . . . . . . . . . . . . . . . 33
5.11 Replacing Front Caster . . . . . . . . . . . . . . . . . . . . . . . . . . 33
5.12 Adjusting the Anti-Tippers . . . . . . . . . . . . . . . . . . . . . . . . 34
5.13 Changing Seat-to-Floor Height . . . . . . . . . . . . . . . . . . . . . 34
5.14 Adjusting the Patient Operated Wheel Locks . . . . . . . . . . 35
5.15 Adjusting the Seat Width . . . . . . . . . . . . . . . . . . . . . . . . . 36

6 Maintenance . . . . . . . . . . . . . . . . . . . . . . . . . . . . . . . . . . . . 38

6.1 Maintenance . . . . . . . . . . . . . . . . . . . . . . . . . . . . . . . . . . 38

6.1.1

Suggested Maintenance Procedures . . . . . . . . . . . . 38

6.1.2

Replacing/Repairing Caster Tire/Tube . . . . . . . . . . 39

6.1.3

Replacing/Repairing Rear Wheel Tire/Tube . . . . . . 39

7 Troubleshooting . . . . . . . . . . . . . . . . . . . . . . . . . . . . . . . . . 40

7.1 Troubleshooting . . . . . . . . . . . . . . . . . . . . . . . . . . . . . . . 40

8 Options . . . . . . . . . . . . . . . . . . . . . . . . . . . . . . . . . . . . . . . . 41

8.1 Options . . . . . . . . . . . . . . . . . . . . . . . . . . . . . . . . . . . . . 41

8.1.1

Installing the Seat Positioning Strap . . . . . . . . . . . . 41

8.1.2

Installing the Wheel Lock Extension Handle . . . . . . 42

9 Warranty . . . . . . . . . . . . . . . . . . . . . . . . . . . . . . . . . . . . . . 43

9.1 Warranty Information . . . . . . . . . . . . . . . . . . . . . . . . . . . 43

Summary of Contents for Veranda 4000 series

Page 1: ...ALL DIMENSIONS ARE IN INCHES UNLESS OTHERWISE SPECIFIED TOLERANCES UNLESS OTHERWISE SPECIFIED INCHES METRIC P N 1567855 NOTES 1 Page Count 48 pages 2 Size A5 3 Orientation Landscape 4 Color Black and...

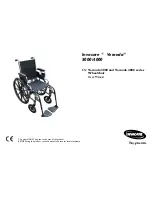
Page 2: ...Veranda 3000 4000 EN Veranda 3000 and Veranda 4000 series Wheelchair User Manual This manual MUST be given to the user of the product BEFORE using this product read this manual and save for future re...

Page 3: ...permission from Invacare Trademarks are identified by and All trademarks are owned by or licensed to Invacare Corporation or its subsidiaries unless otherwise noted Teflon is a registered trademark o...

Page 4: ...Removing Anti Tippers 25 4 6 Using the Patient Operated Wheel Locks 27 5 Service 28 5 1 Adjusting Footplate Height 28 5 2 Installing Removing the Heel Loop 28 5 3 Replacing the Flip Back Armrest 29 5...

Page 5: ...9 2 Usability Survey 45...

Page 6: ...free use 1 2 Intended Use The intended use for the manual mechanical wheelchair is to provide mobility to persons who may be restricted to a sitting position The manual wheelchair is intended for ong...

Page 7: ...on with Invacare accessories Accessories designed by other manufacturers have not been tested by Invacare and are not recommended for use with Invacare products WARNING Risk of injury or damage Use of...

Page 8: ...ombination of the seven may cause the wheelchair to decrease in stability These adjustments MUST be performed by a qualified technician The various seat to floor heights require specific settings depe...

Page 9: ...air with wheel locks Wheel locks are not brakes DO NOT attempt to stop the wheelchair while on a sloped surface Never leave an unoccupied wheelchair on an incline DO NOT use an escalator to move a whe...

Page 10: ...ocks may not prevent the wheelchair from moving on all floor surfaces including those that may be wet or slick ALWAYS exercise caution when transferring into or out of the wheelchair WARNING Operating...

Page 11: ...a weight training apparatus Invacare wheelchairs have not been designed or tested as a seat for any kind of weight training If occupant uses said wheelchair as a weight training apparatus Invacare sh...

Page 12: ...property This wheelchair has been designed to accommodate one individual If more than one individual occupies the wheelchair this may adversely affect the stability of the wheelchair resulting in ser...

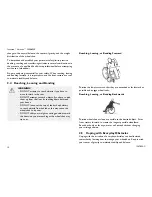
Page 13: ...he floor by reaching down between your knees DO NOT lean over the top of the back upholstery to reach objects from behind as this may cause the wheelchair to tip over DO NOT shift your weight or sitti...

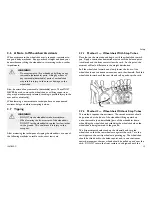
Page 14: ...following methods to tackle curbs short stairs etc 2 7 1 Method 1 Wheelchair With Step Tubes Place foot on the step tube and begin to tilt the wheelchair toward you Apply a continuous downward motion...

Page 15: ...hair between floors when an elevator is not available Moving Up Stairs 1 If necessary rotate the anti tippers so the wheels are facing up 2 One assistant positioned behind the wheelchair securely gras...

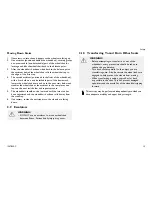
Page 16: ...cess 5 The wheelchair should not be lowered until the last stair has been negotiated and the wheelchair has been rolled away from the stairway 6 If necessary rotate the anti tippers so the wheels are...

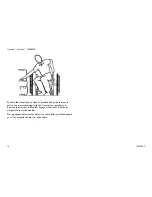
Page 17: ...t to which you are transferring with the front casters parallel to it Remove the armrest if installed Engage wheel locks Shift body weight into seat with transfer During independent transfer little or...

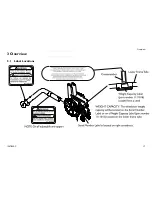
Page 18: ...ACITY The wheelchair weight capactiy will be located on the Serial Number Label or on aWeight Capacity Label part number 1111016 located on the lower frame tube Crossmember Lower FrameTube Weight Capa...

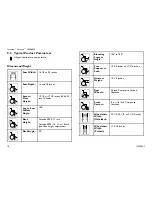
Page 19: ...t Surface Angle 104 Back Height Veranda 3000 17 inch Veranda 4000 16 17 or 18 inch tool free height adjustment Back Angle 90 Elevating Legrest Angle 104 to 180 Foot Support to Seat 12 3 4 inches to 17...

Page 20: ...gings Veranda 3000 34 pounds Aprox 16 X 16 inch Seat Without Front Riggings Weights will vary depending on how wheelchair is equipped Weight Limit 300 lbs 136 Kg Details Tracer Veranda 3000 4000 FRAME...

Page 21: ...ks DO NOT interfere with tires when rolling q Check that the wheel lock pivot points are free of wear and looseness q Check that the wheel locks are easy to engage q Ensure that the wheel locks preven...

Page 22: ...es strap to frame is secure and undamaged Replace if necessary q Inspect back cane hand grips for wear looseness deterioration q Adjust front casters forks bearing system if wheel wobbles noticeably o...

Page 23: ...aster off the ground floor 2 Place your hand on the top of the seat rail A closest to you where the seat upholstery is attached 3 Point your fingers and thumb to the inside of the wheelchair 4 Press d...

Page 24: ...in place 4 Repeat this procedure for the other front rigging assembly A B D C A Front rigging shown Elevating legrests install the same way Removing the Front Riggings 1 Push or pull the front rigging...

Page 25: ...is folded otherwise injury or damage may result Ensure armrest is securely locked into arm socket and armrest release button locks into place before using 1 Unlock the flip back armrests by pressing a...

Page 26: ...les ALWAYS use anti tippers When outdoors on wet soft ground or on gravel surfaces anti tippers may not provide the same level of protection against tipover Extra caution MUST be observed when travers...

Page 27: ...r A 1 1 2 to 2 inch clearance between the bottom of the anti tipper wheels and the ground floor MUST be maintained at all times 5 If the distance between the bottom of anti tipper wheels and the groun...

Page 28: ...may result Interference between the top of the elevating legrest and the wheel lock extension handle may cause the wheel lock to disengage Position wheelchair on a flat level surface to perform this p...

Page 29: ...ely tighten threaded handle 4 If necessary repeat STEPS 1 3 to adjust remaining footrest A D C B 5 2 Installing Removing the Heel Loop This procedure applies to the swingaway front riggings and swinga...

Page 30: ...ame 5 Inspect rear tube of new armrest to ensure insert is properly installed with mounting holes aligned 6 If not properly aligned rotate the insert using a flat screwdriver to align the mounting hol...

Page 31: ...D 2 Remove the existing seat upholstery from the crossbraces 3 Install new seat upholstery by reversing STEPS 1 2 C D B A 5 6 Replacing Back Upholstery Wheelchairs with Seat Positioning Strap ONLY Th...

Page 32: ...occur This procedure MUST be performed by a qualified technician If replacing the same size rear wheel note the mounting position on the wheelchair frame for proper reinstallation of the new rear whee...

Page 33: ...ls page 31 B A C 5 9 Replacing Front Fork Caster WARNING Make sure both fork caster assemblies are the same size before using the wheelchair otherwise injury may occur This procedure can be performed...

Page 34: ...est in a downward position 2 Test wheelchair for maneuverability 3 Readjust locknuts if necessary and repeat STEPS 1 2 until correct 4 Snap dust cover C over the locknut and stem 5 11 Replacing Front...

Page 35: ...ize position of the rear wheels use of an anti tipper model as well as the user condition directly relate to the stability of the wheelchair Any change to one or any combination of the seven may cause...

Page 36: ...5 14 Adjusting the Patient Operated Wheel Locks WARNING DO NOT attempt to stop a moving wheelchair with wheel locks Wheel locks are not brakes If wheel locks do not hold the occupied wheelchair in pla...

Page 37: ...hair Refer to Replacing Back Upholstery and Replacing Seat Upholstery 2 Remove the four button screws A and locknuts B that secure the two pivot links C to the wheelchair frame D and existing crossbra...

Page 38: ...oning of the crossbrace saddle 8 Reinstall the two button screws locknuts and crossbrace saddle that secures the bottom of the new crossbrace to the wheelchair frame Refer to Detail B for hardware ori...

Page 39: ...parts for damage or wear and replace 3 Check all parts for proper adjustment WARNING DO NOT use your wheelchair unless it has the proper tire pressure p s i DO NOT overinflate the tires Failure to fo...

Page 40: ...ry 8 Check upholstery for sagging rips or tears 9 Clean upholstery with mild soap and water 10 Hand grips should be checked monthly for wear looseness dete rioration Clean if desired Replace if loosen...

Page 41: ...LS SLUGGISH TURN OR PERFORMANCE CASTER FLUTTERS SQUEAKS AND RATTLES LOOSENESS IN CHAIR SOLUTIONS X X X X Check tires for correct and equal pressure X X X X Check for loose nuts and bolts X X X Check c...

Page 42: ...elchair You may order with or without the seat restraint Invacare strongly recommends ordering the Seat Positioning Strap as an additional safeguard for the wheelchair user 1 Remove the bottom back up...

Page 43: ...heel lock extension handles MUST be removed before swinging the elevating legrests to the side otherwise injury or damage may result Interference between the top of the elevating legrest and the wheel...

Page 44: ...upholstered materials seat back and armrests of the arm assembly and remaining components of this product when purchased new and unused to be free from defects in materials and workmanship for a perio...

Page 45: ...HE PRODUCT INSTRUCTIONS THE FOREGOING EXPRESS WARRANTY IS EXCLUSIVE AND IN LIEU OF ANY OTHER WARRANTIES WHATSOEVER WHETHER EXPRESS OR IMPLIED INCLUDING THE IMPLIED WARRANTIES OF MERCHANTABILITY AND FI...

Page 46: ...Is the Table of Contents useful q q Does any information seem inaccurate misleading q q Do you understand that misuse of the product can cause injury or damage q q Explain ___________________________...

Page 47: ...__________ 7 Do you have suggestions for other ways of making this document easier to use Explain YES NO ____________________________________________ ____________________________________________ q q T...

Page 48: ...Notes...

Page 49: ...Invacare Corporation www invacare com USA One Invacare Way Elyria Ohio USA 44036 2125 800 333 6900 1567855 C 2014 05 06 1567855C Making Life s Experiences Possible...

Reviews: