


Part No 1141448
7
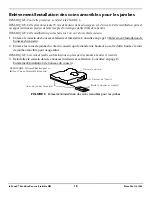
InTouch™ Stabilite/Stabilite OM Cushion
Modification for approximately 1-inch of obliquity
NOTE:
This
modification
can
be
done
on
either
side
of
the
cushion.
1. Determine
which
side
of
the
cushion
needs
to
be
lowered.
2. Remove
the
cushion
from
inner
and
outer
covers.
Refer
to
3. On
the
side
of
the
cushion
that
needs
to
be
lowered,
remove
the
obliquity
insert
by
pulling
on
the
tab.
4. Align
the
chamfered
edges
on
the
obliquity
inserts
as
shown
in
DETAIL
“B”
of
5. Put
the
obliquity
insert
removed
in
step
3
onto
the
obliquity
insert
that
is
in
place
on
the
cushion
as
shown
in
DETAIL
“B”
of
6. Apply
pressure
along
the
hook
and
loop
strip.
Pull
on
the
tab
to
make
sure
that
the
obliquity
inserts
are
securely
in
place
before
installing
the
covers.
7. Install
the
cushion
into
inner
and
outer
covers.
Refer
to
FIGURE 5
Modifying the Cushion to Accommodate Obliquity
DETAIL “A” - MODIFICATION FOR APPROXIMATELY
½-INCH OF OBLIQUITY
Obliquity Inserts
Tab
Tab
Top of cushion
Bottom of cushion
Bottom of cushion
Top of
cushion
DETAIL “B” - MODIFICATION FOR APPROXIMATELY
1-INCH OF OBLIQUITY
Bottom of cushion
Top of cushion
Remove one obliquity insert for ½-inch modification
Align the
chamfered edges of
the obliquity inserts
Put the obliquity insert removed in STEP 3 onto the obliquity
insert in place on the cushion for 1-inch modification
NOTE:
This
modification
can
be
done
on
either
side
of
the
cushion.
NOTE:
This
modification
can
be
done
on
either
side
of
the
cushion.
Hook and loop strip
Tab
Hook and loop strip
Tab


