


5
FIGURE 6 -
FIGURE 6 -
FIGURE 6 -
FIGURE 6 -
FIGURE 6 - A
A
A
A
A TT
TT
TT
TT
TTA
A
A
A
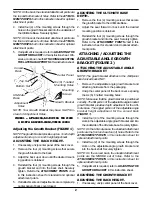
A CHING/ADJUSTING
CHING/ADJUSTING
CHING/ADJUSTING
CHING/ADJUSTING
CHING/ADJUSTING THE
THE
THE
THE
THE
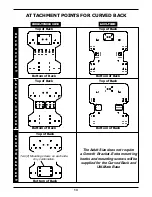
MOUNTING HOOKS
MOUNTING HOOKS
MOUNTING HOOKS
MOUNTING HOOKS
MOUNTING HOOKS
* Mounting
Screws
* Mounting
Hook
Mounting
Screws
Slot
Mounting Hooks
* These items are only
needed on the adult size.
* Mounting
Hooks
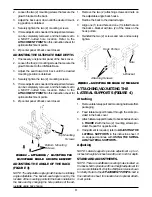
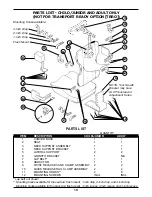
TRANSPORT READY OPTION (TRRO)
Mounting
Screws
Mounting
Screws
Mounting
Screws
Twist Release
Clamp
Seat Mounting
Hooks
Seat
Mounting
Hooks
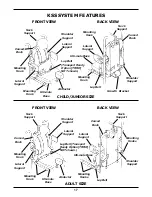
ADULT SIZES.
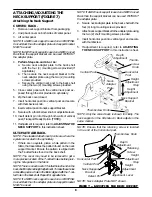
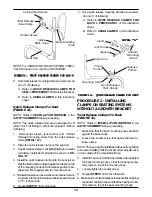
1. Remove eight (8) mounting hooks from the packaging.
2. Slide one (1) hook through the slot provided in the
back cover. Attach to the upper corner, on either side
of the back, with two (2) of the mounting screws pro-
vided. Repeat for opposite side.
3. Slide one (1) hook through the slot provided in the
back cover. Attach to the lower corner, on either side
of the back, with two (2) of the mounting screws pro-
vided. Repeat for procedure for opposite side.
4. Attach one (1) mounting hook to the front corner, on
either side of the seat, with two (2) of the mounting
screws provided. Repeat for opposite side.
5. Attach one (1) mounting hook to the back corner, on
either side of the seat, with two (2) of the mounting
screws provided. Repeat for opposite side.
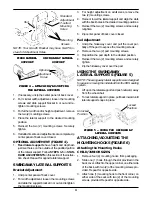
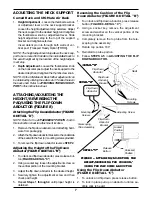
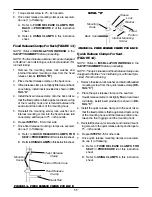
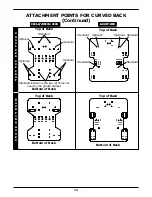
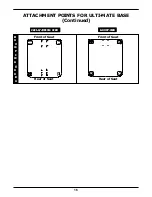
Adjusting the Mounting Hooks
NOTE: Refer to the ATTACHMENT POINTS chart in
this instruction sheet for adjustment locations.
1. If necessary, unzip the back cover.
2. CHILD/JUNIOR AND ADULT SIZES - For minimal
width adjustment, loosen the mounting screws and
adjust the hooks in or out and retighten the mount-
ing screws.
3. ADULT SIZE ONLY - If further adjustment is needed:
a. Remove the mounting screws that secure the
mounting hooks to the back/seat.
b. Adjust the mounting hooks to desired mounting
position.
c. Reinsert the mounting screws. Securely tighten.
4. TRANSPORT OPTION - For seat adjustment, loosen
the mounting screws and adjust the hooks back and
forth.
NOTE: Some configurations for seat depth changes may
require REVERSING seat mounting hooks.
For back adjustment, loosen the mounting screws
and adjust the hooks side-to-side. Retighten the
mounting screws.
WARNING
Ensure the seating system mounting brackets are
correctly positioned and clamps are securely
engaged. Failure to do so may result in serious
bodily injury.
5. If all attachments and adjustments are complete, zip
the back cover closed.
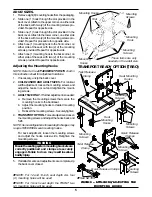
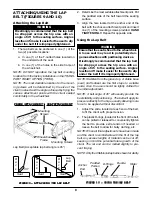
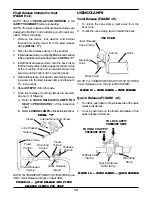
n
NOTE: For 12 and 14-inch seat depth ALL four
(4) mounting holes will be used.
n
NOTE: For 16-inch seat depth the FRONT two
(2) mounting holes will be used.
Mounting
Screws
Quick Release
Clamps
Twist Release
Clamp
Mounting
Screws
Quick Release Clamps
n
See NOTES
Four (4) Mounting
Hooks


