Intrasonic Technology V500 Operation Instructions Manual Download Page 9

15

16

[Return]

: Exit the current menu. 

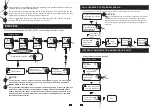
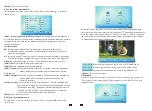
4. Set the alarm parameters

On main menu, move the cursor to the option “Alarm”, then press “    ” to enter the 
“Alarm” menu. 

activity

,


(

detected by the sensor

) and the 

values can be set 

from 0~30 seconds. 

[Alarm record]: 

Options include “Record” and “Snapshot”. “Record” indicates that 

when an alarm is triggered, it will activate the corresponding channel

to start alarm recording. “Snapshot” indicates that when an alarm is 

triggered, it will activate the corresponding channel to capture a 

picture of the current video stream as a still photo.


[Return]: 

Exit the current menu.

[CAM 1 Sensor type or CAM 2 Sensor type]

: Each camera channel corresponds to 

an I/O status (see the following status explanations), which means that when an alarm


is triggered, it will activate the corresponding channel to start alarm recording or


capture a snapshot. 

I/O status types: 

NO

: “Normally open”


means that in its normal state, the sensor is kept under 

        constant low voltage. If the output voltage changes from low to high, then the 

        alarm will be triggered. 

NC

: “Normally closed”, the normal state of the sensor is under constant high voltage. 

        If the output voltage changes from high to low, then the alarm will be triggered.


Disable

: Set the sensor type to “Close”, if external sensor alarms are not in use.

[CAM1]

: Enable or disable the preview of camera 1.

[CAM2]:

 Enable or disable the preview of camera 2.

[CAM 1 ring time]

: The alarm ring time of camera 

1,

 if camera 1 has been triggered by

activity

,


(

detected by the sensor

) and the

 values can be set from 

0~30 seconds. 

[CAM 2 ring time]: 

The alarm ring time of camera 2

,

 if camera 2 has been triggered by

CAM 2 Sensor type:      NO

CAM 1:

Enable

CAM 2:

Enable

CAM 1 ring time:            00 

CAM 2 ring time:            00 

Alarm record:

Record

Return

CAM 1 Sensor type:      NO

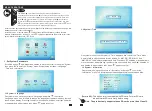
5. Set the color parameters

On main menu, move the cursor to the option “Color”, then press “    ” to enter the 
“color” menu. 

Door1

Door2

CAM1

CAM2

Return

On the color menu

,

 the video color of Door1/Door2/CAM1/CAM2 attributes can be 

adjusted for the best image quality. Scroll the button “    ” upwards or downwards to 
move the cursor to the option “Door1” or “Door2” or “CAM1” or “CAM2”, then press


“    ” to enter the corresponding menu to adjust values of brightness, contrast and


chrome depending on the actual conditions. 

25

25

35

Return

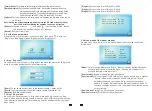
Brightness, values can be set up from 0 to 50, default as 25.

Chroma, values can be set up from 0 to 50, default as 35.

Contrast, values can be set up from 0 to 50, default as 25.

[Return]

: Exit the current menu.

6. Playback

On main menu, move the cursor to the option “Files”, then press “    ” to enter the 
“Files” menu. For the models with SD card, options


include


“Record


files”


and

“Snapshot


files”.

Record files           Snapshot files

Return

Summary of Contents for V500

Page 1: ...OPERATION INSTRUCTIONS V500 Slave Video Monitor Quick Guide Does not work as a standalone master ...

Page 2: ... manufactures serial number or date code will be substituted This warranty extends to the original user or subsequent owner of the product during the warranty term Intrasonic Technology will replace or repair the product at its discretion at no charge with a reconditioned or new product All products with manufactured defects must be returned to Intrasonic Technology Inc If an Intrasonic Technology...

Page 3: ... optional 10 C 60 C External switching power supply DC12V optional Screw anchors cables Bracket Wall screws Monitoring Unlock Talk Hang up 1 2 Optional Indoor monitor 1pcs Screw anchors 4pcs Wall screws 4pcs Bracket 1pcs 4 Pin line 6pcs 2 Pin line 1pcs User manual 1pcs External switching power supply DC 12V optional please check actual model 1pcs The electric lock source camera is not include in t...

Page 4: ...electric lock not included DOOR2 External switching power supply DC 12V optional ALM1 ALM2 DC12V Audio GND Video AC DC power adapter for unlocking not included AC DC electric lock not included DOOR1 TV GND AC DC power adapter for camera not included AC DC power adapter for camera not included Built in power supply AC 100V 240V Wiring connection according to the following to avoid interference Powe...

Page 5: ...ton is a composite key users can press the button scroll the button upward or downward For more details please refer to the section Menu Operations 2 In standby mode press the button once to quickly access the menu 3 In main menu settings scroll the button upwards or downwards to select sub menu then press again to enter sub menu In sub menu settings press to select menu options scroll upwards or ...

Page 6: ...press the call button on either of outdoor units and the monitoring mode will be switched off The visitor s image will then appear on its screen and continuous ringing will be heard If you are using the indoor unit with hands free you can press the talking button to reactivate conversation with the visitor Unlock Press the unlock button on the indoor unit the electric lock will be opened Internal ...

Page 7: ...System then press to enter the System menu System setup includes Language Time and Information 1 1 System Language On system menu move the cursor to Language and press to enter the Language menu Use this field to change the language of the machine menu text and the on screen display Press to select menu options and then scroll upwards or downwards to adjust values then press again to confirm TF En...

Page 8: ... ring volume during three different time period the vibrate and ring time can be adjusted from 10s to 45s when calling Door1 To set up the doorbell tone of the outdoor camera 1 total of 12 Door2 To set up the doorbell tone of the outdoor camera 2 a total of 12 Return Exit the current menu Ring Vol1 the volume level of Ring Vol1 00 10 Ring Vol2 the volume level of Ring Vol2 00 10 Ring Vol3 the volu...

Page 9: ... Close if external sensor alarms are not in use CAM1 Enable or disable the preview of camera 1 CAM2 Enable or disable the preview of camera 2 CAM 1 ring time The alarm ring time of camera 1 if camera 1 has been triggered by activity detected by the sensor and the values can be set from 0 30 seconds CAM 2 ring time The alarm ring time of camera 2 if camera 2 has been triggered by CAM 2 Sensor type ...

Page 10: ... cursor to select file to playback A red list indicates that the list has been selected _ press the button some tips Play Delete current file and Delete all file will appear on the right side of the screen Select Play to play back the current file select Delete current file to delete the selected file and select Delete all file to delete all the files stored on the SD card During playback press th...

Reviews: