Intova IC-12 User Manual Download Page 34

EN-34

APPENDIX

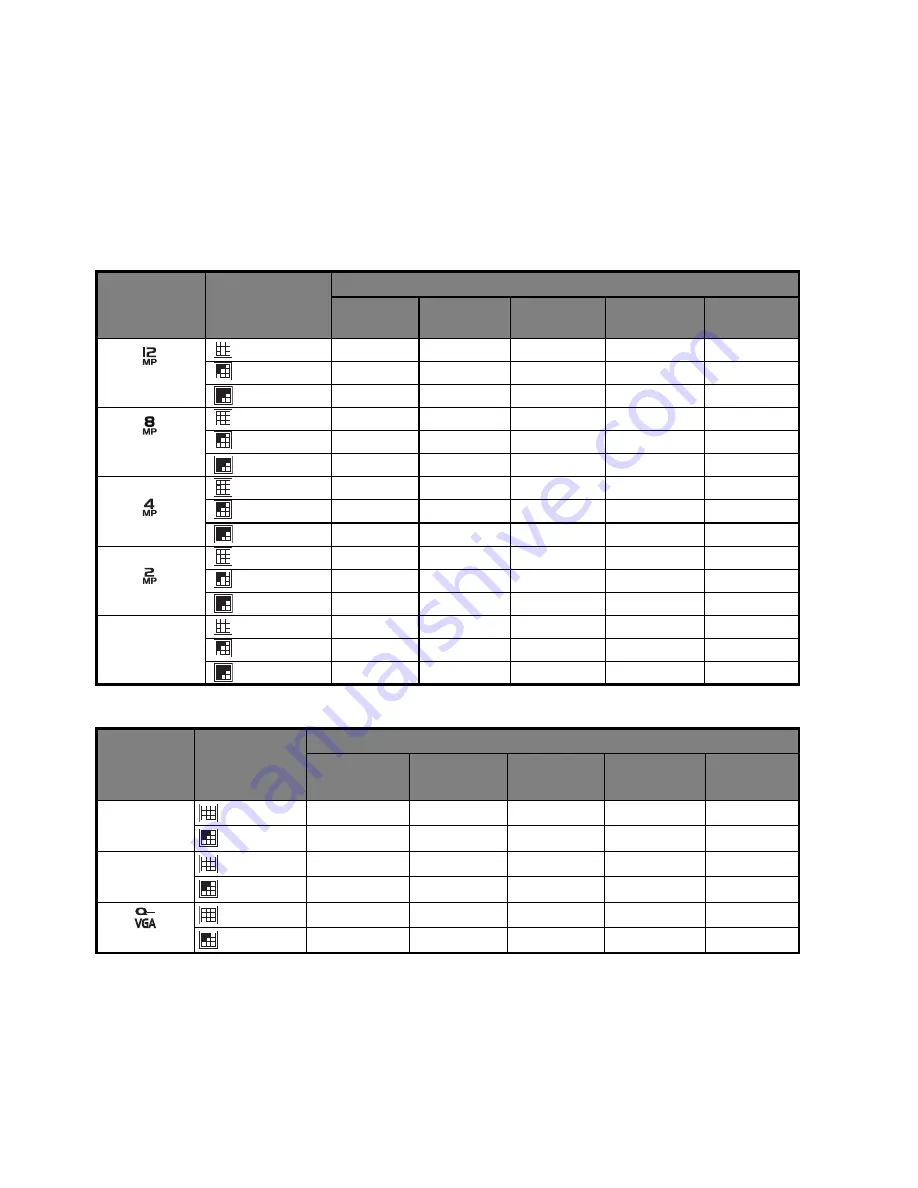
Possible Number of Shots

Possible number of shots (still image)

The table shows the approximate shots that you can capture at each setting based on

the capacity of the internal memory and the SD/SDHC memory card.

Possible recording time / sec (video clip)

* We recommend a memory card of at least 10MB/Sec write speed to prevent auto stop or 

unexpected results. If you experience an error using a slower SD/SDHC memory card, you 

can set your camera’s video recording to QVGA (320 x 240) and standard quality.

Size


Quality

SD/SDHC

 memory card capacity

1GB

2GB

4GB

SDHC

8GB

SDHC

16GB

SDHC

3968 x 2976

 Fine

170

331

682

1370

2675

 Standard

321

623

1282

2575

5025


Economy

398

772

1589

3190

6227

3264 x 2448

 Fine

244

474

978

1963

3832

 Standard

453

877

1805

3623

7072


Economy

560

1082

2228

4473

8729

2304 x 1728

 Fine

592

1143

2354

4275

9221

 Standard

928

1782

3667

7360

14362


Economy

1156

2212

4551

9134

17824

1600 x 1200

 Fine

1303

2487

5118

10272

20045

 Standard

2066

3896

8015

16085

31389


Economy

2452

4597

9457

18979

37035

x

640 x 480

 Fine

5511

9856

20276

40689

79397

 Standard

12292

19974

41090

82457

99998


Economy

12268

19974

41090

82457

99998

Size


Quality

SD/SDHC

 memory card capacity

1GB

2GB

4GB

SDHC

8GB

SDHC

16GB

SDHC

HD

1280 x 720

 Fine

00:06:22

00:12:24

00:25:32

00:51:15

01:40:00

 Standard

00:06:31

00:12:42

00:26:08

00:52:27

01:42:22

x

640 x 480

 Fine

00:08:43

00:16:58

00:34:35

01:10:05

02:16:45

 Standard

00:09:58

00:19:25

00:39:57

01:20:11

02:36:27

320 x 240

 Fine

00:26:38

00:51:53

01:46:45

03:34:13

06:57:59

 Standard

00:32:47

01:03:51

02:11:21

04:23:35

08:34:20

Summary of Contents for IC-12

Page 1: ...lation If this equipment does cause harmful interference to radio or television reception which can be determined by turning the equipment off and on the user is encouraged to try to correct the inter...

Page 2: ...ome with your camera may be different from those described in this manual This is due to the fact that different retailers often specify slightly different product inclusions and accessories to suit t...

Page 3: ...he indicated power supply voltage Use with any other power supply voltage might cause fire or electric shock Do not use the camera in areas near water This might cause fire or electric shock Take spec...

Page 4: ...precision instrument Do not drop it strike it or use excessive force when handling the camera This might cause damage to the camera Do not use the camera in humid steamy smoky or dusty places This mi...

Page 5: ...If the battery is not to be used for a long period of time remove it from the camera to prevent leakage or corrosion and store it after no battery power is left Stored for a long time in a fully char...

Page 6: ...ng Shots using Face Detection Technology 18 Self portrait Function 19 VIDEO MODE 19 Recording Video Clips 19 Playing Back Video Clips 20 PLAYBACK MODE 20 Playing Back Still Images 20 Playback Display...

Page 7: ...Equipped with a 12 0 megapixel CCD this camera is capable of capturing images with a resolution of up to 3968 x 2976 pixels Package Contents Carefully unpack your camera and ensure that you have the f...

Page 8: ...Focus Next 10th image 5 Compensation s P Previous Image 6 Flash Next Image 7 If any scene mode is set switches to scene mode selection screen Still image to display image Video clip to play video clip...

Page 9: ...ize resolution 3968 x 2976 3264 x 2448 2304 x 1728 1600 x 1200 x 640 x 480 11 Shortcut 12 Date and time 13 Quick shot 14 Capture mode icon Single T Continuous U AEB Auto Exposure Bracketing Album Shot...

Page 10: ...ality 11 ISO 12 Mode icon Playback mode Video playback 1 Protect icon 2 Folder File number 3 Storage media 4 Battery condition 5 Volume mode 6 Total recorded time 7 Video status bar 8 Video condition...

Page 11: ...e card To prevent damaging of an SD SDHC memory card be sure to turn off the power when inserting or removing the SD SDHC memory card If inserting or removing the SD SDHC memory card with the power on...

Page 12: ...button and set the camera mode to or or press the 7 button 2 Press the MENU button 3 Select the Setup at the end of the Menu with the c d buttons and press the SET button 4 Select Date Time with the c...

Page 13: ...The setting will be stored 6 To exit from the Setup menu press the MENU button Formatting the Memory Card or Internal Memory This utility formats the memory card or internal memory and erases all sto...

Page 14: ...Turn the zoom lever to side to zoom in on the subject and enlarges the subject on the LCD monitor Turn the zoom lever to side to zoom out on the subject and provides a wider angle image 4 Press the s...

Page 15: ...ted Anti shake This mode minimizes the influences of hand shaking when you want to capture an image Panorama Select this mode when you want to capture a series of shots then stitch them together with...

Page 16: ...ubjects like printed documents Sunset Select this mode when you want to capture a sunset This mode helps keep the deep hues in the scene Sunrise Select this mode when you want to capture a sunrise Thi...

Page 17: ...in the sequence 7 Finish the sequence by pressing the MENU button or switch to another mode after the last image has been recorded Taking Images When the Smile Feature Is On With the camera s new smi...

Page 18: ...it turns red 4 Press the shutter button down fully to capture your image Subjects that are not suitable with this function a A person is wearing glasses sunglasses or face is covered with hat or hair...

Page 19: ...ack Video Clips You can play back recorded video clips on the camera 1 Press the 7 button The last image appears on the screen 2 Select the desired video clip with the e f buttons 3 Press the SET butt...

Page 20: ...age that you want and playback images on the LCD monitor sequentially 1 Press the 7 button The last image appears on the screen 2 Press the c button to display the next 10th image If the 1st image tak...

Page 21: ...process ends this replaces the original image with the corrected image Dynamic Lighting Feature This feature compensates for the unfavorable lighting conditions by brightening underexposed areas and...

Page 22: ...All has been selected is displayed with all the images Canceling the Protection To cancel protection for only one image display the image on which you want to remove the image protection 1 Press the...

Page 23: ...the last image All Erases all of the images except for the protected images 6 Select Execute with the e f buttons and press the SET button To not erase select Cancel and press the SET button 7 To exit...

Page 24: ...ing images When the sensitivity is raised and the ISO figure is increased photography will become possible even in dark locations but the more pixelated grainier the image will appear Auto ISO100 ISO...

Page 25: ...n is measured to calculate the correct exposure Average The exposure is measured all of the image area Single Captures one image at a time Continuous Permits continuous capture of up to 3 images AEB P...

Page 26: ...nu press the MENU button Size This sets the size of the video clip that will be captured HD VGA QVGA Quality This sets the quality compression at which the video clip is captured Fine Standard Color T...

Page 27: ...re for further details Slide Show This function enables you to play back your still images automatically in order one image at a time 3 Sec 5 Sec 10 Sec Rotate If you wish to rotate a still image 90 d...

Page 28: ...rd Of course you can only do this if you have a memory card installed and some files in internal memory All files remain in the internal memory even after copy to the SD SDHC memory card from the inte...

Page 29: ...Refer to the section in this manual titled Setting the Date and Time for further details Language Refer to the section in this manual titled Choosing the Language for further details Auto Off If no o...

Page 30: ...the LCD monitor Standard Bright Format Refer to section in this manual titled Formatting the Memory Card or Internal Memory for further details Media Info This displays the free capacity of the inter...

Page 31: ...ly Your computer system must include the items Microphone Sound card Speakers or headphones Network or Internet connection Install the PC camera driver The PC camera driver included in the CD ROM is e...

Page 32: ...ith family and friends by email or the web Arcsoft Panorama Maker 4 0 Like magic ArcSoft Panorama Maker 4 turns any series of overlapping photos into a gorgeous panoramic image in just seconds The pro...

Page 33: ...image storage Supports SD SDHC memory card up to 16GB optional File format DCF JPEG EXIF 2 2 Motion JPEG AVI HD720p 30fps Lens 3x optical zoom lens Aperture range 3 1 W 5 9 T Focal length 6 3mm 18 9mm...

Page 34: ...90 6227 3264 x 2448 Fine 244 474 978 1963 3832 Standard 453 877 1805 3623 7072 Economy 560 1082 2228 4473 8729 2304 x 1728 Fine 592 1143 2354 4275 9221 Standard 928 1782 3667 7360 14362 Economy 1156 2...

Page 35: ...protected Remove the write protection Images do not appear on the LCD monitor LCD monitor is dark Adjust the brightness of the LCD monitor in the menu Although it is set to auto focus it does not focu...

Page 36: ...X X X Night Portrait O X X O X X Night Scene X X O X X X Candlelight X X O X X X Fireworks X X O X X X Text X X O X X X Sunset X X O X X X Sunrise X X O X X X Splash Water O O O O O O Flow Water X X O...

Reviews: