background image

93901 5 01/18

Translation of the Original Operation Manual

Übersetzung der Originalbetriebsanleitung

GB

16

3 .7  Customization of automatic 

oiler output

The automatic oiler output can be adapted to your re-

quirements:

a) Ample Mode: 

25% more oil is transported to 

the cutting mechanism than in normal mode.

b) Normal Mode - default setting

c) Scarce Mode: 

25% less oil is transported to the 

cutting mechanism than in normal mode.

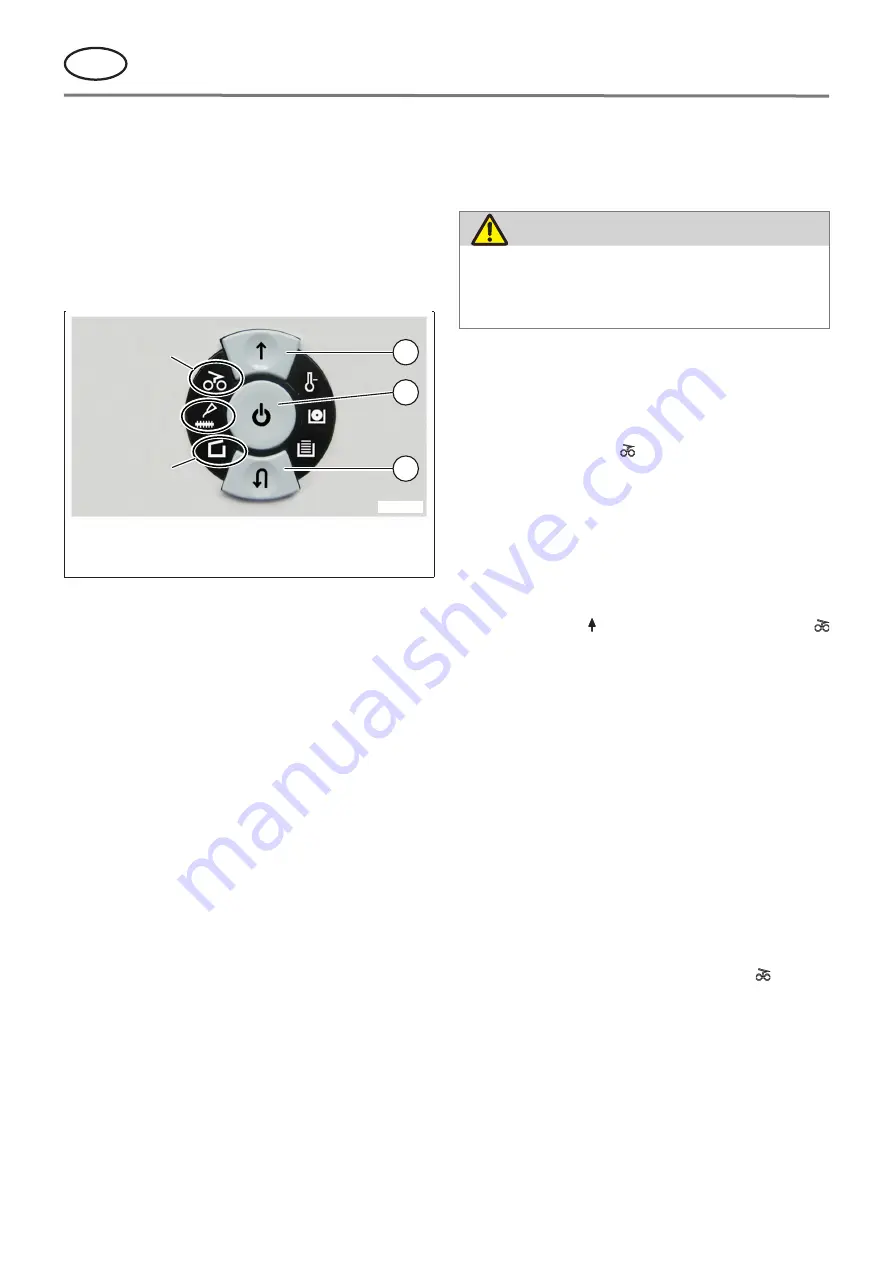
1

2

3

000144

Ample

 Mode 

(+25%)

Normal

 Mode

Scarce

 Mode

-25%

1

Forwards button

2

Functions button

3

Reverse button

fig. 5  Customization of automatic oiler output

For customizing the automatic oiler output proceed as 

follows:

1 . 

The machine must be switched off.

2 . 

Open the door.

3 . 

Press and hold the forward button (fig. 5/1) and the 

reverse button (fig. 5/3) simultaneously.

4 . 

Additionally press and let go of the function but-

ton (fig. 5/2).


¾

All LED indicators on the display light up.

5 . 

Let go of the forward button and the reverse but-

ton.


¾

Now you are in the memory mode.

6 . 

Press the forward button 

twice

 (fig. 5/1).


¾

Now you are in the customization mode for au-

tomatic oiler output.


¾

The LED indicator on the left side flashes show-

ing the current settings.

7 . 

Press the function button (fig. 5/2) so often until 

the needed oiler output mode comes on.


¾

Each time you press the function button the 

output mode changes (Ample, Scarce, Normal)

8 . 

Press the reverse button (fig. 5/3).


¾

Now you are again in the memory mode.

9 . 

Press the function button.


¾

The selected settings are saved.


¾

The machine switches off.

10 . 

Close the door.

If you want to continue shredding turn the machine 

on: press the function button (fig. 5/2) briefly.

4  Malfunctions

4 .1  Material jam in the machine

(auto-reverse-funktion)

CAUTION!

Danger of injury!

Remove the material carefully because the-

re is the risk of being injured by the sharp 

cut surfaces.

If a jam is caused by too much material being fed in the 

following happens:
•  The cutters jam, then run in reverse for a short time 

(material is released) and stop.

•  The motor switches off.

•  The control display   (fig. 3/9) comes on. Proceed 

as follows:

Jam on the paper side (wide feed slot, fig . 1/2)
1 . 

Remove any returned paper or briefly press the 

forward button (fig. 3/2).


¾

The cutters now run forwards automatically and 

shred the remaining paper in the cutters. During 

the forward run the forward button (fig. 3/2) 

LED display   comes on. The control display   

(fig. 3/9) goes out.

2 . 

Continue shredding with less paper.

Jam of the data media side (narrow feed slot, 

fig . 1/1)
1 . 

Press the forward button (fig. 3/2) briefly.


¾

The material is once again fed to the cutting sys-

tem.

2 . 

If necessary, switch the cutters manually alterna-

tely from forward to reverse until the material has 

gone through completely and been shredded.

4 .2  Light barrier covered when ma-

chine turned on

Should there still be material in the feed slot when the 

machine is switched on the control display   (fig. 3/9) 

comes on.

1 . 

Remove the material or

2 . 

Press the forward button (fig. 3/2) briefly.


¾

The existing material is fed to the cutters and 

shredded.

Summary of Contents for 175 hybrid

Page 1: ...000071 Betriebsanleitung D Operating instructions GB Instructions d op ration F Instrucciones de uso E 175 hybrid 93901 5 01 18...

Page 2: ...page 11 18 F Instructions d op ration page 19 26 E Instrucciones de uso p gina 27 34 Vor der Inbetriebnahme die Betriebsanleitung durchlesen Before operating please read the Operating Instructions Veu...

Page 3: ...Maschine und frei zug ngig sein Die Maschine nur in geschlossenen und temperierten 10 25 C R umen einsetzen Offene Geh uset r stets langsam schlie en um die Elektronik nicht zu gef hrden Das Ger t da...

Page 4: ...chlitz Abb 1 1 Nur zur Zerkleinerung von CDs und DVDs verwenden Rechte Schneidwerkseite breiter Schlitz Abb 1 2 Nur zur Zerkleinerung von Papier verwenden 1 2 3 000073 1 Linke Schneidwerkseite f r CDs...

Page 5: ...der Rubrik St rung auf Seite 8 a Motor berlastung Leuchtet auf wenn der Motor berlastet wor den ist und abgeschaltet hat Die Maschine kann w hrend der Abk hlphase des Motors nicht ge startet werden b...

Page 6: ...hickt werden 3 3 Materialzuf hrung ACHTUNG Besch digung der Maschine F hrenSiedemGer tniemalsmehralsdie angegebene H chstmenge Material zu siehe Technische Daten auf Seite 10 Sollte zuviel Material in...

Page 7: ...S Um bei abgeschaltetem Motor den Shredder vorgang noch zu beenden denVorw rtstaster Abb 3 2 gedr ckt halten Das Schneidwerk l uft noch ca vier Se kunden vorw rts Dieser Vorgang l sst sich nur einmal...

Page 8: ...sich wieder im Speichermodus 9 Funktionstaster dr cken Die ausgew hlte Einstellung wird gespeichert Die Maschine wird abgeschaltet 10 Die T r schlie en Wenn Sie mit der Zerkleinerung fortfahren wollen...

Page 9: ...Ger t Folgen Sie den Instruktionen bei Materialstau im Ger t auf Seite 8 Ist der Motor berlastet worden Siehe unter Motorschutz auf Seite 9 HINWEIS In vielen F llen hilft ein Neustart der Maschine 1 M...

Page 10: ...haltet die Maschine automatisch ab HINWEIS Solange der Tropfschlauch mit l bef llt wird kann die Maschine nicht shreddern 5 4 Energiespar Automatik Wird die Maschine nicht benutzt schaltet sie auto ma...

Page 11: ...closed The mains connection at the machine must be freely accessible Only operate the machine in enclosed rooms at temperatures between 10 C and 25 C Always close the open housing door slowly to prev...

Page 12: ...the cutting mechanism narrow slot fig 1 1 Only use for shredding CDs and DVDs Right hand side of the cutting mechanism wide slot fig 1 2 Only use for shredding paper 1 2 3 000073 1 Left hand side of...

Page 13: ...elevant description under the section Malfunctions p 16 a Motor protection Comes on when the motor has been overloaded and has switched off The machine cannot be started while the motor is cooling dow...

Page 14: ...splay comes on for Ready The machine can be loaded 3 3 Material feed CAUTION Damage to the machine Never feed the shredder with a quanti ty of material exceeding the maximum indicated Refer to Technic...

Page 15: ...NOTE To complete the shredding process when the motor is switched off press and hold the for ward button fig 3 2 The cutting mechanism continues to run forward for approx four seconds This process ca...

Page 16: ...memory mode 9 Press the function button The selected settings are saved The machine switches off 10 Close the door If you want to continue shredding turn the machine on press the function button fig 5...

Page 17: ...off the machine once 2 Turn the machine on again If none of these test points apply please contact your dealer 5 Maintenance Disposing 5 1 To change the oil container Cross cut cutting mechanisms must...

Page 18: ...as been filled with oil the machi ne switches off automatically NOTE The machine cannot shred while the drip tube is being filled with oil 5 4 Automatic energy saving If the machine is not used for a...

Page 19: ...couvrir Le raccordement au secteur de la machine doit tre librement accessible et doit se trouver proximit de la machine Utiliser la machine uniquement dans des locaux ferm s et temp r s 10 25 C Toujo...

Page 20: ...e de la fiche secteur voir les indications concernant le fusible auxiliaire requis pour la prise secteur dans les Caract ristiques techniques p 26 3 Utilisation 3 1 Elements de commande 000077 2 3 4 5...

Page 21: ...capteur de porte pr sente un dysfonctionnement lectrique La moteur s teint Veuillez en informer votre distributeur sp cialis 8 Voyant de contr le fig 3 8 a Changement du r servoir d huile Le voyant de...

Page 22: ...broyage de films transparents il con vient de commuter la machine manuellement sur la marche avant maintenir la touche mar che avant fig 3 2 enfonc e Il est possible d interrompre tout moment le proc...

Page 23: ...harge p ex l affichage s allume en rouge en marche vide Il ne s agit pas d un d faut de qualit L affichage de char ge se normalise apr s plusieurs destructions 3 7 Modifier le volume d huile Le volume...

Page 24: ...ue la mat riel soit compl tement d truit 4 2 Barriere lumineuse occupee lors de la mise en marche S il y a encore du mat riau dans la bouche d alimentation en enclenchant la machine le voyant de contr...

Page 25: ...cellules photo electriques 000078 fig 7 Nettoyage des cellules photoelectriques Il est possible que des morceaux de papier restent dans la rainure d admission par ex apr s un bourrage de papier et em...

Page 26: ...de coupe 0 8 x 4 5 mm Cross Cut Capacit de coupe 8 10 feuilles 70g m2 7 9 feuilles 80g m2 Largeur de travail 265 mm C t support de donn es Taille des particules 1 2 x 2 mm Cross Cut Capacit de coupe...

Page 27: ...tiene que encontrarse en un lugar f cilmente accesible y en las inmediaciones de la m quina La m quina s lo se deber usar en recintos cerrados y con temperaturas comprendidas entre 10 25 C Cierre siem...

Page 28: ...anismo de corte ranura est recha Fig 1 1 utilizar solo para el desmenuzamiento de CD y DVD Lado derecho del mecanismo de corte ranura ancha Fig 1 2 utilizar solo para el desmenuzamiento de papel 1 2 3...

Page 29: ...ontrol Fig 3 3 Sobrecarga de motor Aver a el ctrica Para el modo de proceder consulte la descripci n correspondiente en el apartado Averia p 32 a Guardamotor Se enciende cuando el motor se ha sobrecar...

Page 30: ...se encender para la funci n Listo para el uso A continuaci n se puede empezar a alimentar el aparato 3 3 Alimentaci n de material Atenci n Da os a la m quina No introduzca nunca en el aparato m s mat...

Page 31: ...g 3 5 se enciende NOTA Para finalizar el proceso de desmenuzamiento con el motor desconectado mantenga accio nado el pulsador de avance Fig 3 2 El mecanismo de corte seguir avanzan do unos cuatro segu...

Page 32: ...oceso Se vuelve a encontrar en el modo de almacena miento 9 Accione el pulsador funcional Se guardar el ajuste seleccionado La m quina se apagar 10 Cierre la puerta Si desea continuar con el triturado...

Page 33: ...ato p 32 Se ha sobrecargado el motor Consulte el apartado Guardamotor p 33 NOTA En muchos casos es til reiniciar la m quina 1 Desconecte la m quina una vez 2 Vuelva a conectar la m quina Si su aparato...

Page 34: ...uina autom ticamente NOTA Mientras el conducto del aceite contenga li quido en su interior la maquina no puede tri turar 5 4 Funci n autom tica de ahorro energ tico Si el aparato no se utiliza durante...

Page 35: ...8 Juin 2011 sur la limitation de l utilisation de certaines substances dangereuses dans les quipements lectriques et lectroniques Le produit mentionn correspond aux normes cit es ci apr s Confirmamos...

Page 36: ...Ernst Melchior Gasse 20 4 OG Top 6 1020 Wien 43 0 1 2583621 0 contact at intimus com Belgium intimus International Belgium NV Wayenborgstraat 22 2800 Mechelen 32 0 15 29 46 30 infobel intimus com Neth...

Reviews: