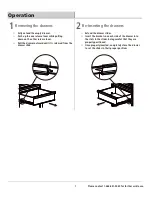
International INT52MWC10GRN Use And Care Manual Download Page 6


A

D

AA


Assembly 


6


Attaching the casters


Be sure the drawers are locked and lay the cabinet (A) 


e

m

a

s


e

h

n

o

 ,

ti

n

u


e

h

o

)

D

s

r

e

t

s

a

c

 l

e

v

i

w

s


e

h

h

c

a

t

t

A


side as the handle, inserting bolts (AA)

                                                               through the swivel 
casters(D) and into the cabinet (A). 


Tighten with supplied hex key (CC) or 12 mm wrench/socket.

Repeat this process for the  xed casters (C) on the 

opposite side of the cabinet (A).


Return the cabinet (A) to its upright position.


CAUTION:


Do not over tighten the bolts.


2


Installation of Power Cord

4

Untie power cord located inside drawer.
Gently pull cord plug through grommet.


1

Attaching the cabinet handle


Position the cabinet handle (B) over the holes on the 

cabinet (A).


Attach with the bolts (BB) and tighten with supplied 

hex key

 (CC).

NOTE

The holes in the cabinet are tapped and do not 

require nuts.  


CAUTION:

Two people are recommended for assembly.


Attaching the storage hook

3

□ 

Position the storage hook (E) over the holes on the 
cabinet (A).


Attach with the bolts (BB) and tighten with supplied 

hex key

 (CC).

A

E

BB

NOTE


One handle comes with this cabinet and can be 

installed on either the left or right side.  If a second 

handle is desired, please call 1-866-441-5080 to order.

A

B

BB

Summary of Contents for INT52MWC10GRN

Page 1: ...ducts designed to enhance your home Visit us online to see our full line of products available for your home improvement needs Thank you for choosing International Model Store SKU Internet SKU INT52MW...

Page 2: ...uct You may fall which may cause personal injury or Be careful when opening more than one drawer The product may become unstable and tip which may cause personal injury or product damage CAUTION Keep...

Page 3: ...as one power supply cord Make sure the cord is unplugged before any servicing or cleaning 3 NOTE This equipment has been tested and found to comply with the limits for a Class B digital device pursuan...

Page 4: ...uct is found to be defective the manufacturer s only obligation and your exclusive remedy is the repair or replacement of the product at the manufacturer s mishandling This warranty shall not apply to...

Page 5: ...66 441 5080 for further assistance 5 Part Description Quantity A B C Cabinet 1 Cabinet handle 1 D 2 2 2 Swivel caster Storage hook E Fixed caster Package Contents continued NOTE The keys are inside to...

Page 6: ...lation of Power Cord 4 Untie power cord located inside drawer Gently pull cord plug through grommet 1 Attaching the cabinet handle Position the cabinet handle B over the holes on the cabinet A Attach...

Page 7: ...n o e h t p u h s u P pulling down on the other release lever Pull the drawer outward until it is released from the drawer slide Extend the drawer slides Insert the brackets on each side of the drawe...

Page 8: ...nsion cord from supply before handling wet charger or cords Only use chargers and batteries that are intact and operating properly Do NOT touch metal prongs when plugging charger into extension cord D...

Page 9: ...41 5080 Drawer Liner 10 A Cabinet Handle 1 B 2 C 2 D Lock 1 F Badge 1 H Drawer Slide 25 G Caster Bolt 16 I 4 J Key 2 E Part Description Quantity Fixed Caster Swivel Caster Handle Bolt K Outlet 1 L Out...

Page 10: ...Questions problems missing parts Before returning to the store call Customer Service 9 a m 6 p m EST Monday Friday 1 866 441 5080 Retain this manual for future use...

Reviews: