


10
11
2.
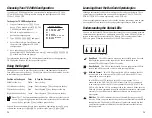
In the Default Router field, enter the IP address of the default router. The IP
address must be in the form n.n.n.n, where each n is a number from 0 to
255. You must separate each n by a period.
(2415 Only) Configure the Radio Parameters
The 2415 communicates with a host computer in an RF network either through
access points and the DCS 30X or directly through the access points. All RF
devices that must communicate with each other must contain the same radios.
The terminal ships with one of these radio options: WLI Forum OpenAir or
IEEE 802.11b.
Depending on the radio that is in the devices, you must match certain parameters
on the 2415s and on the access points.
Press
(
\
2
4
8
to enter the TRAKKER Antares 2400 Menu System. Choose
Configuration Menu, Communications Menu, and then choose Radio.
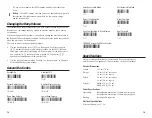
To configure the OpenAir radio parameters
1.
In the Domain field, enter a number from 0
to 15. The terminal can only communicate
with access points that have the same
domain.
2.
In the Security ID field, enter up to 20
alphanumeric characters or leave the field
blank. The terminal can only communicate
with access points that have the same
security ID.
To configure the 802.11b radio parameters
1.
In the Network Name field, enter up to 32
alphanumeric characters. The terminal can
only communicate with access points that
have the same network name
2.
Configure the security parameters:
•
(non-802.1x security) Enable WEP
Encryption and select a WEP Transmit
Key. Enter a WEP key value: WEP 64
requires 5 ASCII characters or hex pairs
and WEP 128 requires 13 ASCII
characters or hex pairs.
•
(802.1x security) Configure the User Name and Password.
7
Note: If you are using the WTP network, you do not need to configure
the Advanced Network parameters.
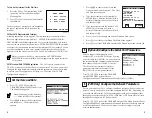
To configure the Primary Network parameters
1.
In the Activate field, press
(
=
or
(
>
to select 2.4 GHz RF (OpenAir radio) or
802.11 DS (802.11b radio).
If you are using the WTP network, you
only need to configure the Activate field.
2.
(UDP Plus) In the Controller IP Address
field, enter the IP address of the DCS 30X
in your network. The IP address must be in
the form n.n.n.n, where each n is a number
from 0 to 255. You must separate each n by
a period.
(TCP/IP) In the Host IP address field, enter the IP address of the host that
you want the terminal to communicate with. The IP address must be in the
form n.n.n.n, where each n is a number from 0 to 255. You must separate
each n by a period.
3.
In the Terminal IP Address field, enter the IP address of the terminal. The IP
address must be in the form n.n.n.n, where each n is a number from 0 to
255. You must separate each n by a period.
If you are using a DHCP (Dynamic Host Configuration Protocol) server in a
TCP/IP network, you can leave the default terminal IP address as 0.0.0.0 to
enable the 2415 as a DHCP client. For help, see “DHCP (Terminal)” in the
2400 Family system manual.
To configure the Advanced Network parameters
Note: If the DCS 30X or the host is on a
different subnetwork from the terminal,
you must configure the subnet mask and
the default router.
1.
In the Subnet Mask field, enter the mask
that is used to separate the subnetwork
address from the terminal IP address. The
subnet mask must be in the form n.n.n.n,
where each n is either 0 or 255. You must
separate each n by a period.
241XG002.eps
PRIMARY NETWORK
Activate:
Disabled
Disabled
Controller IP Addr:
0.0.0.0.
Terminal IP Address:
0.0.0.0.
OK
CANCEL
241XG003.eps
ADVANCED NETWORK
Loopback:
Disabled
Network Port: O5555
Subnet Mask:
255.255.255.0
Default Router
0.0.0.0.
Controller Connect Chk
Send Timer: 0035 sec
Recv Timer: 0060 sec
Retries: 07
more
241XG004.eps
RADIO
Domain:
00
Security ID:
(ID unchanged)
Wakeup on Broadcast:
No
Roam Flag:
Allowed
Transmit Mode: BFSK
Inactivity Timeout:
5 Sec
OK
CANCEL
241XG005.eps
RADIO
Network Name:
Station Name:
Medium Reservation:
Enabled
Resv. Threshold:
0500
Transmit Rate:
Max Available
Tx Rate Fallback:
Enabled
more


