background image

4


TVR 45HD Quick Start Guide


Name 

Description 

11

.


Archive button


Press once to enter quick archive mode. Press twice to start archiving. The 
indicator blinks green when data is being written to a backup device.


12

.


USB Interface


There are two USB ports. Use the USB ports to archive video, upgrade firmware, 
use a USB mouse or connect a USB CD/DVD burner.


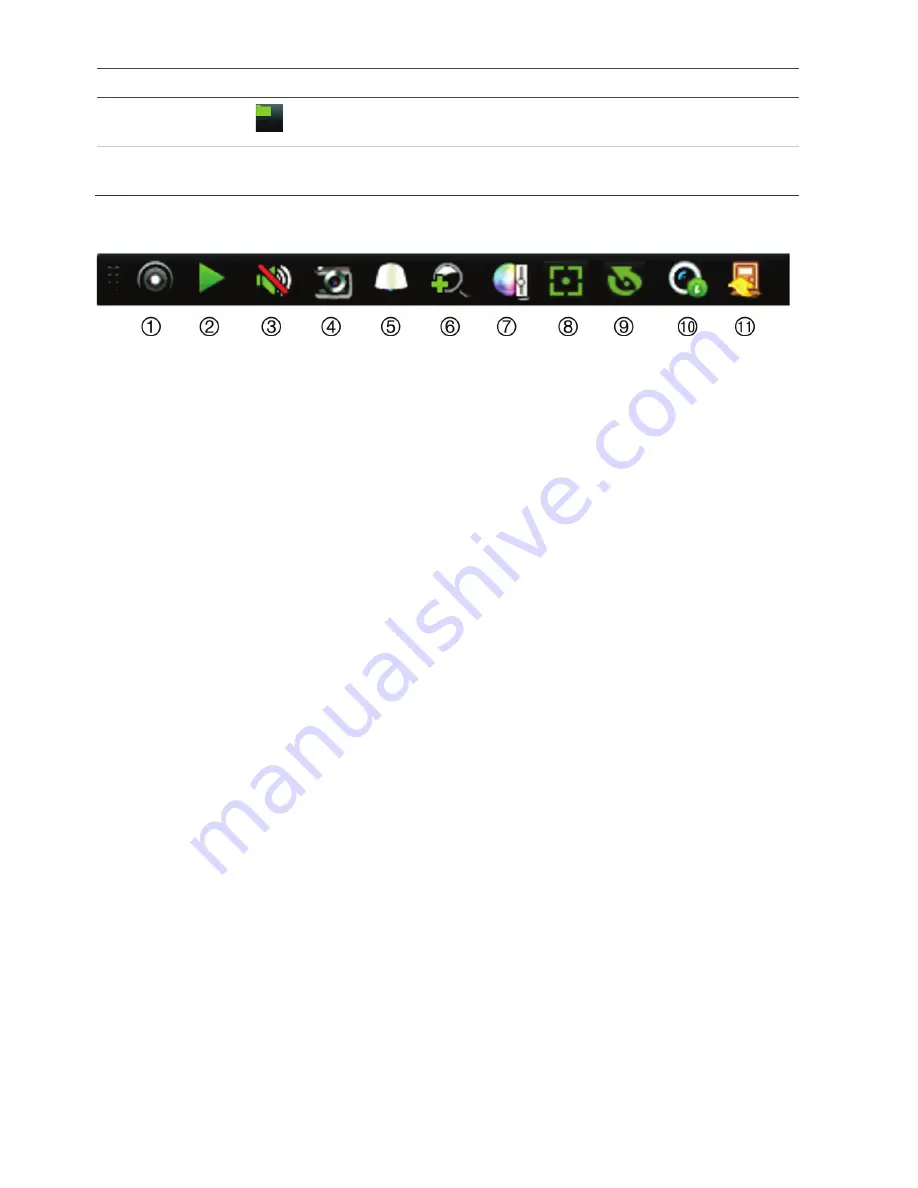
Figure 3: 

Live view toolbar


1. 

Start Manual recording

: Start/stop manual 

recording

2. 

Instant Playback

: Play


back the recorded 

video from the last five minutes.


3. 

Audio On

Enable/disable audio output.


4

Snapshot

: Capture a snapshot of a video 

image.


5

PTZ Control

: Enter PTZ control mode.


6. 

Digital Zoom

Enter digital zoom


mode

7. 

Image Settings

Modify the image lighting levels.


8

Auxiliary Focus

: Automatically focus the camera 

lens


(if supported).


9. 

Lens Initialization

:


Initialize


the lens of a camera 

with a motorized lens


10.

 Stream Informatio

n: Display the real

-

time frame 

rate, bit rate, resolution and video compression.


11. 

Close

Close the toolbar.


Package contents 

The TruVision DVR 45HD


(model TVR 45HD) 

is shipped with the following items:


IR (infrared) remote control


Two AAA batteries for the remote control


AC power cords 


USB mouse


Recorder


CD with software and manuals


TruVision DVR 45HD


Quick Start Guide


TruVision DVR 45HD


User Manual (on CD)


TruVision Recorder Operator Guide (on 

CD)


Installation environment 

Refer to the user manual for detailed 

information, but observe these important 

requirements:


Place the unit in a secure location.


Ensure that the unit is in a well

-

ventilated 

area.


Do not expose the unit to rain or moisture.


Quick install 

Recommended steps for setting up the 

recorder

1. 

Connect all the devices required to the 

back panel of the recorder. See Figure 1 

on page 

1.  

Basic connections: 

Connect the cameras to the BNC camera 

inputs and monitor A to a


VGA or HDMI 

output. Connect the mouse to the USB port 

in the front panel.


Optional connections: 

All the other connections shown are 

optional and depend upon installation 

requirements.


2. 

Connect the power cable


and turn on the 

power.


3. 

Set up the unit with the required settings 

using the setup Wizard.


Summary of Contents for TVR 45HD

Page 1: ...ct up to four alarm outputs 8 Power switch on off 9 Connect up to 8 analog cameras to BNC type connectors depends on the recorder model 10 Connect to a BNC monitor event monitor only 11 Connect to an...

Page 2: ...ack and playback modes press to display or hide the time or control bar In PTZ mode stop all ongoing operations Select or deselect an item Enter a selected folder of the external storage device such a...

Page 3: ...yback a camera in the reverse direction Pause In live view mode freeze the last image of the live display for all active cameras displayed In playback mode stop playback Play In live view mode play al...

Page 4: ...ression 11 Close Close the toolbar Package contents The TruVision DVR 45HD model TVR 45HD is shipped with the following items IR infrared remote control Two AAA batteries for the remote control AC pow...

Page 5: ...he remote control To connect the remote control to the recorder 1 Press Menu on the front panel or right click the mouse and select Menu The main menu screen appears 2 Select Display Mode Settings Mon...

Page 6: ...that lets you edit a group of settings Most menus are available only to system administrators Refer to the recorder user manual for detailed information on configuring the unit To access the main menu...

Page 7: ...50 to 60 Hz Power consumption without HDD TVR 4508HD TVR 4516HD 45 W 65 W Operating temperature 10 to 55 C 14 to 131 F Relative humidity 10 to 90 Dimensions W x H x D TVR 4508HD TVR 4516HD 445 390 70...

Page 8: ...nfo ES Eliminaci n de equipos Los productos marcados con este s mbolo no se pueden eliminar como basura normal sin clasificar en la Uni n Europea Para el reciclaje apropiado devuelva este producto a s...

Page 9: ...u fornecedor local na compra de novo equipamento equivalente ou entregue o nos pontos de recolha designados para o efeito Para mais informa es ver www recyclethis info RO Eliminarea echipamentelor In...

Page 10: ...varmistamiseksi palauta tuote paikalliselle j lleenmyyj lle tai palauta se paristojen ker yspisteeseen Lis tietoja sivuilla www recyclethis info FR limination des piles Ce produit contient une batteri...

Page 11: ...recyclethis info RO Eliminarea bateriilor Acest produs con ine o baterie care n Uniunea European nu poate fi aruncat ca de eu municipal nesortat Pentru informa ii specifice privind bateria consulta i...

Page 12: ......

Reviews: