

2 / 2
P/N 1072542B-EN • REV 0.05 • ISS 21JUN12
Programming
Once the camera hardware has been installed, it can then be
configured. Program the camera by attaching a standard video
monitor to the system. Press
Enter
on the camera’s menu
control button to display the Setup menu (see Figure 2).
OSD control button
The on-screen display (OSD) control button (see Figure 1) is a
five-direction joystick that lets you manually control the camera
functions. Table 1 below lists the OSD control button functions
and describes their use.
Table 1: Description of the OSD control button
Button
direction
Description
Up
Moves the cursor upward to select an item
Left
Moves the cursor left to select or adjust the
parameters of the selected item.
Right
Moves the cursor to the right to select or adjust
the parameters of the selected item.
Down
Moves the cursor downward to select an item.
Enter
Press the center of the control pad to display the
Setup menu. If the selected item has its own
menu, press the control pad to enter a submenu.
Using the Setup menu
The Setup menu provides access to the camera configuration
options.
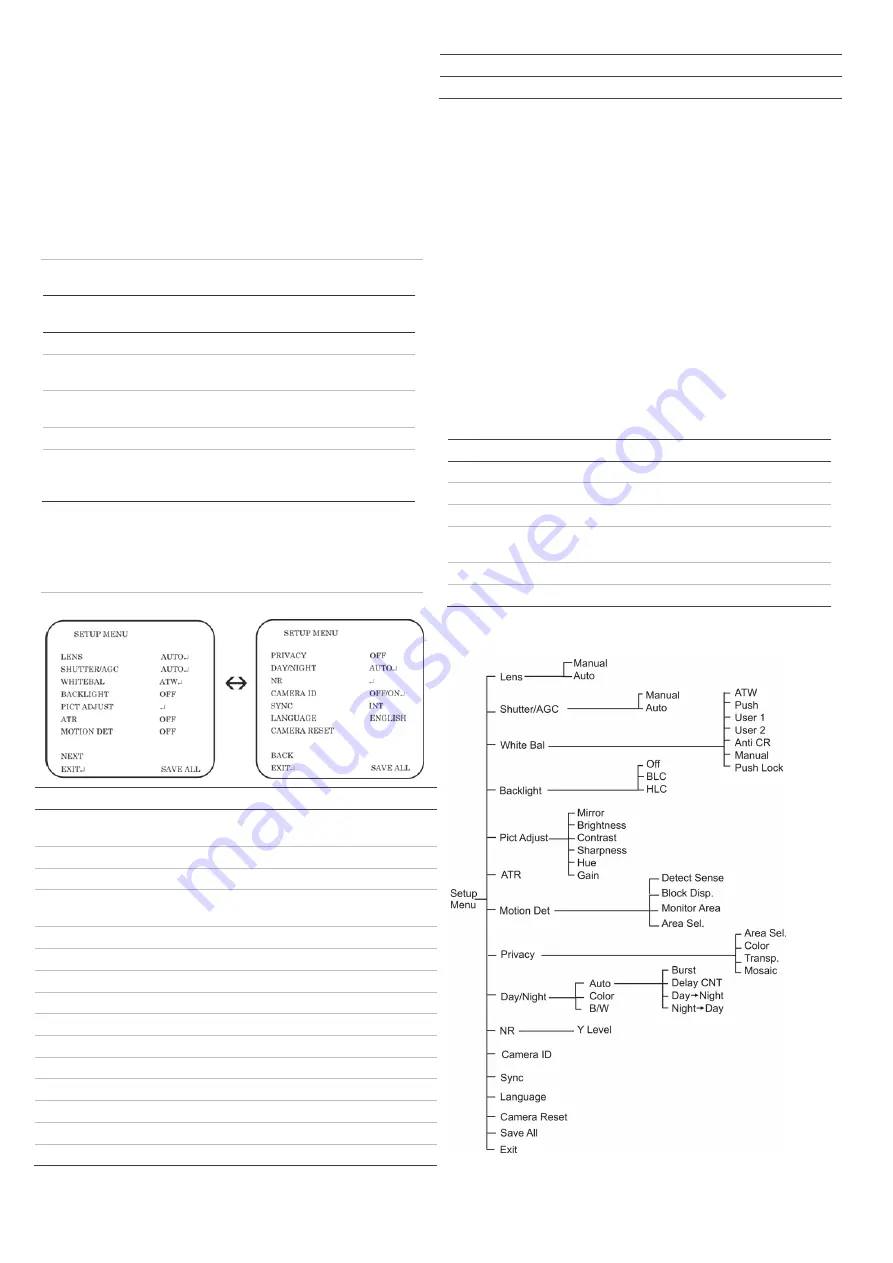
Figure 2: Setup menu screens
Menu item
Description
Lens
Defines the camera ID, mirror, and digital noise
reduction (DNR) set up.
Shutter/AGC
Defines the method of iris control.
White Bal
Defines the white balance (WB) set up.
Backlight
Defines the highlight compensation (HLC) and
backlight compensation (BLC) set up.
Pict Adjust
Defines the image quality functions.
ATR
Defines the adaptive tone-curve reproduction set up.
Motion Det
Defines the motion detection set up.
Privacy
Defines privacy mask set up.
Day/Night
Defines the day/night (D/N) set up.
NR
Defines the digital noise reduction level.
Camera ID
Defines the camera ID displayed on-screen.
Sync
Displays the current synchronization mode.
Language
Defines the language of the OSD.
Camera Reset
Resets the camera to factory default settings.
Save All
Saves changes made.
Menu item
Description
Exit
Exits the menu and returns to live mode.
To access the Setup menu:
1. Press the OSD control button to access the Setup menu
and its submenus.
2. Push the button up/down to move between menu options.
3. Push the button left/right to select an option.
4. Select
Next
to move to the next Setup menu screen and
Back
to return to the previous Setup menu screen.
5. When in a sub menu, select
Return
to return to the
previous menu.
6. To save configuration changes, select
Save All
and press
Enter
.
7. To exit the Setup menu and return to live mode, move the
cursor to
Exit
at the bottom of the screen and press
Enter
.
Specifications
Model TVD-6120VE-2-N(P)
TVD-6125VE-2-N(P)
Power supply
24 VAC / 12 VDC
24 VAC / 12 VDC
Current 290mA
375mA
Power consumption
Max. 3.5 W
Max. 4.5 W
Operating
temperature
-10 to +50 °C (14 to 122 F°)
Weight
800 g (1.76 lbs)
Dimensions (H × Ø)
100 × 140 mm
Menu map


