background image

P/N 1072872-EN 

• REV 

• ISS 

20FEB15 

© 2015 United Technologies Corporation

. Interlogix is part of UTC Building & Indust

r

ial Systems, a unit of United 

Technologies Corporation.  All rights reserved. 


TruVision DVR 12HD Quick Start 

Guide


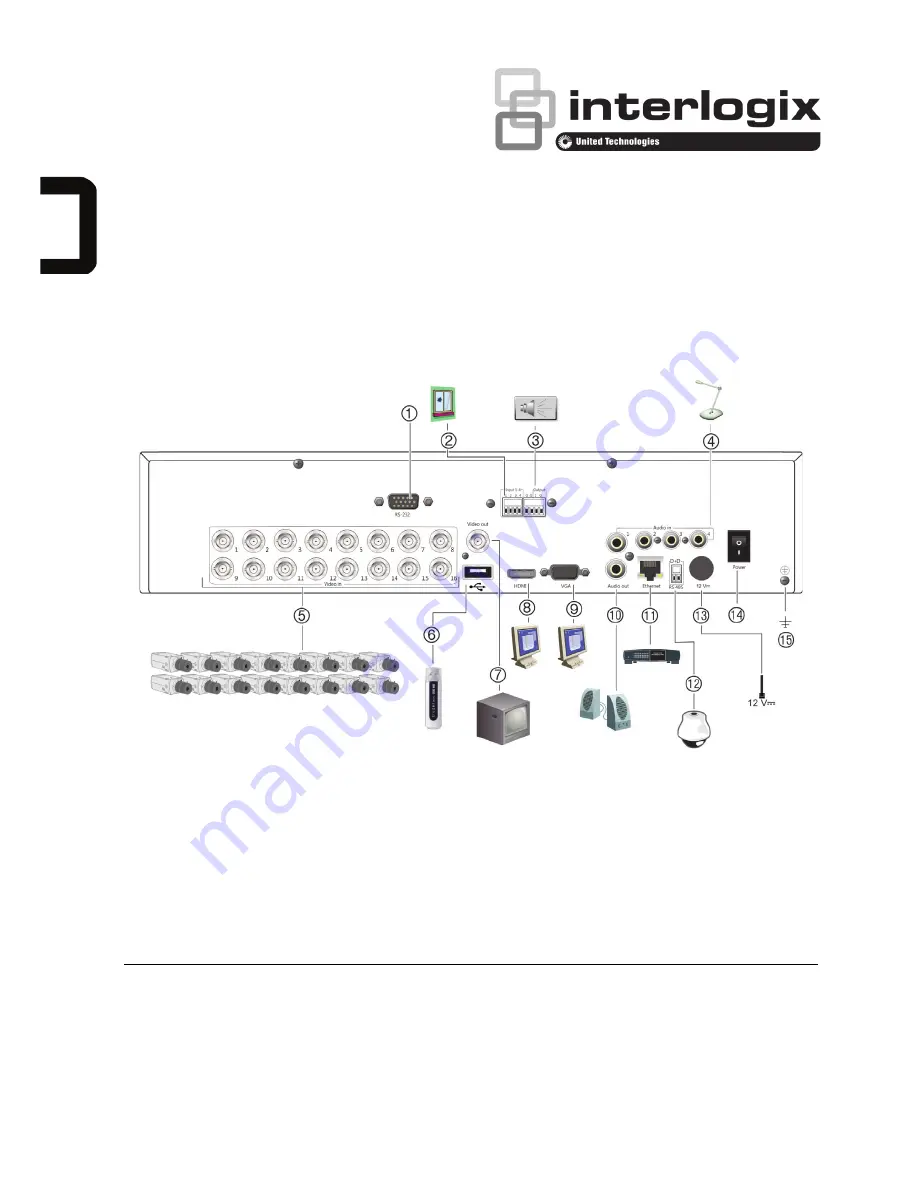
Figure 1: Back panel connections 


1. 

Connect to a RS

-232 device.  

2. 

Connect up to four alarm inputs.


3. 

Connect one alarm output.


4. 

Connect four audio inputs to RCA connectors.


5. 

Connect up to 16 analog cameras to BNC

-

type


connectors (depends on 

the recorder model

).  

6

Connect to an optional USB device such as a 

mouse, CD/DVD burner or HDD.


7. 

Connect one CCTV moni

tor (BNC-

type 

connector).  

8. 

Connect to a HDTV. The HDMI connection 

supports both digital audio and video.


9. 

Connect to a VGA monitor.


10. 

Connect to speakers for audio output. 


11. 

Connect to a network. 


12. 

Connect to a RS

-

485 device such as a PTZ 

camera or a keypad.


13. Connect to the 

12 VDC PSU (includ

ed).  

14. 

Power switch (on/off).


15. 

Connect to ground.


Summary of Contents for TruVision DVR 12HD

Page 1: ... four audio inputs to RCA connectors 5 Connect up to 16 analog cameras to BNC type connectors depends on the recorder model 6 Connect to an optional USB device such as a mouse CD DVD burner or HDD 7 Connect one CCTV monitor BNC type connector 8 Connect to a HDTV The HDMI connection supports both digital audio and video 9 Connect to a VGA monitor 10 Connect to speakers for audio output 11 Connect t...

Page 2: ...control playback Press Enter to confirm menu selection 9 IR receiver 10 Playback buttons Reverse In live view mode use to play back the oldest available video In playback mode play back a camera in the reverse direction Pause In live view freeze the last image for all active cameras In playback mode stop playback Play In live view mode play 24 hour playback of the selected camera In playback mode ...

Page 3: ... the setup Wizard First time use The recorder has an express installation wizard that lets you easily configure basic recorder settings when first used It configures all cameras simultaneously The configuration can then be customized as required By default the setup wizard will start once the recorder has loaded The wizard walks you through some of the more important settings of your recorder Sele...

Page 4: ...rder functions To access the unit open a web browser and enter the IP address assigned to the recorder as a web address In the logon screen enter the default user ID and password User ID admin Password 1234 The default values for recorder network settings are DHCP Disabled by default IP address 192 168 1 82 Subnet mask 255 255 255 0 Gateway address 192 168 1 1 Server Port 8000 HTTP Port 80 RTSP po...

Page 5: ...orage management Configures user settings View system information Provides reference information to the various toolbars and menus within the interface Provides access to logout reboot and shutdown options Camera setup See Table 1 on page 6 for the maximum analog IP camera configuration by recorder model Specifications Power supply 12 VDC Power consumption without HDD TVR 1204 TVR 1208 TVR 1216 10...

Page 6: ... 1 Maximum analog IP camera configuration by recorder model Mix of analog and IP cameras Up to 16 channels Up to 8 channels Up to 4 channels Analog IP Analog IP Analog IP 16 0 8 0 4 0 15 1 7 1 3 1 14 2 6 2 2 2 13 3 5 3 12 4 4 4 11 5 10 6 9 7 8 8 ...

Page 7: ......

Page 8: ......

Reviews: