Intellijel Tetrapad User Manual Download Page 43

10/30/2018

Tetrapad 2.0 Manual - Google Docs

https://docs.google.com/document/d/18AFrtwTCpaE5_dPILqmrodOXnIIEmdZGws2Kx_eEC4M/edit#heading=h.akbpz6132fpo

43/63


Tetrapad Manual


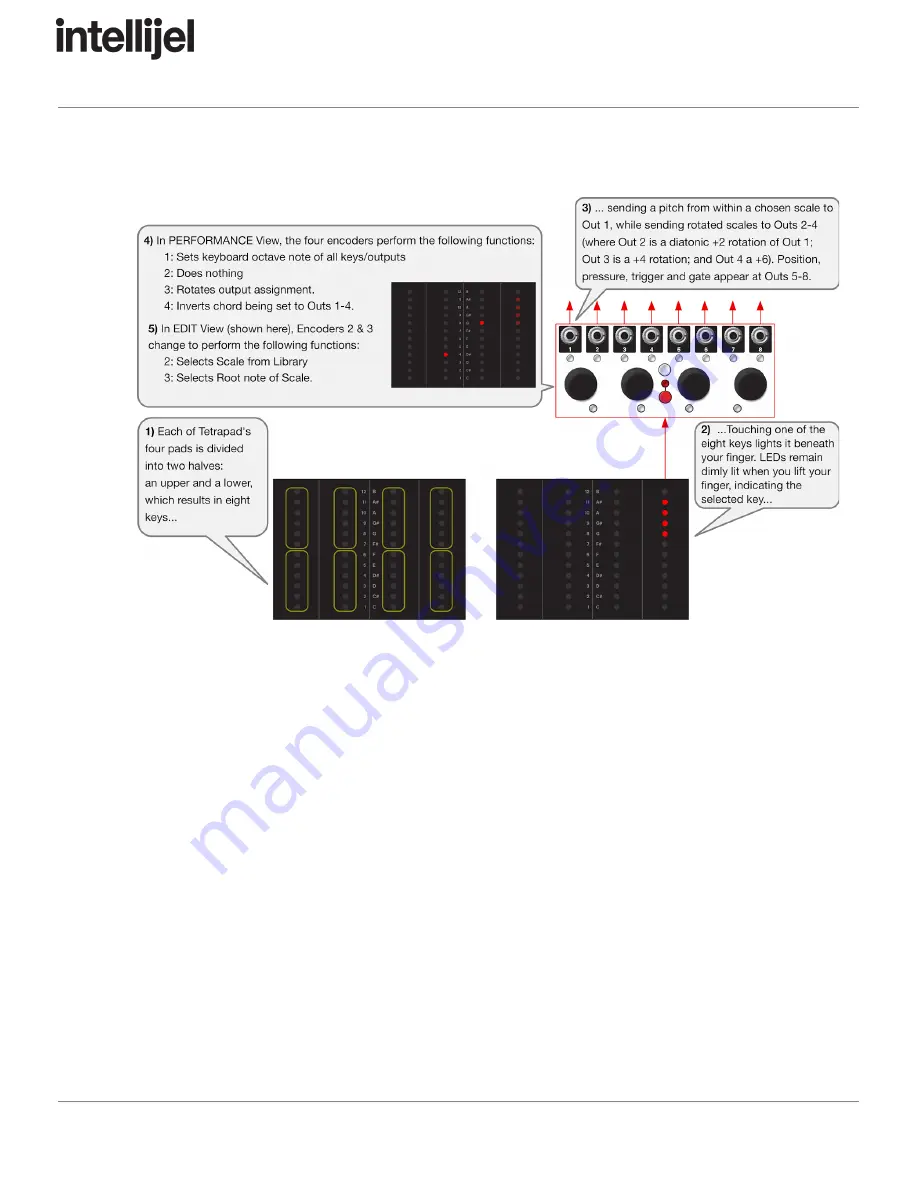
The following flow diagram illustrates these instructions graphically: 


Slew Between Notes 

Tetrapad also gives you the ability to slew between notes. To do so, press the red SHIFT 
button and continue holding it while turning Encoder 1. 

Clockwise turns increase the time it takes to move from one note to another (up to a 
maximum of about 30 sec for a 10 octave glide). Counterclockwise turns decrease the 
amount of time (down to “instantaneous”). 

Slew times are indicated by a red Pad Status LED above each fader — with an LED glowing 
increasingly brighter as the slew gets longer. 

Slew time is a global setting within Keyboard Mode, meaning the rate of change affects all 
notes equally. 


Page 42 

Summary of Contents for Tetrapad

Page 1: ...ogle Docs https docs google com document d 18AFrtwTCpaE5_dPILqmrodOXnIIEmdZGws2Kx_eEC4M edit heading h akbpz6132fpo 1 63 Tetrapad Manual Tetrapad Multi Dimensional Performance Touch Controller Firmwar...

Page 2: ...n Modes Con guration Modes Selecting Modes Loading a Mode Preset Saving Mode Presets Auto Saving Mode Reset Mode 1 Combo Mode Combo Mode Unipolar Fader Assigning Unipolar Fader Functionality To A Pad...

Page 3: ...Voltages Randomize a Single Stored Voltage Randomize all 8 Stored Voltages for a Button Reset a Stored Voltage to 0V Slew Between Stored Voltages Mode 3 Keyboard Mode Using Keyboard Mode EDIT VIEW Ass...

Page 4: ...2Kx_eEC4M edit heading h akbpz6132fpo 4 63 Tetrapad Manual Slew Between Chords Performing in Custom Chord Mode Mode 12 Global Con guration Using Global Con guration Mode Output Voltage Calibration Usi...

Page 5: ...e the equipment Any digital equipment has been tested and found to comply with the limits for a Class A digital device pursuant to part 15 of the FCC Rules These limits are designed to provide reasona...

Page 6: ...y You will also need to ensure your case has enough free space hp to t the new module To prevent screws or other debris from falling into the case and shorting any electrical contacts not leave gaps b...

Page 7: ...12V and a thick white stripe If you are using another manufacturer s power supply check their documentation for instructions Once connected the cabling between the module and power supply should resem...

Page 8: ...Mode each pad can be assigned a function independent of the other three pads such as a fader a bi polar fader an LFO a dual switch or a nger drumming pad The chosen mode determines what type of signal...

Page 9: ...10 30 2018 Tetrapad 2 0 Manual Google Docs https docs google com document d 18AFrtwTCpaE5_dPILqmrodOXnIIEmdZGws2Kx_eEC4M edit heading h akbpz6132fpo 9 63 Tetrapad Manual Panel Reference Page 8...

Page 10: ...1 4 Each of the four pads has its own associated push encoder which functions differently depending on Tetrapad s current mode For example in Custom Keyboard Mode the encoders assign note values for e...

Page 11: ...select which of the 12 mode speci c patches you wish to load The patch number is indicated by the Level LED on the right of center pad Press the Mode Select button or press either of the two left enc...

Page 12: ...signal appearing at the output jack for the active mode Blue Pitch CV Magenta Gate Trigger Green Positive Voltage May indicate vertical position or LFO level Red Negative Voltage May indicate vertica...

Page 13: ...Ds and shift button Tetrapad has three types of modes Mode 1 Combo Mode Combo Mode enables you to assign a unique function to each pad and its pair of associated outputs In Combo Mode you can have dif...

Page 14: ...nger is below the midpoint You can choose whether the fader is latched or unlatched and you can slew between fader levels In addition pressing down on a fader sends an additional control voltage to t...

Page 15: ...Mode is similar to Keyboard Mode described above only instead of automatically assigning keys to a particular scale you manually assign a note to each of the eight keys and for each of the four output...

Page 16: ...Con guration This is a special mode for con guring Tetrapad s pressure response to match your own preferences Unlike the other modes Global Con guration mode is not meant for performance nor for contr...

Page 17: ...on to enter Mode Selection 2 Rotate either of the two left encoders to select the desired mode A brightly lit Level LED embedded beneath the left center pad will move up or down the pad as the encoder...

Page 18: ...eed to select a Mode Preset if you want to use one that s different than the preset you used the last time you selected that mode 4 Press Encoder 3 to load the Mode Preset into Tetrapad 5 Press the wh...

Page 19: ...matically saves its settings every minute or whenever you change modes This makes Tetrapad ideal for live performance since it will always power up with your carefully con gured modes still intact and...

Page 20: ...Level LED embedded beneath the left center pad will move up or down the pad as the encoder is rotated the lowest LED corresponds to Mode 1 and the highest to Mode 12 3 Rotate either of the two right e...

Page 21: ...fader converts a pad into a pressure and position sensitive fader Slide your nger up and down the pad to operate it as a virtual fader with the bottom position sending 0V to the pad s left output and...

Page 22: ...u were moving an actual fader Alternately you can simply tap a pad anywhere along its vertical scale and the fader will jump to that level directly using a slew rate you de ne as discussed shortly Fad...

Page 23: ...r to set its slew rate Clockwise turns increase the time it takes to move from one fader value to another up to a maximum of about 4 sec to move between min max levels Counterclockwise turns decrease...

Page 24: ...n sensitive fader much like a unipolar fader but with its null 0V position in the center of the pad This means it transmits positive voltages to the pad s left output when touched above the midpoint a...

Page 25: ...were moving an actual fader Alternately you can simply tap a pad anywhere along its vertical scale and the fader will jump to that level directly using a slew rate you de ne as discussed shortly Fader...

Page 26: ...coder to set its slew rate Clockwise turns increase the time it takes to move from one fader value to another up to a maximum of about 4 sec to move between min max levels Counterclockwise turns decre...

Page 27: ...gnal left pad output when the pad is touched plus a second CV right pad output based on the vertical position of your nger Since the pad generates a gate no matter where you tap it it s ideal for trig...

Page 28: ...to use your Tetrapad The top and bottom LEDs are lit on the assigned pad indicating that it will now function as a Drum Pad also shown in the previous pictograph Using Drum Pads 1 Tap a pad to send a...

Page 29: ...nual Combo Mode Switches When designated as a switch a single pad becomes two independent switches one on the top half of the pad whose value appears at the pad s left output and one on the bottom hal...

Page 30: ...the bottom indicating that it will now function as a pair of Switches also shown in the previous pictograph Using Switches 1 Touch a switch to send 5V to the corresponding Out jack Each pad is divided...

Page 31: ...a single pad becomes a controller for a built in Low Frequency Oscillator LFO which appears at the pad s left output Using a combination of the pad itself plus the shift button and the encoders you ca...

Page 32: ...red output transmits a programmable LFO the rate of which is shown by the Output Status LED that pulses in time with the LFO and which indicates its polarity LFO rate is controlled by your nger s vert...

Page 33: ...t Status LED is currently red push the SHIFT Button to turn it off enabling PERFORMANCE View In LFO PERFORMANCE View the LFO uses the waveshape and polarity de ned in LFO EDIT View So if you want to m...

Page 34: ...ad 2 If desired rotate either of the two right encoders to select one of twelve Mode Presets indicated by Pad 3 then press Encoder 3 to load your selection Press the white Mode Select button or either...

Page 35: ...to set the amount of wave folding Output 7 could change the grain size in Rainmaker while Out 8 could adjust its wet dry mix In other words used this way Voltages Mode is almost like having patch mem...

Page 36: ...ng an encoder counter clockwise sets increasingly larger negative voltages up to 5 V which are indicated by the intensity of the Output Status LED which glows red to indicate the voltage is negative 3...

Page 37: ...while pressing Encoder 3 then Output 3 will reset to 0V or Output 7 if the Shift LED is red Slew Between Stored Voltages Normally each time you tap a different button Tetrapad instantly sends the corr...

Page 38: ...s indicated by the position of the brightest Level LED beneath Pad 2 If desired rotate either of the two right encoders to select one of twelve Mode Presets indicated by Pad 3 then press Encoder 3 to...

Page 39: ...s enabling you to play melodies or chords from the Tetrapad Gate and trigger signals are also output as well as pressure and position In EDIT View When the Shift Status LED is red EDIT view the middle...

Page 40: ...an 0 2 3 5 7 9 10 4 Lydian 0 2 4 5 7 9 11 5 Phrygian 0 1 3 5 7 8 10 6 Locrian 0 1 3 5 6 8 10 7 Melodic Minor 0 2 3 5 7 9 11 8 Harmonic Minor 0 2 3 5 7 8 11 9 Super Locrian 0 1 3 4 6 8 10 10 Bhairav 0...

Page 41: ...to change its color to green A green Status LED indicates that Tetrapad is in PERFORMANCE View 2 Tap any of the eight keys to send the notes as assigned in EDIT View discussed earlier to Output 1 In...

Page 42: ...output assignments With each clockwise rotation the output assignments shift to the right by 1 So if you rotate Encoder 3 one turn clockwise the unshifted scale will appear at Out 2 rather than Out 1...

Page 43: ...o press the red SHIFT button and continue holding it while turning Encoder 1 Clockwise turns increase the time it takes to move from one note to another up to a maximum of about 30 sec for a 10 octave...

Page 44: ...s indicated by the position of the brightest Level LED beneath Pad 2 If desired rotate either of the two right encoders to select one of twelve Mode Presets indicated by Pad 3 then press Encoder 3 to...

Page 45: ...s are also output as well as pressure and position As an edit display When you touch a key you select it for editing as indicated by the four dim LEDs beneath the key s surface The four pads then disp...

Page 46: ...the Pad Status LED will glow green With each subsequent octave increase the LED will brighten When the pitch is an octave lower than default the Pad Status LED will glow red With each subsequent octav...

Page 47: ...m of about 30 sec for a 10 octave glide Counterclockwise turns decrease the amount of time down to instantaneous Slew times are indicated by a red Pad Status LED above each fader with an LED glowing i...

Page 48: ...rotate either of the two right encoders to select one of twelve Mode Presets indicated by Pad 3 then press Encoder 3 to load your selection Press the white Mode Select button or either of the two lef...

Page 49: ...he four chords you want to de ne All the ladder LEDs beneath the pad s surface light dimly to indicate that it s the active and editable pad 2 Rotate Encoder 1 to set the root note of the chord as it...

Page 50: ...one CCW turn transposes the fourth note down 1 octave etc 6 Touch each of the remaining three pads and repeat steps 3 6 to de ne 4 note chords for each of the four pads Chord Name Intervals Unison 0 0...

Page 51: ...igned chords to all four pads you re ready to perform 1 Route Tetrapad s rst four outputs to four different oscillators 2 Press one of the four pads to send a four note chord to those four oscillators...

Page 52: ...10 30 2018 Tetrapad 2 0 Manual Google Docs https docs google com document d 18AFrtwTCpaE5_dPILqmrodOXnIIEmdZGws2Kx_eEC4M edit heading h akbpz6132fpo 52 63 Tetrapad Manual Page 51...

Page 53: ...red rotate either of the two right encoders to select one of twelve Mode Presets indicated by Pad 3 then press Encoder 3 to load your selection Press the white Mode Select button or either of the two...

Page 54: ...e ladder LEDs beneath the pad s surface light dimly to indicate that it s the active and editable pad 2 Rotate Encoder 1 to set the chord s root note which is sent to Out 1 Rotate encoders 2 4 to set...

Page 55: ...rds equally Performing in Custom Chord Mode Once you ve assigned chords to all four pads you re ready to perform 1 Route Tetrapad s rst four outputs to four different oscillators 2 Press one of the fo...

Page 56: ...nIIEmdZGws2Kx_eEC4M edit heading h akbpz6132fpo 56 63 Tetrapad Manual By way of example look at the following illustration We see that touching Pad 1 sends C E G B to Outputs 1 4 touching Pad 2 sends...

Page 57: ...e either of the two left encoders to select Mode 12 as indicated by the position of the brightest Level LED beneath Pad 2 Press the white Mode Select button or either of the two left encoders to exit...

Page 58: ...1 until the rst LED is lit beneath the surface of Pad 1 The rst LED indicates that you re editing Parameter 1 which is the Pressure Response Curve parameter 2 Rotate Encoder 2 to select the desired p...

Page 59: ...a default level of 7 To adjust the touch sensitivity 1 Rotate Encoder 1 until the third LED is lit beneath the surface of Pad 1 The third LED indicates that you re editing Parameter 3 which is the To...

Page 60: ...on mode long press the Mode Select button a second time until a single red LED lights beneath one of the 8 output jacks To exit Output Voltage Calibration mode press the white Mode select button retur...

Page 61: ...dicated by a red Output Status LED and 1V as indicated by a green Output Status LED Let s begin with the 0V calibration 3 If the Output Status LED is currently green push any of the four encoders to c...

Page 62: ...ll its LEDs blink rhythmically for a few seconds After the light show completes and immediately before the module is ready to use it displays for about 1 second the current rmware version using the Le...

Page 63: ...ed FEATURE Mode Presets introduced Each mode can have up to twelve different user programmable preset con gurations 1 10 June 15 2018 FEATURE Voltage mode slew rates dependent on pressure FEATURE Incr...

Reviews: