background image

SETUP INSTRUCTIONS

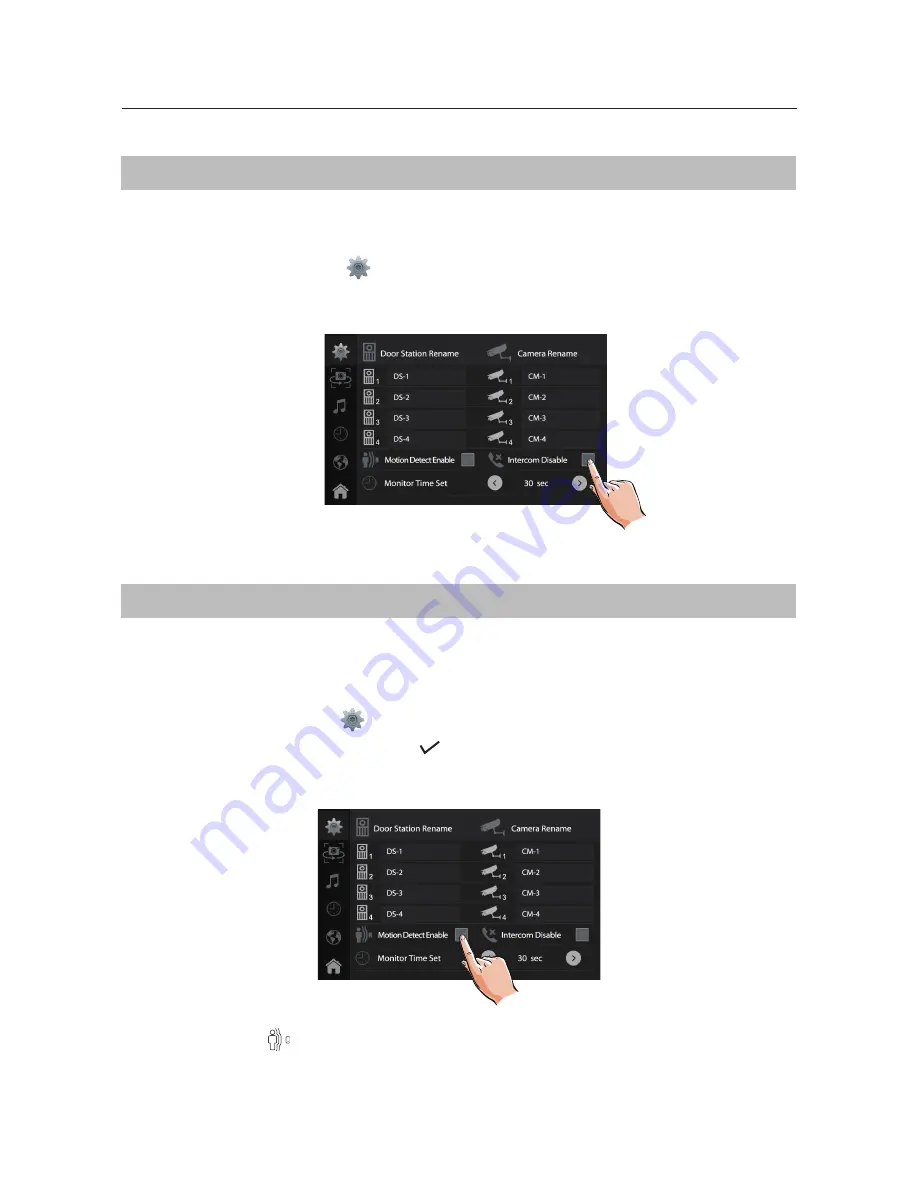
Enable/Disable Intercom Function

Here you can enable or disable 

I

ntercom between monitors function 

On the Main menu page touch

settings icon ->

More

Click / Unclick 

Intercom Disable

 icon

Enabling/Disabling Motion Detection Function

Here you can Enable/Disable Motion Detection function which is available only when Door 
Station Model 607 and additional Motion Detection Interface are installed

On

 the

 main menu page touch

settings icon ->


More

Click/Unclick

icon


Motion Detect Enable 


Montion Detection

 icon


 will be displayed on the Home page when enabled

-15-

Summary of Contents for Alecto

Page 1: ... 1 www intelligenthomeonline com Alecto Video Door System 2 wire Series Installation and User Manual Digital Touch Screen 7 inch Monitor ...

Page 2: ...arts should be protected from violence vibration And not allow be impacting knocking and dropping For clean the LCD screen using hands or wet cloth is forbidden Please do the cleanness with soft cotton cloth please do not use the organic or chemical clean impregnate If necessary please use pure water or dilute soap water to clean the dust Image distortion may occur if the video door phone is mount...

Page 3: ...Function 15 5 10 Enabling Disabling Motion Detection Function 15 5 11 Electric Lock Release Settings 17 6 Basic Operations 18 7 Changing Colour of LED on the Button 29 6 1 Answering a Door Call 18 6 2 Adjusting Colour Brightness and Talk Volume 18 6 3 Pan Tilt Zoom 19 6 4 Intercom Between Monitors Function 20 6 5 Manual Monitoring 21 6 6 Pictures and Video Recording 22 6 7 SD Card Formatting 22 6 ...

Page 4: ...unicate hands free with visitor Press to view outside the property in standby 3 Menu button Press to open Main Menu 4 Unlock button Press to Unlock door or gate 5 Microphone Transmits the audio from door station 6 SD card slot Use to insert micro SD card 7 Mounting hook Use to hang the monitor 8 Connection port Bus connection terminal 9 Speaker Visitors voice coming from speakers 4 ...

Page 5: ...D Black wire to a Negative One Ringer per monitor Locate a ringer in a position where you are unlikely to hear the ringing of the monitors like a garage shed or carport 1 2 3 4 5 6 ON DIP L2 L1 DIP Switches sw L1 L2 1 2 3 ON DIP 4 5 6 L1 L2 Bus line terminal SW SW External Call button connection port Ring GND External ringer connection port NC Not in use DIP switches DIP1 DIP5 User Code setting DI...

Page 6: ...145 160 cm g n i t n u o M r o t i n o M 2 6 ...

Page 7: ... or review sent received messages MEDIA Touch to play recorded images or videos Review messages left by a visitor See memory SD card info CALL RECORD Touch to see calling in out records or missed calls CALL SCENARIO Touch to activate the functions Mute Leave a message and Divert INTERCOM Touch to enter intercom function Current date and time Status bar LOGO Touch to view info about software versio...

Page 8: ...ALLER SETUP 123 OK Help Menu OK Address Setting Menu Code Function Code Function 2412 Reset to Default Setting 8018 8020 Video Display Standard 2499 Format Memory 8040 8050 LED Color Setting For Calling 2810 MCU Code Update 8051 8055 LED Color Setting For Standby 2811 TFT UI Code Update 8300 8301 Auto Recording ON OFF 2812 Consumer Tune Update 8302 8303 Manual Recording ON OFF 2813 Format SD Card ...

Page 9: ...tors ring at the same time Intercom by NameList requires different programming same as for Star connection How to program the User Code for Star connection All monitors must be connected to an additional hub DBC4A distributor One DBC4A can connect up to a 4 video monitors Each monitor in the system should be assigned with the unique User Code according the table and have DIP6 set On in each monito...

Page 10: ...bers Keypad type abc Alphabet keypad 123 Number keypad Edit box Delete the last character Save setting Exit current page _ INSTALLER SETUP 123 00 31 Space key Insert a space Move the cursor Manual Input of User Code In the Address Setting menu choose Manual Input Address option and program user codes via menu rather than DIP switches Range of User Codes are 00 31 Note In Apartment systems program ...

Page 11: ...in Menu page Date Time Sync From System Clock RTC Server Enable 2016 03 08 14 26 30 Here you can set date and time On the Main Menu page touch settings icon and choose Date Time Change values using up and down arrows and click icon to save new settings Here you can set ring tones for multiple Door Stations and Intercom between monitors to distinguish different calling sources Choice of 20 ring ton...

Page 12: ...on Sounds Click Touch Key Sound On Unclick to cancel Note The day time is from 06 00am to 18 00pm The night time is from 18 00pm 06 00am Touch icon to exit and return to the Main menu page Ring Volume Settings Naming Door Station CCTV Camera Here you can give descriptions to your Door Stations CCTV cameras i e Front Door Back Door Gate On the main menu page touch settings icon More Touch the icon ...

Page 13: ...ngs icon More Select Monitor Time Set Touch icon to adjust levels Settings will perform immediately Current renamed door station Current name is displayed here Switch the keypad between alphabet and numbers Keypad type abc Alphabet keypad 123 Number keypad Edit box Delete the last character Save the setting Exit current page DOOR1 RENAME abc DS1_ Enter key Space key Insert a space Move the cursor ...

Page 14: ...uch icon a message Restore To Default will appear About Touch icon to confirm Touch icon to cancel About page can be entered from Logo icon as well Changing Language Restoring to Factory Default Settings Language English Turkish Greek Hebrew Spanish French About Local Address 00 00 Video Standard AUTO System Verson 00 01 00 Display Driver 1 0 Font 1 0 UI 1 0 Logo icon 14 ...

Page 15: ...rcom Disable icon Enabling Disabling Motion Detection Function Here you can Enable Disable Motion Detection function which is available only when Door Station Model 607 and additional Motion Detection Interface are installed On the main menu page touch settings icon More Click Unclick icon Motion Detect Enable Montion Detection icon will be displayed on the Home page when enabled 15 ...

Page 16: ... door station1 motion detection Task for Door station Multiple Choice Duration time for motion detection 06 22 00 00 Save settings and exit Unsave and exit Task for monitor Single Choice Increase timing decrease timing Example of Door Station Detection Settings To see all recorded detection touch Multimedia Motion Detection icon Door Station Model 607 and Motion Detection Interface must be connect...

Page 17: ...d page Using the keypad type in the following codes 8010 for Power on to open lock 8011 for Power off to open lock To set the unlocking time use codes 8401 8499 for 1 to 99 seconds Example Type in 8401 for 1 second unlocking time 8499 for 99 secs unlocking time UNLOCK On the Main menu page touch Logo icon to enter About page Press and hold for 2 sec UNLOCK button Digital keypad will be shown 00 10...

Page 18: ...me 4 scene modes are available to select Normal Bright Soft and User Screen Contrast The range is 0 9 Touch or to set desired levels Screen Brightness The range is 0 9 Touch or to set desired levels Screen Colour The range is 0 9 Touch or to set desired levels 00 10 DS 1 00 10 DS 1 Normal Brightly Soft User Here you can adjust your monitor properties such as Contrast Brightness and Colour Followin...

Page 19: ...n installed Example Touch icon to zoom center of the image When the video from Door Station is displayed move to the desired position by touching using the 5 Direction Pad on the screen to view the image in Zoom mode Touch icon to zoom right side of the image BASIC OPERATIONS 19 ...

Page 20: ...ion will be esatblished only between two monitors 00 10 DS 1 Use or to adjust Talk volume Touch icon to end the call BASIC OPERATIONS 3 Name List Call use Intercom by Name List to call to a specific monitor in the system Name list of monitors have be created after installation is complete and user codes of monitors are known 00 or 01 are the user codes addresses of the monitors 00 Kitchen 01 Groun...

Page 21: ...DS 1 DS 2 DS 3 CAM 1 DS 4 CAM 2 00 10 DS 1 There is no audio during Manual monitoring To activate audio during monitoring touch icon Video Quad Monitoring Video quad monitoring is available with an additional QSW Interface On Monitor Select page touch icon to scroll to a next page Select QUAD 1 to activate video quad monitoring 00 10 DS 1 Monitor Select CAM 3 CAM 3 CAM 4 CAM 4 CAM 1 CAM 2 QUAD 1 M...

Page 22: ...Recording starts in 3 seconds after Door Station is rung While recording REC blinks Captures one picture for each call Manual Recording If nobody rings the door bell but you see something via manual monitoring and want to take a picture of video clip of the event touch icon Record If you want your manual video clip recording with sound remember to hit the Talk icon Micro SD card need to be formatt...

Page 23: ... to format the SD card again 20151119_115125 jpg Copying Recordings onto SD Card You can copy recordings images stored in the built in memory onto a SD card On the Main Menu page touch Media Copy to SD Touch icon to copy Touch icon to cancel BASIC OPERATIONS Video 008 020 2015 06 23 14 36 55 00 03 00 09 Pictures and Video Playback All recorded images videos can be viewed on the monitor On the Main...

Page 24: ...ited to 10 sec When you have new Voicemail the icon will appears in the status bar on the Home page Voicemail Immediately The system will prompt a visitor to leave a voicemailimmediately Voicemail If No Answer The visitor will wait for 30 sec for someone to answer and then system will a e v a e l o t r o t i s i v t p m o r p voicemail On the Main Menu page touch Multimedia Visitor Message icons V...

Page 25: ...room 05 27 21 43 Gate 04 20 13 16 Launge Current page Pages N Calling date time Calling source Scroll to next page Scroll to last page Exit Called in Called out Touch one record of the calling list Touch icon to view the visitor s image Notes Vertical Arrow Red missed calls If the missed calls have been viewed the arrow will change to blue Vertical Arrow Blue call was answered Max 100 calling reco...

Page 26: ...d Edit box Delete the last character Press to send the SMS Exit current page 02 abc Enter key Space key Insert a space Move the cursor You can exchange messages between monitors in multiple monitors system Reviewing received messages On the Main Menu page touch SMS Inbox icon the most recent received messages will be displayed Reviewing sent out messages On the Main Menu page touch SMS Outbox icon...

Page 27: ...ed 00 10 DS 1 Call Scenario Normal Do Not Disturb Voicemail Simultaneously Voicemail if No Answer Divert Simultaneously Divert If No Answer There are two Divert Modes 1 Divert Simultaneously call will be diverted immediately All monitors and telephone hand sets will ring All monitors will come On with video from door station Call can be answered from any monitor or telephone handset On main menu p...

Page 28: ...tely if selected and the status bar on the Main Menu page will show icon Touch icon to save and exit Operating Security Light This function will be activated only when actual security light connected with an additional Ligh Lock Control RLC Interface Touch Light icon on the main Menu page or touch icon during monitoring or talking to turn the light On It will be turned Off automatically within 60 ...

Page 29: ...8055 Purple 8049 Purple flashing 8056 White 8050 White flashing 8057 Off Changing Colour of LED on the Button Power supply DC 20 28V Power consumption Standby 0 27W Working 7W Communication Handsfree Screen 7 Inch digital color TFT Display Resolutions 800 3 R G B x 480 pixels Video signal 1Vp p 75Ω CCIR standard Mounting Surface wall mount Material Aluminum front panel Color White Wiring 2 wires n...

Page 30: ...elligent Home Online Ltd 62 Hartley Old Road Purley Surrey CR8 4HJ 44 0 20 86170015 www intelligenthomeonline com _ _ _ _ _ _ _ _ _ _ _ _ _ _ _ _ _ _ _ _ _ _ _ _ _ _ _ _ _ _ _ _ _ _ _ _ _ _ _ _ _ _ _ _ _ _ _ _ _ _ _ _ _ _ _ _ _ _ _ _ _ _ _ _ _ _ _ _ _ _ _ _ _ _ _ _ _ _ _ _ _ _ _ t c u d o r P _ _ _ _ _ _ _ _ _ _ _ _ _ _ _ _ _ _ _ _ _ _ _ _ _ _ _ _ _ _ _ _ _ _ _ _ _ _ _ _ _ _ _ _ _ _ _ _ _ _ _ _ _ ...

Page 31: ... 18 www intelligenthomeonline com Right to interpret and copyright of this manual are preserved Alecto 2 wire series ...

Reviews: