background image

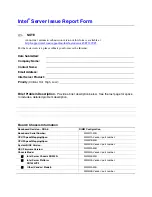
Issue Report Form 

Operating System Information 

Operating System  


Version  


Service Pack  


Peripheral Information 

Check each box below that is used, and provide the requested information 


Peripheral 

Card or Peripheral Description 

Driver 
Revision 

IRQ # 

I/O Base 
Address 

FW Rev# 

Low-profile Riser 

ˆ

 Top 

slot 


ˆ

 Center 

slot 


ˆ

 Bottom 

slot 


Full-height Riser  

ˆ

 Top 

slot 


ˆ

 Center 

slot 


ˆ

 Bottom 

slot 


Video 

ˆ


On-Board Video    


ˆ

 Add-in 

Video 


NIC 

ˆ

 On-Board 

NIC1 

(10/100/1000 Mb) 


ˆ

 On-Board 

NIC2 

(10/100/1000 Mb) 


Hard Drive Information:  


ˆ


ATA 

# of drives installed:   


Make/Model/Firmware Revision  


ˆ


SATA  # of drives installed:    


Make/Model/Firmware Revision  


Hot-swap:  

 Fixed: 


Management Information:  

ˆ


Essentials Server Management (on-board) 

Control Panel Information:  

ˆ


Standard Control Panel 


Summary of Contents for SE7320VP2

Page 1: ...Intel Server Board SE7320VP2 User Guide Order Number C71354 002 ...

Page 2: ...ifications and product descriptions at any time without notice Intel server boards contain a number of high density VLSI and power delivery components that need adequate airflow for cooling Intel s own chassis are designed and tested to meet the intended thermal requirements of these components when the fully integrated system is used together It is the responsibility of the system integrator that...

Page 3: ...tructions on using the utilities that are shipped with the board or that may be required to update the system This includes how to navigate through the BIOS Setup screens how to perform a BIOS update and how to reset the password or CMOS Information about the specific BIOS settings and screens is available in the Technical Product Specification See Additional Information and Software for a link to...

Page 4: ... and interactive repair information Use the link to the SMaRT Tool under Other Resources at the right side of the screen at http support intel com support motherboards server SE7320VP2 Accessories or other Intel server products Search for Spares and Configuration Guide Hardware peripheral boards adapter cards and operating systems that have been tested with this product Search for Tested Hardware ...

Page 5: ...ance testing For more information please contact your local Intel Representative See Regulatory and Integration Information for product safety compliance and EMC regulatory compliance information This is an FCC Class A device Integration of it into a Class B chassis does not result in a Class B device Intended Uses This product was evaluated as Information Technology Equipment ITE which may be ins...

Page 6: ...nted metal surface on your server when handling parts ESD and handling boards Always handle boards carefully They can be extremely sensitive to ESD Hold boards only by their edges After removing a board from its protective wrapper or from the server place the board component side up on a grounded static free surface Use a conductive foam pad if available but not the board wrapper Do not slide boar...

Page 7: ...loves Wichtige Sicherheitshinweise Lesen Sie zunächst sämtliche Warn und Sicherheitshinweise in diesem Dokument bevor Sie eine der Anweisungen ausführen Beachten Sie hierzu auch die Sicherheitshinweise zu Intel Serverplatinen und Servergehäusen auf der Ressourcen CD oder unter http support intel com support motherboards server SICHERHEISMASSNAHMEN Immer wenn Sie die Gehäuseabdeckung abnehmen um an...

Page 8: ...tension tous les périphériques connectés au système 2 Mettez le système hors tension en mettant l interrupteur général en position OFF bouton poussoir 3 Débranchez tous les cordons d alimentation c a du système et des prises murales 4 Identifiez et débranchez tous les câbles reliés aux connecteurs d E S ou aux accès derrière le système 5 Pour prévenir les décharges électrostatiques lorsque vous to...

Page 9: ...sis Si el sistema ha estado en funcionamiento el microprocesador y el disipador de calor pueden estar aún calientes También conviene tener en cuenta que en el chasis o en el tablero puede haber piezas cortantes o punzantes Por ello se recomienda precaución y el uso de guantes protectores AVVERTENZA Italiano PASSI DI SICUREZZA Qualora si rimuovano le coperture del telaio per accedere all interno de...

Page 10: ...Preface x ...

Page 11: ...figuration 31 Installing a PCI PCI X or PCI Express Add in Card 32 Replacing the Backup Battery 32 3 Server Utilities 34 Using the BIOS Setup Utility 34 Starting Setup 34 If You Cannot Access Setup 34 Setup Menus 34 Upgrading the BIOS 36 Preparing for the Upgrade 36 Upgrading the BIOS 37 Clearing the Password 37 Clearing the CMOS 38 4 Troubleshooting 39 Resetting the System 39 Problems following I...

Page 12: ... Registrations Declarations 50 Product Regulatory Compliance Markings 50 Electromagnetic Compatibility Notices 51 FCC USA 51 Industry Canada ICES 003 52 Europe CE Declaration of Conformity 52 Taiwan Declaration of Conformity BSMI 52 Korean Compliance RRL 52 Getting Help 53 Intel Server Issue Report Form 55 Figures Figure 1 Intel Server Board SE7320VP2 15 Figure 2 Server Board Connector and Header ...

Page 13: ... Port Configuration Jumper J8A3 19 Table 4 BIOS Select Jumper J1A4 20 Table 5 NIC LEDs 21 Table 6 Processor Support 22 Table 7 Memory Capacity Support 23 Table 8 Keyboard Commands 35 Table 9 Keyboard Commands 48 Table 10 Product Certification Markings 50 Table 11 Customer Support Telephone Numbers 53 xiii ...

Page 14: ...Contents xiv ...
Page 15: ...apter provides a photograph of the product a list of the server board features and diagrams showing the location of important components and connections on the server board The Server Board SE7320VP2 is shown in the following picture Figure 1 Intel Server Board SE7320VP2 Intel Server Board SE7320VP2 User Guide 15 ...

Page 16: ...headers SSI compliant 24 pin main power connector supporting the ATX 12V standard on the first 20 pins Add in PCI PCI X PCI Express Cards riser s required One low profile riser connector that supports a riser card with a PCI or PCI X slot that is capable of speeds up to 66 MHz One full height riser connector utilizing Intel Adaptive Slot technology This connector supports a riser card with PCI PCI...

Page 17: ...e PCI slot N Floppy connector Z Power supply connector E Back panel I O ports O PCI fan connecors two Y OEM RMC connector F Serial port selection jumper P IDE connector Z Front panel USB header G DIMM sockets Q 100 pin Floppy Front Panel ATA connector AA IDE power connector H Processor 1 fan header R Main power connector BB BIOS Select jumper I Processor 1 socket S 50 pin front panel connector CC ...

Page 18: ... normal operation J1H2 Password Clear 2 3 These pins should be jumpered for normal system operation 1 2 If these pins are jumpered the system will attempt to recover the BIOS by loading the BIOS code into the flash device from a floppy disk his jumper is typically used when the BIOS has become corrupted These pins should not be jumpered for normal operation J1H3 Recovery Boot 2 3 These pins should...

Page 19: ... 2 1 3 DCD to DTR Default 2 4 DSR to DTR Figure 4 Serial Port Configuration Jumper Location Table 3 Serial Port Configuration Jumper J8A3 Pins What happens at system reset 1 3 Serial port is configured for DCD to DTR default 2 4 Serial port is configured for DSR to DTR 19 ...

Page 20: ...A4 3 BIOS Select 1 2 Normal Operation Default 2 3 Force to Lower Bank 3 Figure 5 BIOS Select Jumper Location Table 4 BIOS Select Jumper J1A4 Pins What happens at system reset 1 2 System is configured for normal operation 2 3 Force BIOS to lower bank 20 ...

Page 21: ...rs The NIC LEDs at the right and left of each NIC provide the following information Table 5 NIC LEDs LED Color LED State Description Off No network connection Solid Amber Network connection in place Left LED Blinking Amber Transmit receive activity Off 10 Mbps connection if left LED is on or blinking Solid Amber 100 Mbps connection Right LED Solid Green 1000 Mbps connection 21 ...

Page 22: ...7320VP2 provides six DIMM sockets across two channels Channel A and Channel B Channel A consists of DIMM sockets 1A 2A and 3A Channel B consists of DIMM sockets 1B 2B and 3B If six DIMMs are installed the following maximum capacitites are possible For DDR266 DIMMS Maxixmum capacity of 24GB For DDR333 DIMMS Maximum capacity of 16 GB A minimum of one 256MB DIMM is required in DIMM socket 1A This use...

Page 23: ... under Additional Information and Software Memory Sparing and Mirroring The Intel E7320 chipset supports memory mirroring and memory on line sparing Both memory mirroring and memory on line sparing provide a way to prevent data loss in case a DIMM fails With memory mirroring the system maintains two copies of all data in the memory subsystem If a DIMM fails the data is not lost because the second ...

Page 24: ... components For a link to the power budget utility see Additional Information and Software Optional Hardware Storage Devices The Server Board SE7320VP2 provides two SATA connections and two ATA IDE ATAPI controllers The two SATA connectors are on the powersupply side of the board marked SATA 0 and SATA 1 Each ATA connection supports one or two ATA 100 devices IDE devices can be connected to the st...

Page 25: ...y The silkscreen on the board for the DIMMs displays DIMM1B DIMM1A DIMM2B DIMM2A DIMM3B and DIMM3A starting from the edge of the board DIMM3A is the socket closest to the processor socket See Memory for a discussion of the memory requirements and options See Additional Information and Software for a link to the list of tested DIMMs Installing DIMMs To install DIMMs follow these steps 1 Observe the...

Page 26: ...7 Holding the DIMM by the edges remove it from its anti static package 8 Position the DIMM above the socket Align the two small notches in the bottom edge of the DIMM with the keys in the socket see inset in Figure 7 9 Insert the bottom edge of the DIMM into the socket 10 When the DIMM is inserted push down on the top edge of the DIMM until the retaining clips snap into place Make sure the clips a...

Page 27: ...at accompanied your server chassis for instructions on removing the server s cover 5 Gently spread the retaining clips at each end of the socket The DIMM lifts from the socket 6 Holding the DIMM by the edges lift it from the socket and store it in an anti static package 7 Reinstall and reconnect any parts you removed or disconnected to reach the DIMM sockets 8 Replace the server s cover and reconn...

Page 28: ... board Keep part of your body in contact with the metal chassis to dissipate the static charge while handling the processor 2 Avoid moving around unnecessarily Installing the Processor To install a processor follow these instructions 1 Observe the safety and ESD precautions at the beginning of this book 2 Turn off all peripheral devices connected to the server Turn off the server 3 Disconnect the ...

Page 29: ... with the socket and insert the processor into the socket NOTE Make sure the alignment triangle mark and the alignment triangle cutout align correctly TP00764 A A B Figure 9 Inserting Processor 7 Lower the socket lever completely TP00765 Figure 10 Closing Socket Lever 29 ...

Page 30: ...00774 Figure 11 Installing Heat Sink 5 Reinstall and reconnect any parts you removed or disconnected to reach the processor sockets 6 Replace the server s cover and reconnect the AC power cord See the documentation that accompanied your server chassis for instructions on installing the server s cover Removing a Processor 1 Observe the safety and ESD precautions at the beginning of this book 2 Turn...

Page 31: ...gnals To change the configuration to support DCD signals a jumper on the board must be changed Use the following instructions to configure your server board to support DCD signals 1 Observe the safety and ESD precautions at the beginning of this book 2 Turn off all peripheral devices connected to the server Turn off the server 3 Disconnect the AC power cord from the server 4 Remove the server s co...

Page 32: ...e absence of power When the battery starts to weaken it loses voltage and the server settings stored in CMOS RAM in the RTC for example the date and time may be wrong Contact your customer service representative or dealer for a list of approved devices WARNING Danger of explosion if battery is incorrectly replaced Replace only with the same or equivalent type recommended by the equipment manufactu...

Page 33: ... and locate the battery See the documentation that accompanied your server chassis for instructions on removing the server s cover 5 Insert the tip of a small flat bladed screwdriver or an equivalent under the tab in the plastic retainer Gently push down on the screwdriver to lift the battery 6 Remove the battery from its socket TP00945 Figure 13 Replacing the Backup Battery 7 Dispose of the batte...

Page 34: ...ion when CMOS NVRAM has been corrupted you will see other prompts but not the F2 prompt Warning CMOS checksum invalid Warning CMOS time and date not set In this condition the BIOS will load default values for CMOS and attempt to boot If You Cannot Access Setup If you are not able to access BIOS Setup you might need to clear the CMOS memory For instructions on clearing the CMOS see Clearing the CMO...

Page 35: ...o display a pick list if a selected feature has a value field or to select a sub field for multi valued features like time and date If a pick list is displayed the Enter key will undo the pick list and allow another selection in the parent menu Esc Exit The ESC key provides a mechanism for backing out of any field This key will undo the pressing of the Enter key When the ESC key is pressed while e...

Page 36: ...ity Recording the Current BIOS Settings 1 Boot the computer and press F2 when you see the message Press F2 Key if you want to run SETUP 2 Write down the current settings in the BIOS Setup program NOTE Do not skip step 2 You will need these settings to configure your computer at the end of the procedure Obtaining the Upgrade Download the BIOS image file to a temporary folder on your hard drive See ...

Page 37: ...hat you enter Setup check your settings save your settings and exit Setup Clearing the Password If the user or administrator password s is lost or forgotten moving the password clear jumper into the clear position clears both passwords The password clear jumper must be restored to its original position before a new password s can be set The password clear jumper is located on jumper block J1H2 1 P...

Page 38: ...AM The CMOS Clear jumper is located on jumper block J1H5 1 Power down the system and disconnect the AC power 2 Open the server 3 Move the jumper from the normal operation position CMOS Clear by BMC at pins 2 and 3 to the CMOS Clear Force Erase position covering pins 1 and 2 as indicated in the following diagram Figure 15 CMOS Recovery Jumper 4 Reconnect the AC power power up the system 5 When the ...

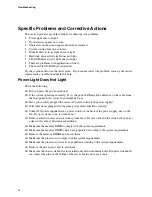
Page 39: ...ckage called the Platform Confidence Test that may help with your diagnostics See Additional Information and Software for a link to this software If you are unable to resolve your server problems on your own see Getting Help for assistance Resetting the System Before going through in depth troubleshooting attempt first to perform reset your system using one of the methods below To do this Press So...

Page 40: ...and switch settings on add in boards and peripheral devices correct To check these settings refer to the manufacturer s documentation that comes with them If applicable ensure that there are no conflicts for example two add in boards sharing the same interrupt Are all peripheral devices installed correctly If the system has a hard disk drive is it properly formatted or configured Are all device dr...

Page 41: ...splay monitor 4 If the operating system normally loads from the hard disk drive make sure there is no diskette in drive A and no CD ROM disk in the CD ROM drive 5 If the power LED does light attempt to boot from a floppy diskette or from a CD ROM disk 6 Turn on the system If the power LED does not light see Power Light Does Not Light Verifying Proper Operation of Key System Lights As POST determin...

Page 42: ...the front panel to the server board might be loose Have you securely plugged the server AC power cord into the power supply Will other items plugged into the same power outlet function correctly Some ATX power supplies have a power switch on the back of the power supply next to the fan If your system as one is it turned on Remove all add in cares and see if the system boots If successful add the c...

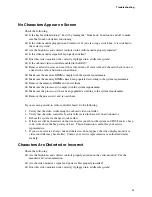
Page 43: ... with the system requirements Make sure the processor s have been populated according to the system requirements Remove the processor s and re seat them If you are using an add in video controller board do the following 1 Verify that the video works using the onboard video controller 2 Verify that the video controller board is fully seated in the server board connector 3 Reboot the system for chan...

Page 44: ...le from the front panel board connected to the both the front panel board and to the server board Are the power supply cables properly connected to the server board Are there any shorted wires caused by pinched cables or have power connector plugs been forced into power connector sockets the wrong way Diskette Drive Activity Light Does Not Light Check the following Are the diskette drive s power a...

Page 45: ...rs without a hub you will need a crossover cable Check the network controller LEDs next to the NIC connectors Problems with Network The server hangs when the drivers are loaded Certain drivers may require interrupts that are not shared with other PCI drivers For these drivers it may be necessary to alter settings so that interrupts are not shared See the documentation that came with your PCI card ...

Page 46: ... other software runs correctly Check the following Make sure the system meets the minimum hardware requirements for the software See the software documentation Make sure the software is properly installed and configured for the system See the software documentation Use only an authorized copy Unauthorized copies often do not work If you are running the software from a diskette CD ROM or DVD ROM tr...

Page 47: ... Software for a link to the current drivers and chipset files Hard Drive s are not Recognized Check the following Make sure the drive is not disabled in BIOS Setup Make sure the drive is connected correctly and that is plugged into the power supply Make sure the drive is compatible See Additional Information and Software for a link to the tested drives Make sure you have not exceeded the power bud...

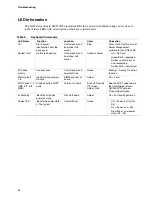
Page 48: ...Fault Green Blink degraded Amber critical error or non recoverable Amber blink non critical ATA drive activity Control panel Control panel and board left side Green Blinking Activity No action required Memory fault 1 6 Identify failing memory module DIMM end rear of board Amber On Fault POST code 1 4 LSB bit1 bit2 MSB Display boot 80 POST code Left rear of board Each LED can be Off Green Amber Red...

Page 49: ...ce Intel targets 10db margin to Class A Limits The Server Board SE7320VP2 has been has been tested and verified to comply with the following electromagnetic compatibility EMC regulations when installed a compatible Intel host system For information on compatible host system s refer to Intel s Server Builder Web site or contact your local Intel representative FCC ICES 003 Emissions USA Canada Verif...

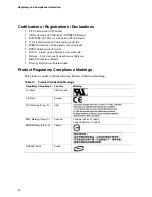
Page 50: ... Listed on one System License Russia Belarus Listed on one System License Belarus RRL Certification Korea Ecology Declaration International Product Regulatory Compliance Markings This product is marked with the following Product Certification Markings Table 10 Product Certification Markings Regulatory Compliance Country Marking UL Mark USA Canada CE Mark Europe FCC Marking Class A USA EMC Marking ...

Page 51: ...articular installation If this equipment does cause harmful interference to radio or television reception which can be determined by turning the equipment off and on the user is encouraged to try to correct the interference by one or more of the following measures Reorient or relocate the receiving antenna Increase the separation between the equipment and the receiver Connect the equipment to an o...

Page 52: ...E Declaration of Conformity This product has been tested in accordance too and complies with the Low Voltage Directive 73 23 EEC and EMC Directive 89 336 EEC The product has been marked with the CE Mark to illustrate its compliance Taiwan Declaration of Conformity BSMI The BSMI Certification Marking and EMC warning is located on the outside rear area of the product Korean Compliance RRL English tr...

Page 53: ...rmany 069 9509 6099 Italy 02 696 33276 Spain 91 377 8166 Belgium 02 714 3182 Finland 9 693 79297 Denmark 38 487077 Norway 23 1620 50 Sweden 08 445 1251 Holland 020 487 4562 In Asia Pacific region Australia 1800 649931 Hong Kong 852 2 844 4456 Korea 822 767 2595 China 800 820 1100 toll free 8 621 33104691 not toll free Singapore 65 6213 1311 India 0006517 2 68303634 manual toll free From India you ...

Page 54: ...Chile Mainland and Juan Contact AT T USA at 800 225 288 Once connected dial 800 843 4481 Miami 1 800 621 8423 Ecuador Andimate Contact AT T USA at 1 999 119 Once connected dial 800 843 4481 Ecuador Pacifictel Contact AT T USA at 1 800 225 528 Once connected dial 800 843 4481 Guatemala Contact AT T USA at 99 99 190 Once connected dial 800 843 4481 Venezuela Contact AT T USA at 0 800 2255 288 Once c...

Page 55: ...on Provide a brief description below See the last page for space to include a detailed problem description Board Chassis Information Baseboard Revision PBA DIMM Configuration Baseboard Serial Number DIMM1A MB CPU1 Speed Stepping Spec DIMM1A Vendor part number CPU2 Speed Stepping Spec DIMM1B MB System BIOS Version DIMM1B Vendor part number HSC Firmware Version DIMM2A MB Chassis Model DIMM2A Vendor ...

Page 56: ... FW Rev Low profile Riser Top slot Center slot Bottom slot Full height Riser Top slot Center slot Bottom slot Video On Board Video Add in Video NIC On Board NIC1 10 100 1000 Mb On Board NIC2 10 100 1000 Mb Hard Drive Information ATA of drives installed Make Model Firmware Revision SATA of drives installed Make Model Firmware Revision Hot swap Fixed Management Information Essentials Server Manageme...

Page 57: ...iption In the space below provide a complete description of the steps used to reproduce the problem or a complete description of where the problem can be found Please also include any details on troubleshooting already done ...

Reviews: