4
Intel
®
QuickAssist Adapter Installation
Install the Intel
PCI Express
*
Adapter
1. Turn off the computer and unplug the power cord.
2. Remove the computer cover and the adapter slot cover from a slot that matches your adapter.
3. Firmly place the adapter edge connector into the slot until it is fully inserted. Secure the bracket to
the chassis.
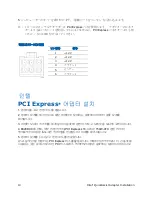
4. For the 8920DCC only, connect the external power connector—a 6-position connector derived
from the PCI Express x16 Graphics 150W-ATX power connector definition. See below.
5.
Replace the computer cover. Plug in the power cord.
NOTE:
Some Intel adapters utilize the PCI Express bus. You may utilize a slot that is longer than your
adapter’s connector with no harm but do not attempt to install it in a slot shorter than the PCI
Express connector.
Power Connector Pin-Outs
Installer la carte
Intel PCI Express*
1. Mettez l'ordinateur hors tension et débranchez le cordon d'alimentation.
2. Retirez le panneau de l'ordinateur et le panneau du connecteur de carte correspondant à votre
carte.
3. Insérez fermement le connecteur au bord de la carte dans le connecteur, jusqu'à ce qu'il soit
complètement logé. Fixez solidement le support sur le châssis.
4. Pour le modèle 8920DCC uniquement, branchez le connecteur d'alimentation externe
(connecteur à 6 positions dérivés de la définition du connecteur d'alimentation PCI Express x16
Graphics 150W-ATX). Lisez les informations ci-dessous.
5. Remettez le panneau de l'ordinateur en place. Branchez le cordon d'alimentation.


