background image

Intel® Local Control Panel for EPSD Platforms TPS  

Physical and Electrical Description 

Revision 1.0 

Intel order number G83726-001 


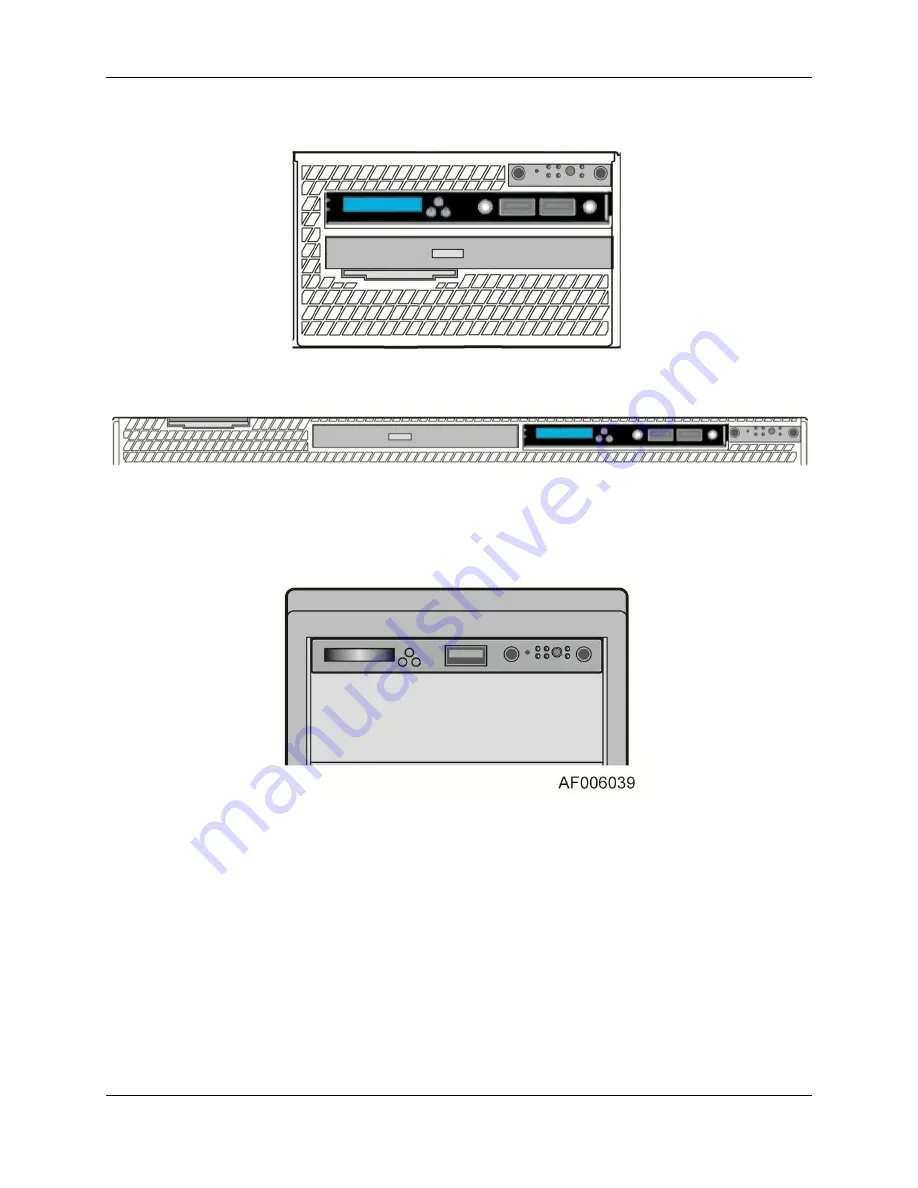
The following figure shows where the LCP should be mounted in an Intel

®

 Rack Server System: 


Figure 3: Mounting the A1U2ULCP in an Intel

®

 2U Server Chassis 


Figure 4: Mounting the A1U2ULCP in an Intel

®

 1U Server Chassis 

The following figure shows where the LCP should be mounted in an Intel

®

 Pedestal Server 

System: 


Figure 5: Mounting the A4ULCP in an Intel

®

 Pedestal Server Chassis 

Summary of Contents for A1U2ULCP

Page 1: ...PSD Platforms Based on Intel Xeon Processor E5 4600 2600 2400 1600 1400 Product Families Technical Product Specification Intel order number G83726 001 Revision 1 0 December 2012 Enterprise Platforms a...

Page 2: ...MPLOYEES OF EACH HARMLESS AGAINST ALL CLAIMS COSTS DAMAGES AND EXPENSES AND REASONABLE ATTORNEYS FEES ARISING OUT OF DIRECTLY OR INDIRECTLY ANY CLAIM OF PRODUCT LIABILITY PERSONAL INJURY OR DEATH ARIS...

Page 3: ...4 RMM LAN RL Configuration 10 3 5 5 Power Pow 11 3 5 6 Last POST Code Last PC 11 3 6 Configuration Conf Menu 11 3 6 1 BMC LAN BL Configuration 11 3 6 2 RMM LAN RL Configuration 13 3 6 3 Boot Device BD...

Page 4: ...igure 17 Last BIOS POST Code 11 Figure 18 Configure Menu Items 11 Figure 19 BMC IP Configuration Menu 11 Figure 20 BMC IP Source Configuration Menu 11 Figure 21 Screen shot for Configuring IP Address...

Page 5: ...el Tray from the Pedestal server system 23 Figure 38 Installing the Intel A4ULCP Local Control Panel in a Pedestal server system 24 Figure 39 Removing the Intel A4ULCP Local Control Panel from a Pedes...

Page 6: ...List of Figures Intel Local Control Panel for EPSD Platforms TPS Intel order number G83726 001 Revision 1 0 vi This page is intentionally left blank...

Page 7: ...ntel Local Control Panel allows a user to monitor the health of an Intel server platform or configure an Intel server for remote IPMI management This allows for monitoring configuration and control of...

Page 8: ...0SC R1000GZ GL and R2000GZ GL Families Product Order Code A4ULCP is for all Intel Pedestal Server Systems P4000CR P4000CP P4000GP P4000IP P4000SC S2400GP P4000M S2400SC P4000M S2600CO P4000M and S2600...

Page 9: ...shows where the LCP should be mounted in an Intel Rack Server System Figure 3 Mounting the A1U2ULCP in an Intel 2U Server Chassis Figure 4 Mounting the A1U2ULCP in an Intel 1U Server Chassis The foll...

Page 10: ...ct the content that needs to be displayed on the LCD screen by operating these buttons The figures below show the Intel Local Control Panel buttons and configuration Label Description Functionality A...

Page 11: ...indicator K NIC 3 LED NIC 3 Activity LED indicator L System Reset Button reset and re initialize the system M HDD Activity LED hard drive activity LED indicator N System Status LED show the current h...

Page 12: ...baseboard BMC detects the problem has been cleared the amber backlight is deactivated to turn on the green backlight 2 3 4 External Connectors The Intel Local Control Panel has either one or two USB...

Page 13: ...s active error messages when the system is not healthy Provides the ability to quickly see asset information on system without having to open the chassis Provides basic server management configuration...

Page 14: ...y one of the following four menu items Figure 10 Main Menu If the user selects menu item then the LCD displays the previous screen that is Banner Error string Selecting the menu item means moving the...

Page 15: ...on will stop scrolling and the corresponding action for that button press will be taken Switching between scrolling and freezing the screen and vice versa is not supported due to the limitation of LCD...

Page 16: ...tem GUID System UUID stored by BIOS CSTR Customizable String Custom string placed by the OEM end user Selecting any item in the above screen displays its value 3 5 3 BMC LAN BL Configuration Selecting...

Page 17: ...user selects Conf item in the main menu then the following options will be displayed to configure Figure 18 Configure Menu Items The following sub sections will explain individual items of the configu...

Page 18: ...in the same item 2 If the cursor is under last position inside the second menu item then a Right button will move the cursor to next item that is Set 3 If the cursor is under first position inside the...

Page 19: ...hen the following options will be displayed The selected item will be set as the next boot option Figure 23 Boot options configuration menu 3 6 4 Banner Ban When the user selects Ban in the Conf menu...

Page 20: ...only It shall not display an informational message If the system is healthy then it displays System Health Ok BIP BMC IP Displays BMC s IP address as banner RIP RMM IP Displays RMM s IP address as ba...

Page 21: ...e letter A 2 Remove the two screws see letter B 3 Slide out the bracket from server chassis together with cables see letter C 4 Remove the two screws and slide out the front USB connecter from the bra...

Page 22: ...rver system 4 2 Removing the Intel A1U2ULCP Local Control Panel in a 1U server system 1 Disconnect the Intel Local Control Panel cable and the front USB cable from the server board see letter A 2 Remo...

Page 23: ...A1U2ULCP Local Control Panel in a 1U server system 5 Install the front USB connecter to the bracket and secure the two screws see letter E 6 Install the bracket together with cables see letter F 7 Se...

Page 24: ...ree screws to release the hard drive cage see letter A For 2U system with 3 5 hard drive configuration remove the six screws to release the hard drive cage Please refer to the Intel Server System Serv...

Page 25: ...cables see letter H 11 Secure the two screws see letter I Figure 31 Installing the Intel A1U2ULCP Local Control Panel in a 2U server system 12 Install the cage into server chassis see letter J For 2U...

Page 26: ...For 2U system with 2 5 hard drive configuration remove the stiffener first Please refer to the Intel Server System Service Guide for detailed instructions 3 Disconnect the Intel Local Control Panel c...

Page 27: ...out the Intel Local Control Panel from server chassis together with cables see letter E 8 Remove the two screws and slide out the front USB connecter from the bracket see letter F Figure 34 Removing...

Page 28: ...d drive configuration secure the three screws see letter K For 2U system with 3 5 hard drive configuration secure the six screws Please refer to the Service Guide of your Intel Server System for detai...

Page 29: ...panel cable and USB cable from motherboard see letter A 2 Slide the front panel tray out from the chassis see letter B and C 3 Refer to Replacing the Front Panel Board to remove front panel board fro...

Page 30: ...ULCP Local Control Panel in a Pedestal server system 4 6 Removing the Intel A4ULCP Local Control Panel in a Pedestal server system 1 Disconnect all cables from the motherboard see letter A 2 Slide the...

Page 31: ...rder number G83726 001 25 Figure 39 Removing the Intel A4ULCP Local Control Panel from a Pedestal server system 4 Insert the front panel tray into the chassis see letter H 5 Connect all cables of the...

Page 32: ...ee Letter A securing the front panel board and remove the front panel board see Letter B Figure 41 Removing the Front Panel Board 3 Remove the cap on the front panel board power button and install the...

Page 33: ...properly grounded plugs To help protect your computer system from sudden transient increases and decreases in electrical power use a surge suppressor line conditioner or uninterruptible power supply...

Page 34: ...ate components inside your computer To prevent static damage discharge static electricity from your body before you touch any of your computer s electronic components such as the microprocessor You ca...

Reviews: