Integra DSR-7.3 Instruction Manual Download Page 19

19

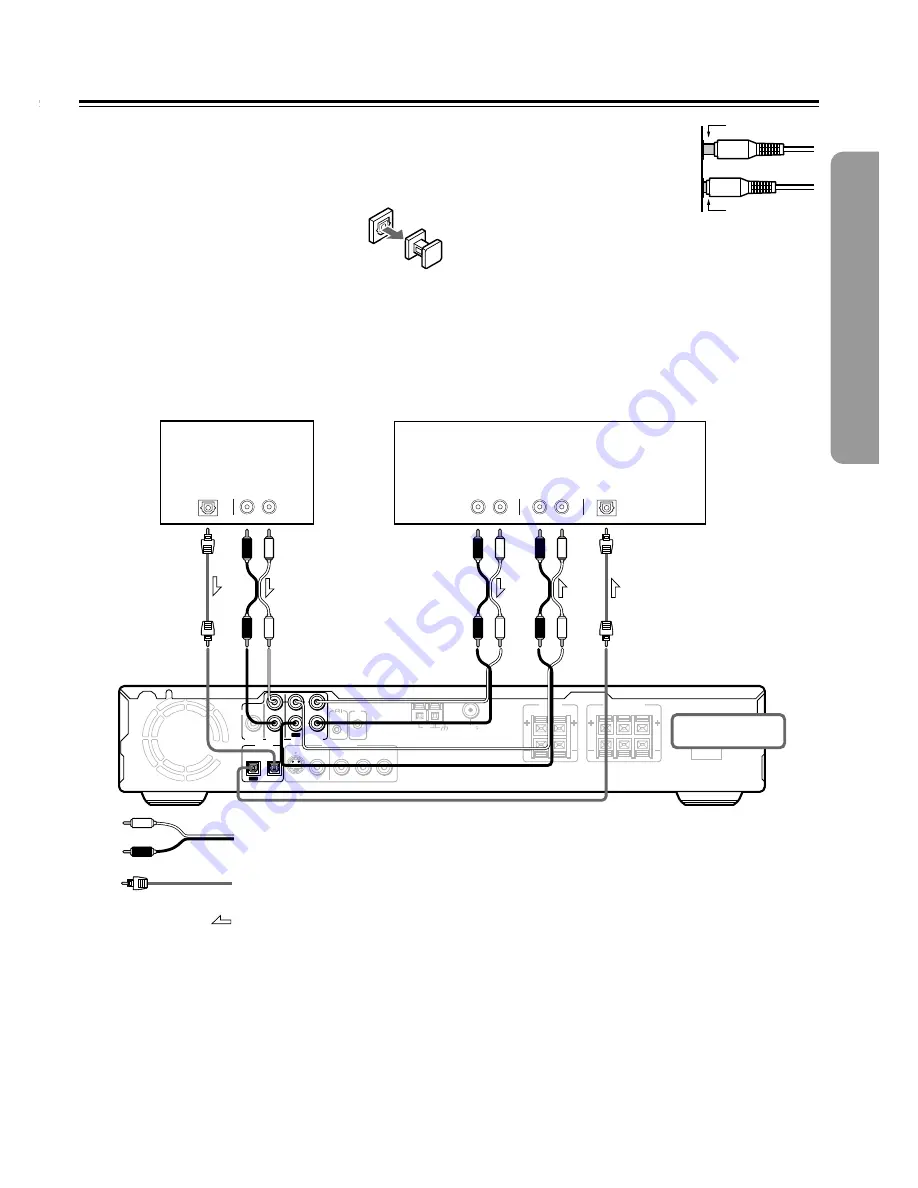
Cassette Tape Deck, MD Recorder,

CD Recorder, etc.

Audio connection cable

Signal flow

Optical fiber cable

AC INLET

PREOUT

SUB

WOOFER

TV/LINE

MD/CDR/TAPE

DIGITAL

OPTICAL

AUDIO

REMOTE
CONTROL

AM

FM 75

SURROUND

SPEAKERS

FRONT SPEAKERS

CENTER

R

L

IN

IN

IN

OUT

L

R

R

L

OUT

ANTENNA

VIDEO OUTPUT

S VIDEO

VIDEO

COMPONENT

Y

P

B

P

R

IN

IR

AUDIO

OUT

R

L

R

L

AUDIO

IN

AUDIO

OUT

R

L

DIGITAL

IN

OPTICAL

DIGITAL

OUT

 OPTICAL

DO NOT

 connect the

power cord at this time.

Connecting to Audio/Video Equipment

Before connecting

• Refer also to the instruction manual of each component to be

connected.

• When you connect the DVD Receiver to audio/video equipment, be

sure to turn off the power and unplug all the units from the socket
before making any connections.

About the DIGITAL OPTICAL OUT/IN connectors

Remove the protective caps before making
connections. When not in use, be sure to replace them.

• Analogue audio from components connected to TV/

LINE IN or MD/CDR/TAPE IN is not output from the
unit’s DIGITAL OPTICAL OUT jack. Only digital audio playback from
this unit is output from this jack.

Incomplete

Insert completely

Caution

When connecting this unit’s DIGITAL OPTICAL OUT jack to the digital in
jack of a CD recorder or MD recorder, do not connect the CD or MD
recorder’s digital output to this unit’s DIGITAL IN. A signal loop could be
created which may damage the units.

If you don’t connect TV audio output to this unit, you can
connect MD player or BS tuner audio output.

BS tuner,

MD player, etc.

• Connect the plugs securely.

Summary of Contents for DSR-7.3

Page 1: ...aking connections and turning on the power Following the instructions in this manual will enable you to obtain optimum performance and listening enjoyment from your new DVD Receiver Please retain this...

Page 2: ...against voltage surges and built up static charges Article 810 of the National Electrical Code ANSI NFPA 70 provides information with regard to proper grounding of the mast and supporting structure gr...

Page 3: ...ommunications However there is no guarantee that interference will not occur in a particular installation If this equipment does cause harmful interference to radio or television reception which can b...

Page 4: ...en you place the unit near a TV radio or VCR the playback picture may become poor and the sound may be distorted In this case place the unit away from the TV radio or VCR 8 Care From time to time you...

Page 5: ...D Receiver 24 Speaker Setup 26 Basic Operation Getting Started Using Your DVD Receiver 29 Listening to the Radio 35 Playing the Connected Source 38 Various Functions Common to all the Sources 40 Using...

Page 6: ...ymbol are trademarks of Dolby Laboratories Confidential Unpublished Works 1992 1997 Dolby Laboratories All rights reserved Theater Dimensional is a trademark of Onkyo Corporation Receiver Features 25...

Page 7: ...nd Back Right Surround Back Right Zone 2 Right Zone 2 Right Front Left Front Left SP B Zone 2 Left SP B Zone 2 Left Front Right Front Right SP B Zone 2 Right SP B Zone 2 Right Front Right Front Right...

Page 8: ...nd the recording characteristics of the recorder as well as the properties damage or stain of the disc in use and stain or condensation on the pickup lens of this unit For details please refer to the...

Page 9: ...not attach paper or tape to discs Differences in Disc Composition DVD All discs are divided up into smaller more manageable sections so that you can find specific content more easily DVDs are divided...

Page 10: ...ace discs in the disc tray with the label side facing up 0 Open Close button 29 34 Press to open and close the disc tray Pause button 29 Press to pause playback Press again to resume playback Stop but...

Page 11: ...during A B repeat playback 7 Source Listening mode indicators 38 47 49 One of the source indicators lights to show the format of the current source 8 SLEEP indicator 42 Lights up when the sleep timer...

Page 12: ...te controller 6 Sleep button 42 For setting the sleep timer 7 Dimmer button 40 For adjusting the brightness of the front display 8 Top Menu button 32 52 Press to call up the top menu programmed on the...

Page 13: ...o change the acoustic mode to boost the super bass high frequency sounds button 29 32 34 52 54 58 60 Press to start or resume playback 1 buttons 33 35 During playback of DVD and Video CD press to perf...

Page 14: ...remote controller 6 ANTENNA terminals 22 23 These terminals are for connecting the FM antenna and AM antenna 7 FRONT SPEAKERS CENTER SPEAKER and SURROUND SPEAKERS terminals 18 Speaker terminals are p...

Page 15: ...the remote controller and the remote control sensor the remote controller will not operate Switching the remote controller function modes Some buttons on the remote controller have two or more functio...

Page 16: ...component video connection cable not supplied These connections allow you to enjoy higher quality picture playback You can switch between S1 and S2 S video output from the Setup menu on page 69 S vid...

Page 17: ...eakers Before connecting Refer also to the instruction manuals of the speakers This DVD Receiver is designed to reproduce optimum sound quality when speakers with the impedances specified below are co...

Page 18: ...he sensation of being in the middle of the action Place the left and right surround speakers 1 meter 3 feet above the listener s ear level and facing toward the sides of the room making sure that the...

Page 19: ...ff the power and unplug all the units from the socket before making any connections About the DIGITAL OPTICAL OUT IN connectors Remove the protective caps before making connections When not in use be...

Page 20: ...nected component the input source selected at the this unit automatically changes to that component Program Timer You can operate timer playback and recording using this unit Sleep Timer You can fall...

Page 21: ...hen operation with the remote controller will not be possible In such a case it will be necessary to install a remote sensor at a location outside of the cabinet for the infrared rays from the control...

Page 22: ...es AM indoor antenna Insert into the hole FM indoor antenna DO NOT connect the power cord at this time An outdoor antenna will be more effective if it is stretched horizontally above a window or outsi...

Page 23: ...e antenna for both FM and TV or VCR reception since the FM and TV or VCR signals can interfere with each other If you must use a common FM TV or VCR antenna use a directional linkage type splitter Dir...

Page 24: ...ndicator Standby indicator Connect the power cord to the AC INLET of the DVD Receiver Connect the power cord to a wall outlet The DVD Receiver enters the standby mode and the Standby indicator lights...

Page 25: ...n the IPM indicator on the unit Notes The IPM system may not function properly with some TV sets When using monaural TV connect the audio output of the TV to the DVD Receiver s TV LINE IN L jack When...

Page 26: ...ubwoofer mode Before operating the remote controller Press Mode Recvr Press SW Mode on the remote controller With the first press of the button you can check the present setting Then each press of the...

Page 27: ...d left and right speaker distance You cannot enter the following distances Distances longer than the distance set for the front speakers Distances shorter than the distance obtained by subtracting 15...

Page 28: ...Audio Last M Program Random Late Night Timer Angle Clear Subtitle FM Mode Input Selector ENTER Light TV Display VOL CH TV Input Setup DVD Recvr Tape Tun Step Slow Top Menu Menu Return Clock Sleep Dimm...

Page 29: ...or 0 on the Remote controller to open and close the disc tray Do not touch the disc tray while it is moving Doing so may cause the DVD Receiver to malfunction Do not press down on the disc tray or pu...

Page 30: ...go forward using the cursor button 3 so it will be necessary to answer all the questions that occur after the screen that was returned to To exit the Setup Navigator Press Setup TV Input while on any...

Page 31: ...lled the aspect ratio Confirming the settings The Exit Setup Navigator is the final screen in the Setup Navigator Settings Save Changes Factory setting Select to have the DVD Receiver make all of the...

Page 32: ...o play When screen saver appears During disc playback when the disc is paused a screen saver appears after a fixed period Press or to resume playback Alternately the unit can be programmed to turn off...

Page 33: ...V Display VOL CH TV Input Setup DVD Recvr Tape Tun Step Slow Top Menu Menu Return Clock Sleep Dimmer 1 2 3 4 5 6 10 Search 0 7 8 9 7 Menu Top Menu Return 4 2 3 5 ENTER 1 Forward and Reverse Scanning F...

Page 34: ...Unit Open Close Standby Resuming playback from where you stopped Use the resume feature to restart playback from the point that the disc was stopped last This features cannot be used with MP3s and CD...

Page 35: ...er 1 2 3 4 5 6 10 Search 0 7 8 9 Input Selector 2 3 FM Mode Tune in the radio station you wish to preset see steps in the left column of this page Press Preset Memory The preset number starts flashing...

Page 36: ...etup Test Tone CH Sel RC 507M Audio Last M Program Random Late Night Timer Angle Clear Subtitle FM Mode Input Selector ENTER Light TV Display VOL CH TV Input Setup DVD Recvr Tape Tun Step Slow Top Men...

Page 37: ...en Close 2 T D Setup IPM SW Mode Distance T D ST A B Surround A Control Mode Enter Repeat Muting Up Down SP Setup Test Tone CH Sel RC 507M Audio Last M Program Random Late Night Timer Angle Clear Subt...

Page 38: ...rce See page 46 Press Input Selector 2 3 on the remote controller or Input 2 3 on the unit to select one of the following input sources TV TAPE MD CDR The selected input source appears in the multipur...

Page 39: ...lay Change display Program Memory Clear Clear 0 9 10 Number buttons FM Mode Play mode random program normal Number buttons CD recorder On On Standby Standby On Standby Play 7 Stop Cancel Pause 4 Down...

Page 40: ...Remote controller only Phones jack Listening Through Headphones Connect the plug of the stereo headphones to the Phones jack on the DVD Receiver Notes The speakers will not reproduce sound while headp...

Page 41: ...o a proper power supply Blinking Display disappears after 7 seconds Display switches back to the function Send On Standby Open Close 2 T D Setup IPM SW Mode Distance T D ST A B Surround A Control Mode...

Page 42: ...press of the Sleep button makes the remaining time shorter by 10 minutes Press the Cursor 5 buttons to adjust the time in 1 minute intervals Checking the remaining time Press Sleep while the Sleep Ti...

Page 43: ...o this unit the timer will activate and the unit will turn on and the function will change at the timer time but nothing will happen Press 5 to select the start playback time When the desired time is...

Page 44: ...after selecting REC Press 5 to select the recording source Select TV FM or AM then press ENTER Repeatedly press 5 to select the recording start time When the desired time is displayed press ENTER Tip...

Page 45: ...start time of each times If two or more ONCE WEEKDAY WEEKEND REC are set to the same timers start times are given the following priority ONCE WEEKDAY WEEKEND REC If the REC timer is deactivated becaus...

Page 46: ...stop playback for about three seconds then resume playback Some CD players if connected to the DVD Receiver and LD players may be unable to play DTS Surround sources correctly even if you connect the...

Page 47: ...r sometimes it is difficult to meet all those conditions In reality you may only have front speakers or not be able to place the surround speakers in position Even if your speaker system is not comple...

Page 48: ...L R L R Listening angle Theater Dimensional mode is the technology which controls the characteristics of the sounds reaching the listener s left and right ears therefore there is a sweet spot where y...

Page 49: ...n SPEAKER 2CH is selected Only STEREO can be selected Only PL II MOVIE PL II MUSIC or STEREO can be selected when SPEAKER 3CH is selected DSP indicator Send On Standby Open Close 2 T D Setup IPM SW Mo...

Page 50: ...he source press CH Sel repeatedly Each press of the button changes the speaker which outputs the sound and the selected speaker appears in the display in the following order LEFT Front left ch CENTER...

Page 51: ...tup Test Tone CH Sel RC 507M Audio Last M Program Random Late Night Timer Angle Clear Subtitle FM Mode Input Selector ENTER Light TV Display VOL CH TV Input Setup DVD Recvr Tape Tun Step Slow Top Menu...

Page 52: ...nd then make your selection With some DVDs the search operation may not be possible and may stop shortly after being performed In this case the mark will appear on the screen Time search is not possib...

Page 53: ...taining MP3 tracks Press Menu to enter the MP3 Navigator screen The left side of the screen shows a list of folders containing MP3 tracks If you display the MP3 Navigator when a disc is playing the cu...

Page 54: ...on is canceled Note If you press 4 during track repeat or chapter repeat the repeat mode may be cancelled DVD VCD CD Repeating a Specific Segment Repeat play of a specified section Press A B at the be...

Page 55: ...tep Slow 2 Press Step Slow Step Slow The picture advances one frame each time the button is pressed Step Slow The picture backs up a DVD a few frames each time the button is pressed To return to norma...

Page 56: ...ogram Chapter or Program Title Once the program type is selected Use the cursor button to enter the program window When Program Chapter is selected you must also select what title the chapters to be p...

Page 57: ...om memory If you press Clear in stop mode the program will be cleared from memory and Program Memory will be turned to Off Programming Video CDs CDs VCD CD Exit Move Play Current Track Total Time 1 10...

Page 58: ...n the top left of the screen Once you ve entered a valid track number the name of the track appears Programming MP3s 3 ENTER PROGRAM MP3 Program Exit Play Folder 001 25 001 008 Move MP3 Press ENTER or...

Page 59: ...onfirm the contents of a program On a CD or Video CD track program press Program to confirm The program screen displays the current program On a DVD select the program type title or chapter with the c...

Page 60: ...ile in the stop mode and then press Random Random play of programmed tracks or chapters is not possible Repeat playback of random playback is not possible You cannot use random play while using MP3 na...

Page 61: ...ormation on the disc jacket or accompanying material Selecting a Subtitle Language Multi Language Subtitles You can select a desired subtitle language with DVDs that have subtitle data in multiple lan...

Page 62: ...ally when loaded In this case press 7 to stop playback Press Last M while in the stop mode The disc begins playback at the memorized point Last Memory mode may not function for some DVDs You can use L...

Page 63: ...hether or not a disc is recorded with angles The jackets of discs that are recorded with angles will be marked with When locations on discs that are recorded with angles are played back the indicator...

Page 64: ...current title chapter number elapsed time of current chapter current title chapter number elapsed time of current title remaining time of current chapter remaining total time of current chapter curre...

Page 65: ...5 10 6 51 3 18 6 50 4 16 3 22 Information Compact Disc Exit 1 2 Exit Folder 001 002 003 004 005 Folder 01 02 03 04 05 Track 1 10 1 13 1 5 1 4 1 8 Track 1 9 1 11 1 3 1 22 1 15 1 2 Information MP3 DISPL...

Page 66: ...with the cursor the settings appear below the menu heading Use the cursor button to enter the menu The top item within the menu becomes highlighted Use the cursor buttons 5 to select the setting you w...

Page 67: ...g Note The next time you press Setup TV Input you ll see the menu screen that you exited from last time How to interpret the setting indicator colors in the Setup screen menus When setting up the syst...

Page 68: ...en Letter Box setting Wide screen format DVD The Letter box presentation places black bars at the top and bottom portions of the screen to provide the full wide screen presentation of a movie on a sta...

Page 69: ...nterlace setting Your TV monitor must be compatible with progressive scan to use this setting Tip If this DVD Receiver is set to output progressive scan video it s possible that the picture will appea...

Page 70: ...reen Video 2 menu Selecting a preprogrammed setting 1 Use the cursor button 3 to select Start then press ENTER Setting items vary depending on the settings in the Setup screen Video 1 menu Video2 Lang...

Page 71: ...jacks Memory Interlace Memory Programs the current settings 5 Use the cursor buttons 2 3 to adjust the settings Adjust these while a disc is playing to see the effect of changes immediately 6 Repeat...

Page 72: ...fective with DVDs that contain a 4 3 aspect ratio video presentation Turning the angle indicator on and off Expert When a picture recorded in different angles is played back is displayed on the screen...

Page 73: ...hold up to 8 different language tracks and subtitle information in as many as 32 different languages This section outlines the variety of audio language and subtitle options available with this DVD r...

Page 74: ...u in the Expert menu mode page 67 You cannot make this setting with a disc playing Settings On Factory setting Off Assist Subtitle Notes If there is no subtitle information recorded on the DVD no subt...

Page 75: ...dic kl Cambodian km Kannada kn Kashmiri ks Kurdish ku Kirghiz ky Latin la Lingala ln Laothian lo Lithuanian lt Latvian lv Malagasy mg Maori mi Macedonian mk Malayalam ml Mongolian mn Moldavian mo Mara...

Page 76: ...xit Return Move Select Parental Lock Level Change Setup Parental Lock SETUP ENTER RETURN 1 Level 2 3 4 6 7 8 5 Off Setting the Parental Lock Level Change the Parental Lock level to a higher or lower l...

Page 77: ...word refer to Entering the Password on the previous page The Country Code selection screen appear List of Codes Code 0 2 us Setup Country Code Language V2 General Video1 Exit Return Move Select Countr...

Page 78: ...eat Muting Up Down SP Setup Test Tone CH Sel RC 507M Audio Last M Program Random Late Night Timer Angle Clear Subtitle FM Mode Input Selector ENTER Light TV Display VOL CH TV Input Setup DVD Recvr Tap...

Page 79: ...s Enter Confirm VOL Adjusts the volume at the television Muting Activates the muting function at the television Note You can use the grayed buttons in the illustration to control the DVD receiver in t...

Page 80: ...e of the recording equipment for recordable sampling frequency refer to the manual of the digital recording equipment 96 88 2 kHz digital audio signals are not output from copy protected discs Analog...

Page 81: ...ker when the listening mode is STEREO or ORCHESTRA Adjust the volume level of the center speaker Check that the selected speaker configuration includes the center speaker Set the TV to the DVD Receive...

Page 82: ...r to exit the pause mode Increase the volume level Change the aspect setting in the TV Screen setting in the Setup screen Video 1 menu to the screen type most appropriate to the TV or monitor you are...

Page 83: ...tched off for a long time The sound system you are trying to record is DTS Surround Playback source is not Dolby Digital encoded The signal input is not compatible The z cable is not firmly connected...

Page 84: ...ohms Laser Semiconductor laser wavelength 650 nm DVD 780 nm CD Frequency response 10 Hz to 44 kHz 96 kHz Signal to noise ratio digital audio More than 100 dB Audio dynamic range digital audio More th...

Page 85: ...85...

Page 86: ...86...

Page 87: ...87...

Page 88: ...park Way Upper Saddle River N J 07458 U S A Tel 201 785 2600 Fax 201 785 2650 http www integrahometheater com Integra Division of ONKYO CORPORATION Sales Product Planning Div 2 1 Nisshin cho Neyagawa...

Reviews: