Intech Instruments ezeio-GSM Supplementary Manual Download Page 8


Getting started with configuration. 


The first task is to configure the 2400-A16. 

Connect the 2400-A16 to a computer as covered bottom of page 16 in the ‘2400-A16 Installation Guide’. 
If you do not already have a copy of the ‘Intech Micro Station Programmer Software’, download and install from this link: 

www.intech.co.nz/downloads/Install-StationProgrammer.html 


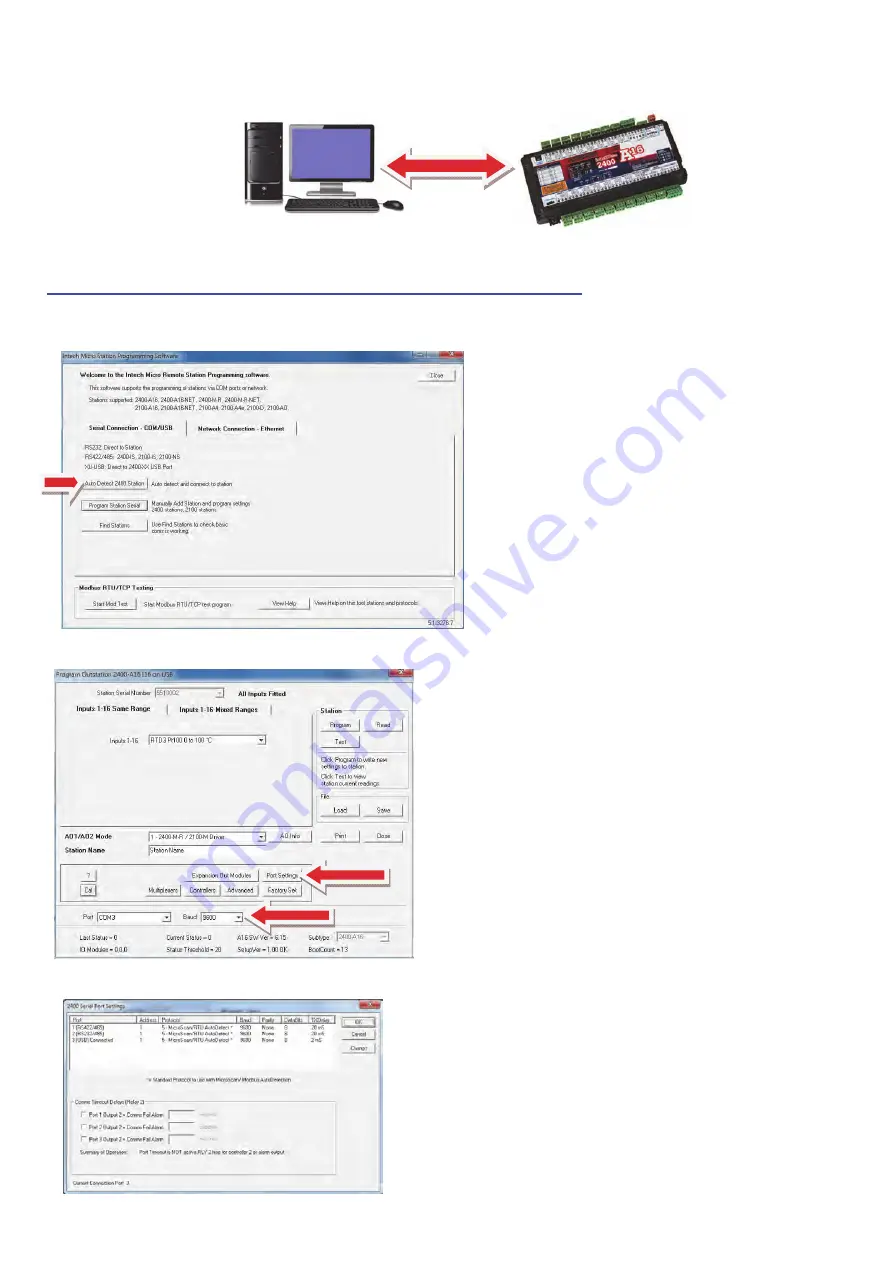
Run the ‘Intech Micro Station Programmer Software’. 

Click on the ‘Auto Detect 2400 Station’ button. 

Configure the required input channel settings as shown. 
 
The 2 important areas to make the same as the eze is the 

Baud

 rate and the ‘

Port Settings

’.  

This 2400-A16 configuration screen (left) displays the  
parameters the 2400-A16 should be set to, with special  
attention to the ‘

Address

’ which is referred to on the ezeio 

Controller as the ‘

Polling address

’. 


Note that on the 2400-A16, the ‘Address’ number can be set  
differently for each (comms) port, so make sure the 2400-A16 
port used for the ezeio Controller is the same as that used in 
the ezeio Controller. 

Summary of Contents for ezeio-GSM

Page 1: ...ezeio Controller and the 2400 A16 input expansion Important Supplementary Manual...

Page 2: ...m Page 14 Section 3 Alarms Page 15 Using a data GSM 3G SIM in the ezeio GSM Controller Page 16 Product Liability This information describes our products It does not constitute guaranteed properties an...

Page 3: ...transceiver Ethernet port 4 analogue inputs and Modbus RTU RS 485 Comms ezeio Controller Compatibility The Modbus RTU RS 485 port on the ezeio controller can be used to connect to Intech Micro Station...

Page 4: ...m Click on the Configure tab And then the by the Inputs Now select which input you wish to configure Select the Input type to match the configuration of the Jumper setting in the table above Always re...

Page 5: ...s example we want to read 10 If you wish this to actually read another value for example 100 then enter 100 Click on Use 2 Now go to the eze Configure page and click on Input type and select Custom as...

Page 6: ...good accuracy at a particular point of the span then calibrate at that point instead of the full span point 7 For the best average accuracy calibrate the scale between 0 75 of span 8 Apply this proce...

Page 7: ...es 1 More than one 2400 A16 can be added to a ezeio controller 2 The ezeio Controller will accept up to 40 inputs total per ezeio controller this also includes the 4 analogue inputs on the ezeio contr...

Page 8: ...Software Click on the Auto Detect 2400 Station button Configure the required input channel settings as shown The 2 important areas to make the same as the eze is the Baud rate and the Port Settings Th...

Page 9: ...ng address may be set to 2 Enter your Account number Login and Password The first task is to add the 2400 A16 onto the ezeio Controller Click on the Configure tab and wait for the Configure screen to...

Page 10: ...ure input scaling for RTD s and thermocouples Select Custom for all 2400 A16 input configurations Type in these 2 calibration details for all listed temperature probes both RTD and Thermocouple The 24...

Page 11: ...splays input values from the selected range Table of how eze scales this input 2400 A16 output value to eze eze Raw value 0 0 100 100 000 Select Custom Click on Linear analog Point 1 is the zero point...

Page 12: ...m Click on Linear analog Point 1 is the zero point As the pressure transmitter range is 1 at minimum range the Raw value and the pressure sensor value 0 but the Value 1Bar Point 2 is Full Scale which...

Page 13: ...sec Therefore 1250 will be value used for full scale reading The 2400 A16 calculates this Hz input the same as the normal analogue input 0Hz 0 and 100Hz 100 Select Custom Click on Linear analog Point...

Page 14: ...puts on the 2400 A16 are also available but need to be initialised by eze On Site Calibration Trim When an onsite calibration offset or zero adjustment is required to correct the reading on the eze we...

Page 15: ...2 Two set point settings are required one for setting the alarm and the 2nd for unsetting the alarm as per this screen shot 3 Example for configuration of a SMS text alarm message When in this alarm...

Page 16: ...e Configuration area click on System Setting required for New Zealand GPRS APN leave all other areas blank match to your provider as listed below 7 Click Save changes Remove the Ethernet connection an...

Reviews: