IInntta
atteecc LLiim
miitteed
d,, A
Aiirrffiieelld
d IInnd
duussttrriia
all EEsstta
attee,, H
Hiixxo
onn,, S
Stta
affffss,, S
STT1
18
8 0
0PPFF
Tel: 0
01
18
88
89
9 2
20
07
72
20
00
0 Fax: 0
01
18
88
89
92
27
71
11
17
72
2 email: ssa
alleess@
@iinntta
atteecc..cco
o..uukk
© Intatec Ltd 2008
V
VRR9
99
94
4C
CPP V
Va
annd
da
all RReessiisstta
anntt S
Shho
ow
weerr H
Heea
ad
d
RReea
arr a
annd
d B
Bo
otttto
om
m C
Co
onnnneeccttiio
onnss
EExxp
po
osseed
d IInnsstta
alllla
attiio
onn
EExxp
po
osseed
d IInnsstta
alllla
attiio
onn IInnssttrruuccttiio
onnss
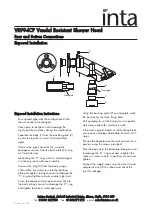
For exposed pipework the configuration of the
shower needs to be changed.
Care needs to be taken not to damage the
highly polished surfaces during the modification.
Separate the body (1) from the backing plate (2)
by unscrewing the set screw (3) and pulling
apart.
Unscrew the pipe connector (4), using the
hexagonal section, from the back plate (2) using
a 10mm Allen key.
Lubricating the ‘O’ rings which a mild detergent
or silicone grease will ease assembly.
Unscrew the plug (5) from the body using a
10mm Allen key and screw into the backing
plate and tighten, taking care not to damage the
‘O’ ring and tighten to make a water tight joint.
Screw the exposed inlet pipe connector (6) into
the body taking care not to damage the ‘O' ring
and tighten to make a water tight joint.
Using the backing plate (2) as a template mark
the position for the three fixing holes.
Drill and plug to suit the fixing screws supplied
which are suitable for most brick walls.
If the wall is plaster board or soft building block
use special wall plugs obtainable from most DIY
stores.
Position the backplate on the wall and secure in
position using the screws provided.
Push the body onto the backplate taking care not
to damage the ‘O’ ring seal and re-tighten the
socket set screw to hold in position, do not over
tighten.
Connect the supply pipe using the olive (7) and
compression nut (8) as shown and check the
joint for leakage.
1
2
3
4
5
6
7
8
Hexagon
Hexagon


