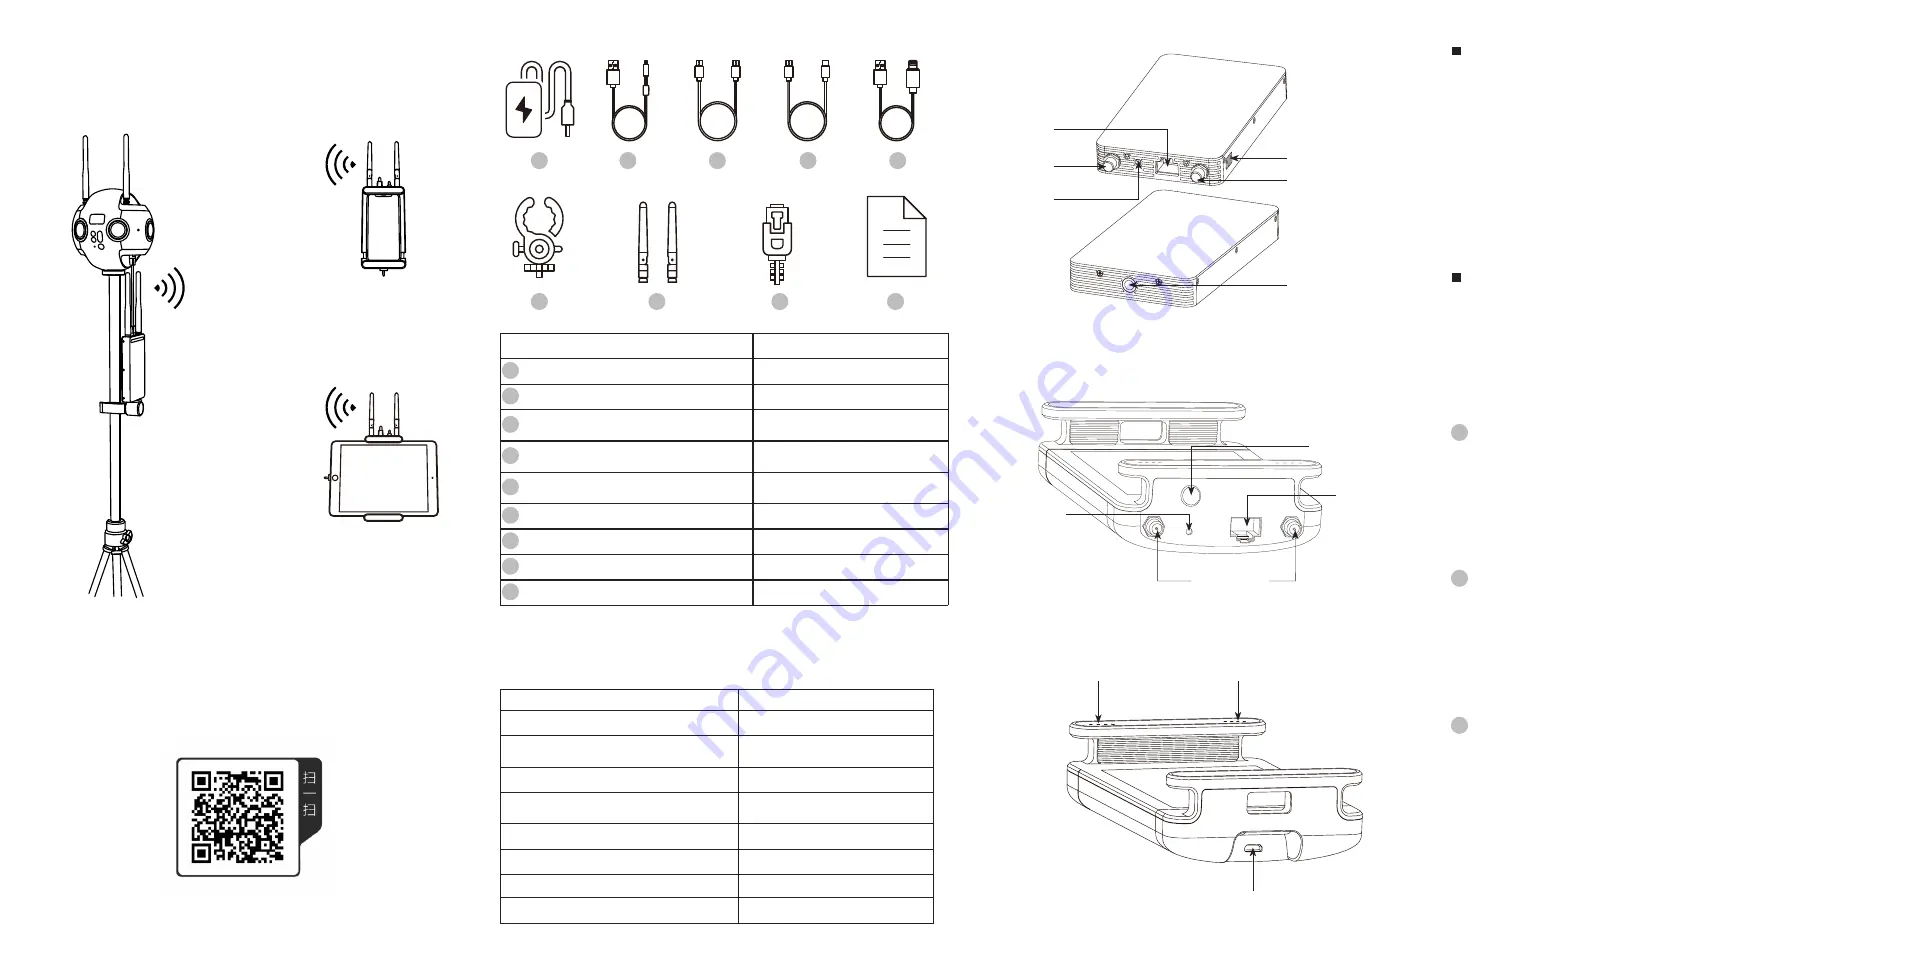
Insta360 FarSight Wireless Communication Devices
User Guide and Safety Guideline
2. Specifications
App Download
Item
Specifications
Operating Frequency
5.18 GHz
Wireless communication distance
(no interference or obstructions)
Ground to sky: 2-3 km
Ground to ground: 300 m
Real-time image transmission resolution
1080p
Max Transmission rate
300Mbps bidirectional
communication
System Requirement
Mac / Windows / iOS / Android, etc.
Operating temperature
-10
。
C ~ 40
。
C
Built-in battery
11.4V , 1000mAh
Power adapter
5V / 3A
Scan the QR code below or visit
http://insta360.com/download/
to download the
official control app.
1. What's Included
Name
Quantity
1
Power adapter
2
2
Micro-USB to DC cable
2
3
Micro-USB to Micro-USB cable
Cable
length
:
155mm × 1
Cable length: 285mm × 1
4
Micro-USB to USB Type-C cable
Cable
length
:
155mm × 1
Cable length: 285mm × 1
5
Micro-USB to Lightning cable
Cable
length
:
155mm × 1
Cable length: 285mm × 1
6
Pole Mount
1
7
Antenna
4
8
Ethernet cable
1
9
User guide and safety guideline
1
1
6
7
8
9
2
3
4
5
1
Disclaimer
:
Thank you for purchasing Insta360 Farsight wireless communication devices. Please read this
disclaimer carefully. Using these included devices means that you acknowledge and accept
the terms of this disclaimer. Please follow instructions in this guide to operate and use the
product. The user shall take full responsibility for any damages resulting from improper use,
improper installation or issues not directly pertaining to the quality of the included accessories.
Within the scope of national laws and regulations, Shenzhen Arashi Vision Co., Ltd. (hereinafter
referred to as Insta360) reserves the right to interpret the above disclaimer and advisory
content.
3
Installation Precautions:
•
Do install antennas of the wireless communication devices, otherwise the quality of WiFi
signal will be affected.
•
Please verify that the supply power voltage of the wireless communications devices is
within the rated voltage, otherwise the electric circuit may be damaged.
•
Keep antennas of the transmitter upward vertically and no huge metals or other
obstructions nearby, otherwise the transmitting distance will be greatly affected.
•
It is suggested to use the included antennas so that the frequency, impedance and other
specifications can be matched.
2
Caution:
•
Please read and follow instructions in this guide carefully. Improper use may cause
damage to terminal devices or hurt human body.
•
Make sure that all cables are connected well and correctly.
•
Make sure that there is no high power wireless transmitting devides nearby, otherwise the
receiver may not be able to receive images properly.
•
When the wireless signal of the receiver on the ground is bad, you can adjust the angles of
antennas to improve the wireless signal quality.
•
It is suggested to use accessories with good electromagnetic shielding performance.
Power indicator
WiFi signal indicator
Micro-USB port
4.
Wireless Communication Receiver
6. Safety Guideline
3. Wireless Communication Transmitter
5. How to Use
Antenna port
1/4 mounting port
Power button
Power button
Antenna port
Antenna port
DC power port
DC power port
LAN port
LAN port
When the receiver is connected to a smartphone or a pad:
①
Install antennas onto the transmitter and receiver.
②
Turn on the camera and the transmitter. It will take about 40s until the transmitter
initiates.
③
Connect the camera and the transmitter with an Ethernet cable.
④
Check whether the IP displayed on the camera's OLED screen is
192.168.100.X
or not.
If not, unplug the Ethernet cable, reconnect the camera and wait until the camera obtains
an IP address of 192.168.100.X.
⑤
Turn on the receiver and connect it to the smartphone or pad with the included sync
cable. About 40s later, go to the Setting page of the smartphone or pad, select
Ethernet
and set
Configure IP
to
Automatic
on the Ethernet Setting page, and then check whether
the IP address is 192.168.100.X or not. If not, unplug the Ethernet cable, reconnect the
smartphone / pad and wait until the camera obtains an IP address of
192.168.100.X
.
⑥
Open the app you've downloaded on the smartphone or pad, select Connection Method 1,
set the IP address to the one displayed on the camera, and click "
Connect
".
When the receiver is connected to a computer:
①
Disable WiFi of the camera, and then connect the computer and the receiver with an
Ethernet cable. About 40s later, select "
Ethernet Status
" on the
Network and Sharing
Center
page of the computer and verify that the IP address is 192.168.100.X. If not, unplug
the Ethernet cable, reconnect the computer and wait until the IP address is
192.168.100.X
.
②
Open the app you've downloaded on the computer, enter the IP address displayed on
the camera and click
Connect
.


