USER MANUAL
– EN
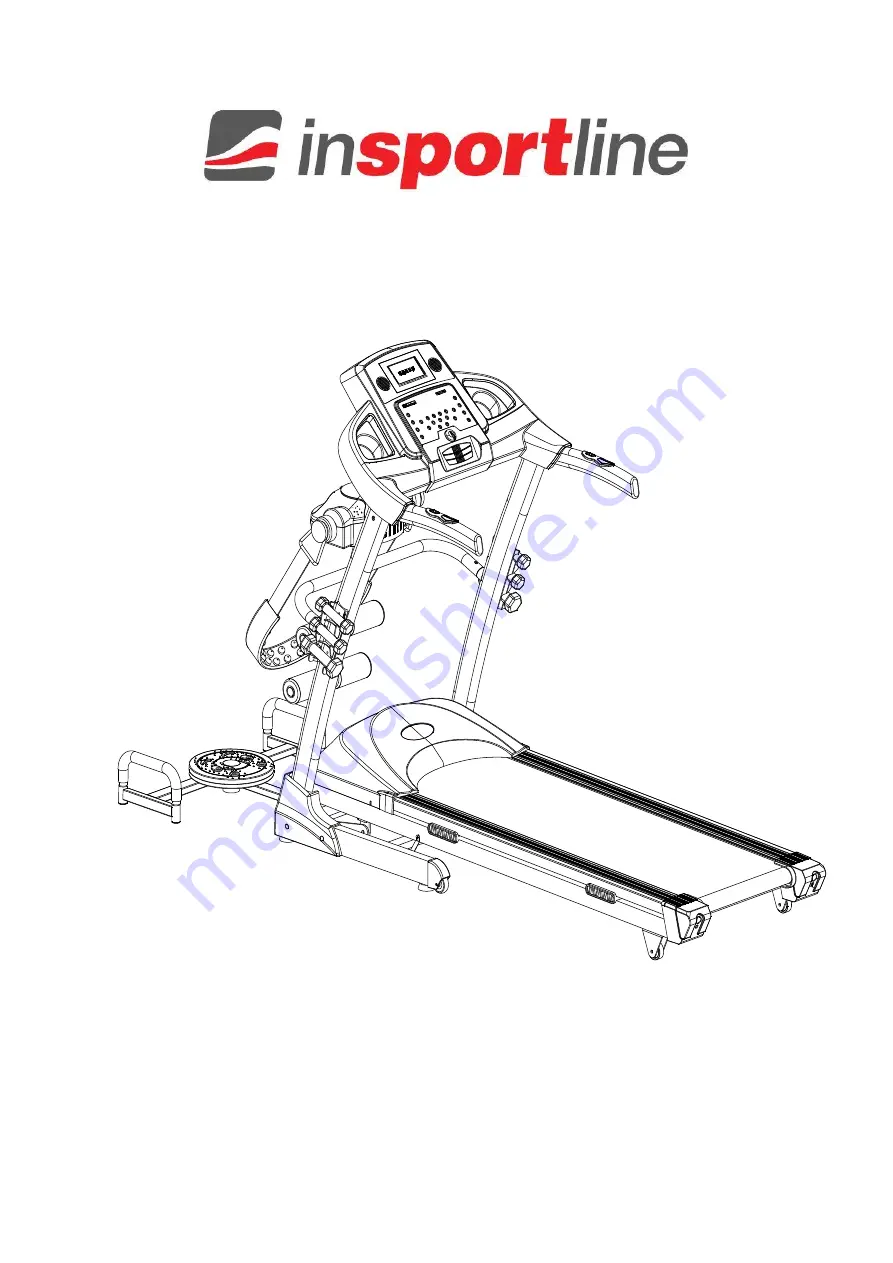
IN 7565 Treadmill inSPORTline Mendoz 4v1
Page 1: ...USER MANUAL EN IN 7565 Treadmill inSPORTline Mendoz 4v1 ...
Page 2: ...USE 13 SAFETY KEY 13 FOLDING UNFOLDING 13 INSTRUCTION FOR CONSOLE 14 PANEL KEYS AND FUNCTIONS 15 DISPLAYED WINDOW 17 PROGRAMS 17 GETTING STARTED 19 EXERCISE INSTRUCTIONS 20 THE WARM UP PHASE 20 THE COOL DOWN PHASE 21 SAFE EXERCISE 21 MAINTENANCE 21 CLEANING 23 CAUTIONS DEPOSITING 23 GUIDES FOR MALFUNCTION 23 IMPORTANT NOTICE 25 ENVIRONMENT PROTECTION 25 TERMS AND CONDITIONS OF WARRANTY WARRANTY CL...
Page 3: ...l on thick carpet If the power cable is damaged do not use the device Buy new one in authorized shop Protect the treadmill from humidity and water Place the treadmill not to cover socket Do not use aerosol sprays in the area around treadmill If the treadmill is running do not remove the protective cover If you need to remove the protective cover during maintenance unplug the treadmill from socket ...
Page 4: ...perate in accordance with procedures 2 Check components in the package 3 Remove all paper boxes and foams used as fasteners 4 Check all the following components If there is missing or problematic parts please contact the dealer Frame Meter Meter tube Decorating cover at base Multifunction frame Twister frame Massage head Solid tube for multifunction frame Push up handlebar Dumbbell shelf Dumbbell ...
Page 5: ...5 Washer 21PCS Nut 9pcs Umbrella type cross tapping screw M4 2 15 8pcs Lubricant Safety key MP3 connector 1pcs ...
Page 6: ...6 EXPLODED DIAGRAM ...
Page 7: ...lot belt 1 17 Motor cover 1 18 Side rail 2 19 Left back cover 1 20 Right back cover 1 21 Connector part for base frame 1 22 Adjusting foot pad 5 23 Left decorating cover at base 1 24 Right decorating cover at base 1 25 Base handling wheel set 2 26 Lower cover of motor 1 27 Shock absorption 6 28 Long shock absorption 4 29 Locating pad for side rail 8 30 Rubber transporting wheel 2 31 Transporting w...
Page 8: ...mmunication line 1 46 Red connecting line 1 47 Red connecting line 1 48 Green connecting line 1 49 Power wire 1 50 Speaker 2 51 MP3 module 1 52 Solid tube for multifunction frame 1 53 Multifunction frame 1 54 Sponge protecting bush 4 55 Tube plug 4 56 Massage head 1 57 Fan 1 58 Solid tube for twister 1 59 Push up handlebar 2 60 Push up handlebar sponge 2 61 Twister 1 62 Tube plug washer 4 63 Dumbb...
Page 9: ...e the communication line through the right meter tube Set meter tube on the base frame Use 2 pcs of Screw M8 15 with 2 pcs of washer and 4pcs of Screw M8 50 with 4 pcs of washer 4 pcs of nut to solid the meter tube Don t fasten screw at first ...
Page 10: ...er on the meter tube Use 6 pcs of Screw M8 15 with 6 pcs of washer to solid the meter Don t fasten screw at first After the machine is power on push Start if everything goes well then fasten screws mentioned in front steps Step 3 Use 4 pcs of Screw M8 15 with 4 pcs of washer to solid it Don t fasten screw at first ...
Page 11: ...e on base frame Don t fasten screw at first Use Screw M8 80 with washer nut to solid multifunction frame on solid tube then fasten screws mentioned in front steps Install 4 pcs sponge protecting bush on multifunction frame Step 5 Use 3 pcs of Screw M8 15 with 3 pcs of washer to solid massage head ...
Page 12: ...12 Step 6 Secure the covers with screws ST4 2x15 Step 7 Step 8 ...
Page 13: ...chine can work only when you put safety key at the appointed position Make sure the other end of the safety key has been nipped to your clothes In this way you can pull the safe key for the machine s sudden stop under the dangerous condition Then you will not be injured If you need to reuse the machine you could put safety key back FOLDING UNFOLDING Folding Folding will help to save space Before f...
Page 14: ...14 INSTRUCTION FOR CONSOLE Tech info Time 00 00 99 59 Min Speed 1 0 16 0 km h Incline 0 15 Distance 0 00 99 9 km Calorie 0 999 KCAL Heart rate 50 200 Min ...
Page 15: ...P Key Press start stop keys for starting stopping the running belt Reset Press Stop Key twice continuously the machine will be reset and start for new exercise record when you press Start PROG Key Under ready condition Press PROG you could select program P1 P99 and FAT P1 P99 is built in program FAT is body fat test When you finished selecting you have to press start to start it ...
Page 16: ...ference is 0 1 km h for each time When we press it for above 0 5 seconds it will progressive increase or reduce automatically INCLINE Key Under ready condition it is used for setting some data Under running condition it is used for setting incline incline difference is 1 for each press When we press it for above 0 5 seconds it will progressive increase or reduce automatically SPEED direct key Use ...
Page 17: ...Put safe key in the right position Press START Key there will be 3 seconds countdown displayed on the window After countdown the machine will run at the speed of 1 0km h According to your needs you could use SPEED SPEED to change speed use INCLINE INCLINE to change incline When you put your hands on the handlebar s heart pulse for 5 8 seconds it will display heart rate on the screen MANUAL MODE Un...
Page 18: ...ve 10 parts the time for each part setting time 18 When machines come into next part there will be a voice Bi Bi Bi for 3 times to remind you and speed and incline will be changed according to the built in programs No matter whether you have pressed INCLINE INCLINE SPEED SPEED to change speed and incline in front parts After finishing one program there will be voice Bi Bi Bi for 3 times the machin...
Page 19: ...nti slip rails of the belt and grasp both handles of the handrails Set the speed between 1 6 3 2 km h stand straight look ahead and try to stand on the belt several times with one leg Then put it on both feet to practice Once you get used to the belt you can slowly increase the speed to 3 5 km h and keep it for 10 minutes Then stop the device slowly EXERCISES First learn how to control the machine...
Page 20: ...jury It is advisable to do a few stretching exercises as shown below Each stretch should be held for approximately 30 seconds do not force or jerk your muscles into a stretch If it hurts STOP Touching your toes Slowly bend your back from hips Keep your back and arms relaxed while stretching downwards to your toes Do it as far as you are able and hold the position for 15 seconds Bend your knees sli...
Page 21: ...e the device more often you can choose between walking and during If you are not sure of the most suitable speed follow the following information Speed 1 3 0 km h physically weaker individuals Speed 3 0 4 5 km h less physically fit individuals Speed 4 5 6 0 km h people used to classic walking Speed 6 0 7 5 km h fast walking people Speed 7 5 9 0 km h recreational runners Speed 9 0 12 0 km h medium ...
Page 22: ... right by turning it for half a turn clockwise then adjust the bolt on the left by turning it half an anti clockwise see Diagram 3 c If the running belt is deflected to the left adjust the bolt on the left by turning it for half a turn clockwise then adjust the bolt on the right by turning it half a turn anti clockwise see Diagram 4 d After the adjustment the running belt still keeps deflecting pl...
Page 23: ...y it for use d Please take the protecting cover off every two months use vacuum dust collector to suck the dust remaining inside of the protecting cover The dust will make the components of circuitry board short circuit CAUTIONS DEPOSITING Cautions Please make sure that the plug has been pulled out before cleaning or maintenance Depositing The treadmill should be deposited indoor in case of being ...
Page 24: ...rcuit replace PCB 11 Displayed E03 on the screen Big fluctuated speed If this problem happened when speed is bigger than 8km h then the reason is overload and running belt is broken or lack of oil If the motor has been used for a long time then replace the motor Otherwise replace the PCB 12 Displayed E04 on the screen The PCB and meter cannot communicate with each other Check the lower communicati...
Page 25: ...RONMENT PROTECTION After the product lifespan expired or if the possible repairing is uneconomic dispose it according to the local laws and environmentally friendly in the nearest scrapyard By proper disposal you will protect the environment and natural sources Moreover you can help protect human health If you are not sure in correct disposing ask local authorities to avoid law violation or sancti...
Page 26: ... prove the purchase and validity of the claim by the Invoice or Bill of Delivery that includes the product s serial number or eventually by the documents without the serial number If the Buyer does not prove the validity of the Warranty Claim by these documents the Seller has the right to reject the Warranty Claim If the Buyer gives notice of a defect that is not covered by the Warranty e g in the...
Page 27: ...27 ...