USER MANUAL
– EN
IN 19988 Air Exercise bike inSPORTline Airbike Pro
Page 1: ...USER MANUAL EN IN 19988 Air Exercise bike inSPORTline Airbike Pro...
Page 2: ...CONSOLE 13 PROGRAMS 16 BATTERY REPLACEMENT 20 USE 20 EXERCISING INSTRUCTIONS 21 CORRECT BODY POSTURE 21 MAINTENANCE 22 STORAGE 22 IMPORTANT NOTICE 22 ENVIRONMENT PROTECTION 22 DIAGRAM 23 PARTS LIST 2...
Page 3: ...ever operate the machine if the machine is not functioning properly Only carry out training work on the equipment when it is in perfect working order Only use original spare parts in the event of a re...
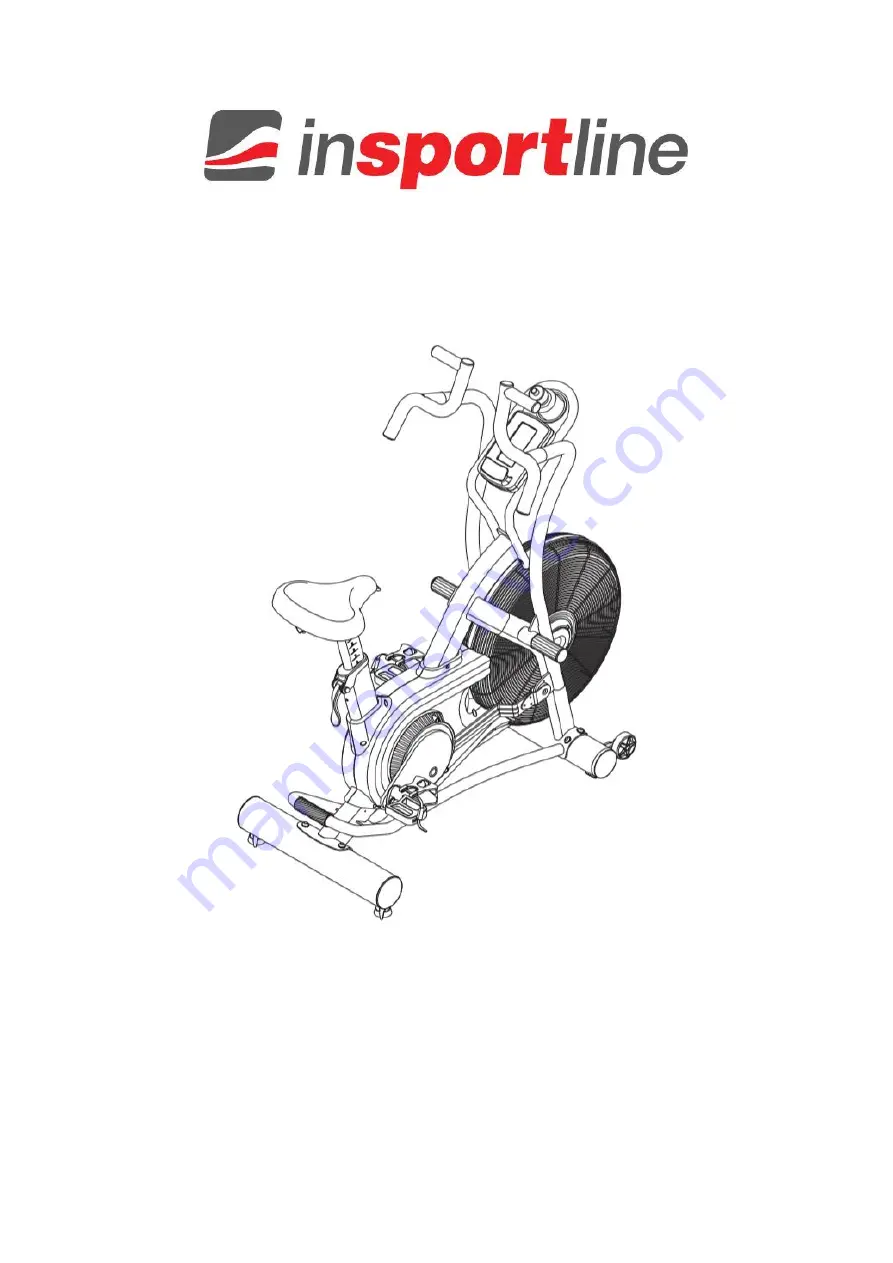
Page 4: ...er 7 Left cover 8 Lever 9 Serial number 10 Leveling foot 11 Rear stabilizer 12 Warning label 13 Right pedal 14 Right crank 15 Right cover 16 Connection rod 17 Bottle holder 18 Console holder 19 Consol...
Page 5: ...09 Bolt M6 x 1 x 10 mm 2 112 Arc washer M10 8 Place all parts out of the box on a clean surface Remove all packing material and place it in the box Do not remove the packing material until the exercis...
Page 6: ...transport wheels 43 on the front stabilizer 40 face forward Attach the front stabilizer 40 to the main frame 1 with screws 108 and washer 112 STEP 2 Remove the screws from the cardboard rollers from t...
Page 7: ...tach the cap 84 to the footrest 83 STEP 4 Attach the right connection rod 29 to the bottom of the right handle 58 using the mounting plate 74 spacer 75 bolt 105 and nut 93 Do not tighten the screw unt...
Page 8: ...8 Screw the right pedal 39 onto the right crank 28 as shown Tighten the pedal The pedal shlouder 38 39 should touch the crank To secure screw the screw 109 onto the right 28 and left 38 crank STEP 7 A...
Page 9: ...ecure the console 85 in the console bracket 48 with the screw 106 Do not damage the cables while attaching the bracket 85 STEP 9 Attach the bottle holder 113 to the console bracket 48 Place the bottle...
Page 10: ...xercise bike with the leveling feet 46 located on the rear stabilizer 44 Transportation There are transport wheels 43 on the front stabilizer 40 Place the exercise bike on the front wheels 43 using th...
Page 11: ...health problems Make sure that all screws are properly tightened before use Maximum load capacity 160 kg SEAT HEIGHT ADJUSTMENT For effective exercise it is important to set the correct saddle height...
Page 12: ...the desired position HEART RATE The exercise bike does not include a chest belt or other forms of heart rate transmission However it is compatible with chest belts operating at 5 kHz The chest belt se...
Page 13: ...n TURN OFF In standby mode the console will turn off after 60 seconds of inactivity During training except for Interval Program the console will turn off automatically after 90 seconds of inactivity D...
Page 14: ...ncrease value DOWN Decrease of value TARGET TIME Set the desired training time TARGET DISTANCE Set the desired training distance TARGET CALORIES Set the desired calories burned TARGET HEART RATE Targe...
Page 15: ...burning to 999 Kcal Calories are for reference only and are not intended for medical purposes 0 flashes to set target calories from 10 to 990 Kcal and starts counting down from that value RPM Displays...
Page 16: ...standby mode after 30 seconds of inactivity Console will turn off after 60 seconds of inactivity In standby mode the LCD display shows Interval 10 20 Interval 20 10 Interval custom Ready Work Rest Tim...
Page 17: ...e if the pulse is outside the set threshold 65 or 85 of the maximum heart rate You must enter your age and have a chest strap with signal transmission Press the Target heart rate button the LCD displa...
Page 18: ...is complete the program stops for 30 seconds and then turns off after 60 seconds of inactivity INTERVAL 20 10 A program where the user exercises for 20 seconds and then rest for 10 seconds Press the 2...
Page 19: ...ly after 60 seconds of inactivity FUNCTION DESCRIPTION Press STOP to turn off the program When the program is running the console will enter standby mode after 30 seconds of inactivity The console wil...
Page 20: ...This movement is very similar to cycling When doing exercise on a bicycle you just sit on the saddle with the right height keep your feet firmly in the pedals hold the ergonomically shaped handles and...
Page 21: ...or the main workout The cool down phase should protect your muscles from injuries and cramps Do warm up and cool down exercises as shown in the chart below Touching your toes Slowly bend your back fro...
Page 22: ...starting training on the exercise bike Your doctor should evaluate whether you are physically fit to use the machine and how much effort you are able to undergo Incorrect exercise or switching of the...
Page 23: ...23 DIAGRAM...
Page 24: ...Nut M8 x 1 25 2 50 Grommet Plug 2 16 Crank Shaft 1 51 Left Handlebar 1 17 Pulley 1 52 Sensor Clip 1 18 Right Crank 1 53 Bearing 6003Z 2 19 C Ring S25 1 54 Bearing 6202Z 2 20 Spring Pin 1 55 Bearing 62...
Page 25: ...x 20 mm 1 119 Allen key 6 mm 1 93 Nut M8 x 1 25 5 120 Allen key 14 17 mm 1 94 Washer M8 3 121 Wrench 1 95 Bolt M6 x 1 x 16 mm 1 122 Screwdriver 1 96 Bolt ST4 x 10 mm 7 123 Manual 1 97 Bolt M6 x 1 x 1...
Page 26: ...ivered by the Seller immediately after taking the responsibility for the Goods and its damages i e immediately after its delivery The Buyer must check the Goods so that he discovers all the defects th...
Page 27: ...s r o Registered Office Strakonick 1151 2c Praha 5 150 00 R Headquaters D lnick 957 V tkov 749 01 Warranty Service ermensk 486 V tkov 749 01 CRN 26847264 VAT ID CZ26847264 Phone 420 556 300 970 E mail...