background image

9

Insignia NS-LCD19F 19” LCD TV

www.insignia-products.com

Canadian French MPAA Ratings

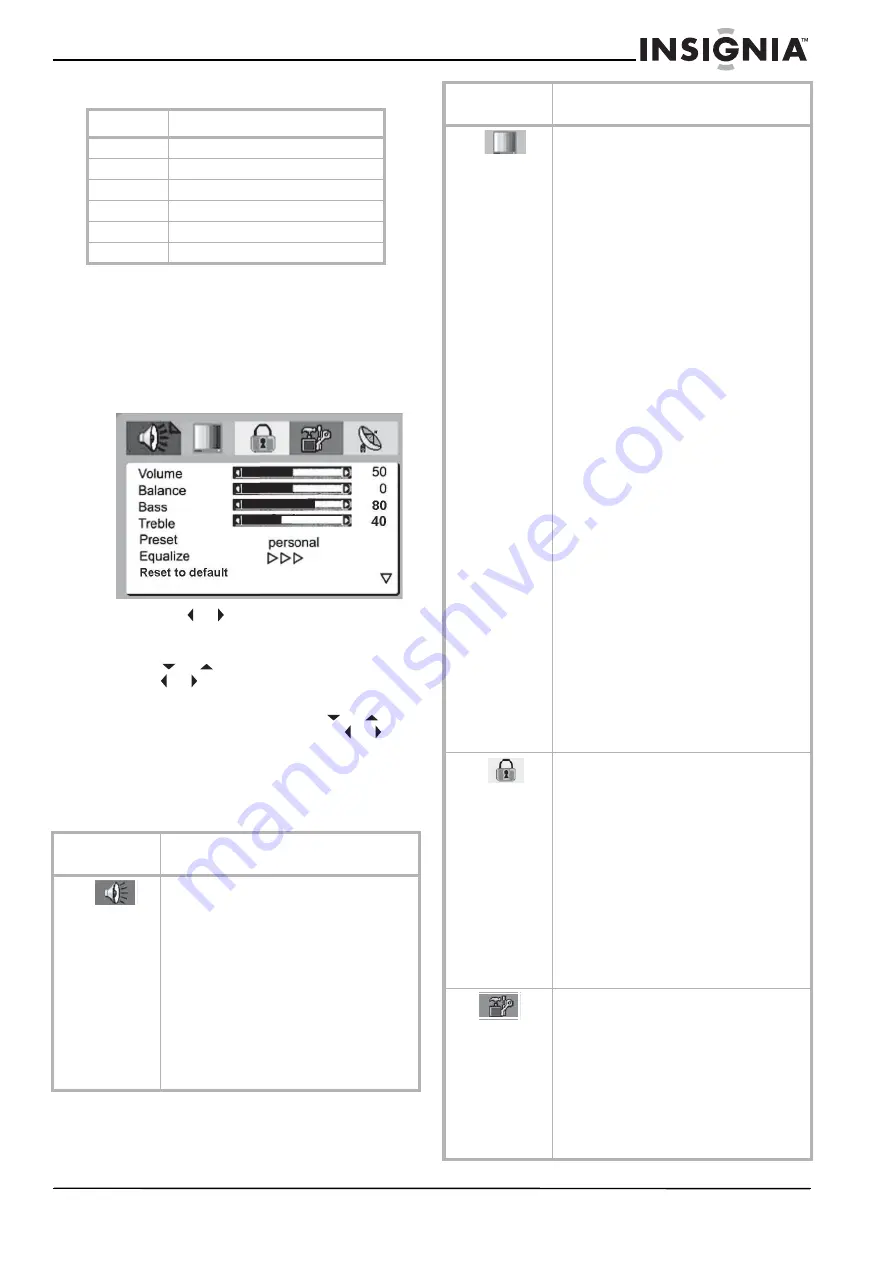
Using the on-screen menu

Your TV has an on-screen menu that lets you 
adjust TV settings, such as video and audio 
settings.

To use the on-screen menu:
Press the MENU button. The on-screen 

menu opens to the Audio page.

Press the   or   buttons repeatedly to select 

the Video page, the V-chip page, the OSD 
page, or the TV page.

Press 

 or 

 to highlight a menu item, then 

press   or   to set the value or enter the 
sub-menu (if available).

If you enter a sub-menu, press 

 or 

 to 

highlight a menu item, then press   or   to 
set the value.

Press MENU or EXIT to close the on-screen 

menu.

On-screen menus

Rating

Description

E

Not  rated

G

Children

8+

Children 8 years and above

13+

Children 13 years and above

16+

Children 16 years and above

18+

Adult programming

On-screen 
menu

Options

Audio 

Volume–Adjust the volume up or down.
Balance–Adjusts the right and left speaker 
volumes.
Bass–Adjusts the low sounds (bass).
Treble–Adjusts the high sounds (treble).
Preset–Designed for different types of sound 
output. There are four preset mode options, 
including Personal, Voice, Music, and Theater. 
In Personal mode, you can set Bass, Treble, 
and Equalizer according to your taste.
Equalizer–You can select and adjust the levels 
for 100 Hz, 300 Hz, 1 kHz, 3 kHz, and 8 kHz.
Reset to default–Restores the settings to 
factory default.

Video 

Brightness–Increases the brightness to add 
more light to dark areas of the picture. 
Decreases the brightness to add more dark to 
light areas of the picture. (0 ~ 100)
Contrast–Increases the picture level to adjust 
the white areas of the picture. Decreases the 
picture level to adjust the black areas of the 
picture. (0 ~ 100)
Position–Only available in VGA mode. Lets you 
set the horizontal and vertical position of the 
picture
Video noise–Only available in VGA mode. Lets 
you adjust the phase and clock from –50 to 
+50.
Auto adjust–Only available in VGA mode. 
Automatically adjusts the PC input to the 
optimal screen size.
Information

Only available in VGA and 

Component modes. Shows the current signal 
input information.
Color

Adjusts the overall color of the picture. 

(0~100)
Sharpness

Increases the sharpness for a 

cleaner and clearer image. Decreases the 
sharpness for a smoother picture. You can 
select NormalSharpSharpestSoftest, and 
Soft.
Tint

Adjusts picture color from 0~100.

Dyn.skin tone

When the Dynamic skin tone is 

ON, skin tones are more vivid.
Color Temp

–S

elects the color temperature of 

the picture. In VGA mode, there are five 
options, including NormalWarmCool
SRGB, and User color. Other modes, there are 
3 options, including NormalWarm, and Cool.
Preset

Selects a preset picture mode. Options 

include PersonalMovieSportWeak Signal, 
and Game.
Image Size

Selects the image size. Options 

include ZoomNormal, Wide 1, Wide 2, and 
Cinema.
Reset to default

Resets the picture settings to 

factory default mode.

V-chip 

Child lock–Enables or disables the Child lock 
function.
Age–Selects a Child lock rating. Options 
include ChildYouthYouth AdultAdult
Custom, and Off.
MPAA Rating–Sets the MPAA rating when Age 
is set to Custom,
PG Rating–Sets the TV Parental Guidelines 
(PG) when Age is set to Custom. Can.English
Lets you set the Canadian English rating when 
Age is set to CustomCan.French–Lets you set 
the Canadian French rating when Age is set to 
Custom.
Set Password–Sets the password for parental 
control options. The default password is 0000. 
See “Setting parental controls” on page 7.

OSD 

Set Time–Sets the clock. For more 
information, see “Setting the clock” on page  6.
Language–Sets the language of the on-screen 
menus. You can select EnglishFrench, or 
Spanish
.
Sleep Timer–Sets the sleep timer.
CC–Enablea or disables the Closed Caption 
function
CC Preset–Selects a Closed Caption channel.
Reset to default–Resets the OSD settings to 
factory default.

On-screen 
menu

Options

Summary of Contents for NS-LCD19F

Page 1: ...19 LCD TV Téléviseur ACL de 19 po NS LCD19F ...

Page 2: ......

Page 3: ... to be walked on or pinched by items placed on or against them Pay particular attention to cords at plugs convenience receptacles and the point where they exit from your TV Attachments Only use attachments recommended by Insignia Stand Do not place your TV on an unstable cart stand tripod bracket or table Your TV may fall causing serious personal injury and serious damage to your TV Use only with ...

Page 4: ...he marking label If you are not sure of the type of power supplied to your home consult your TV dealer or local power company Screen protection Your TV s screen is made of glass Do not drop your TV or hit the glass screen If the screen breaks be careful of broken glass Pixel defect Your TV s screen is designed to display finely detailed pictures Occasionally a few non active pixels may appear on t...

Page 5: ...ideo and Composite source modes 4 COMP Press to select Component source mode 5 Number buttons Press to enter channel numbers In the on screen menu press to enter your parental control s password 6 CCD Press to turn closed captions on and off For more information see Viewing closed captions on page 7 7 VOL Press to adjust the volume up 8 MUTE Press to mute the sound Press again to restore the sound...

Page 6: ...n connect your cable TV using an RF switch not supplied For more information about connecting a converter descramble box contact your cable TV provider 15 DISPLAY Press to display status information 16 TV Press to select TV mode 17 PC Press to select PC mode 18 RECALL Press to watch the previous channel 19 CH Press to change TV channels up 20 AUDIO Press to select the sound mode 21 CH Press to cha...

Page 7: ...al signal source For component video Plug the Y Pb and Pr video cables and the Audio L and Audio R cables into the component input jacks 2 Turn on your TV 3 Press the INPUT button repeatedly to select the external signal source you want to watch 4 Turn on external signal source 5 Insert a disc or videotape into the external signal source then press the PLAY button Connecting a computer To connect ...

Page 8: ...he channel to the channel list set Skip to Off If you want to delete the channel from the channel list set Skip to On 5 Press MENU or EXIT to close the menu Changing channels To change channels Press the CH or CH button on the remote control to go to the next lower or higher channel Or press the number buttons to directly select a channel for example if you want channel 83 press 8 then press 3 If ...

Page 9: ...s your children can watch Parental controls include four rating systems MPAA Rating PG Rating Can English and Can French Each rating system has preset levels for each of the five Age settings Child Youth Youth Adult Adult and Custom Before you can select ratings you need to set up a parental controls password To set up a password 1 Press the MENU button The on screen menu opens to the Audio page 2...

Page 10: ...then press or to set the rating to E C C8 G PG 14 or 18 8 To set the Can French rating press or to move to Can French then press or to set the rating to E G 8 13 16 or 18 9 Press MENU or EXIT button to close the menu American MPAA ratings TV Parental Guidelines PG ratings Some of the age based TV Parental Guidelines ratings also have content based ratings Canadian English MPAA Ratings Rating Descr...

Page 11: ...able in VGA mode Lets you adjust the phase and clock from 50 to 50 Auto adjust Only available in VGA mode Automatically adjusts the PC input to the optimal screen size Information Only available in VGA and Component modes Shows the current signal input information Color Adjusts the overall color of the picture 0 100 Sharpness Increases the sharpness for a cleaner and clearer image Decreases the sh...

Page 12: ...r outlet Unplug the power cord wait 60 seconds then plug the cord back in and turn on your TV On screen menu Options No picture Make sure that the video cables are connected securely to the back of your TV Adjust the contrast and brightness Make sure that the correct video mode is selected Make sure that the incoming signal is compatible Make sure that the antenna is connected correctly Check the ...

Page 13: ...es the user to be notified that any changes or modifications made to this device that are not expressly approved by Insignia may void the user s authority to operate the equipment Cables Connections to this device must be made with shielded cables with metallic RF EMI connector hoods to maintain compliance with FCC Rules and Regulations Canadian notice This Class B digital apparatus meets all requ...

Page 14: ...12 Insignia NS LCD19F 19 LCD TV www insignia products com ...

Page 15: ...ection as the original packaging To obtain in home warranty service for a television with a screen 25 inches or larger call 1 888 BESTBUY Call agents will diagnose and correct the issue over the phone or will have an Insignia approved repair person dispatched to your home WHERE IS THE WARRANTY VALID This warranty is valid only to the original purchaser of the product in the United States and Canad...

Page 16: ...14 Insignia NS LCD19F 19 LCD TV www insignia products com ...

Page 17: ...ots un plus large que l autre Une prise de type mise à la terre est composée de deux plots et d un troisième de mise à la terre Ce troisième plot large ou rond a été prévu pour la sécurité de l utilisateur Si la fiche ne s adapte toujours pas à la prise secteur contacter un électricien afin qu il remplace la prise inadéquate Protection du cordon d alimentation Les cordons d alimentation électrique...

Page 18: ... tombé ou s il est endommagé de quelque façon que ce soit Si l appareil présente une détérioration marquée de ses performances Pièces de rechange Si des pièces doivent être remplacées vérifier que le technicien a utilisé des pièces de rechange spécifiées par le fabricant qui ont les mêmes caractéristiques que les pièces d origine Toute substitution par des pièces non autorisées risque de provoquer...

Page 19: ...u précédent ou diminuer la valeur d un paramètre 3 CH Permet d aller au canal suivant En mode Menu fait fonction de flèche vers le haut 4 CH Permet d aller au canal précédent En mode Menu fait fonction de flèche vers le bas 5 MENU Permet d afficher le menu d écran 6 ENTRÉE Permet de parcourir les sources d entrée disponibles En mode Menu fait fonction de touche Entrée ENTER 7 MARCHE ARRÊT Permet d...

Page 20: ...e télévision de façon croissante 20 AUDIO Permet de sélectionner le mode audio 21 CH Permet de changer les canaux de télévision de façon décroissante 22 QUITTER Permet de quitter le menu d écran 23 PICTURE Image Pour afficher la page Vidéo 24 ARRÊT DIFFÉRÉ Permet de régler l arrêt différé de l appareil Pour toute information complémentaire voir Réglage de l arrêt différé à la page 21 Remarques La ...

Page 21: ...télécommande de l appareil pour visualiser les canaux en clair Régler l interrupteur RF en position B et utiliser les commandes du décodeur décrypteur pour visualiser les canaux brouillés Connexion à une source de signal externe Il est possible de connecter un lecteur de DVD de VCD ou un magnétoscope de différentes façons avec des câbles composites à composantes ou un câble S Vidéo Le câble S Vidé...

Page 22: ...Lors de la configuration de la liste des canaux l appareil recherche les canaux disponibles localement et en mémorise la liste En appuyant sur CH ou CH le téléviseur saute automatiquement les canaux qui n émettent pas de signaux Configuration automatique des canaux Pour configurer la liste des canaux automatiquement 1 Appuyer sur MENU Le menu d écran s ouvre sur la page Audio 2 Appuyer sur ou pour...

Page 23: ...Le menus d écran OSD s affiche 3 Appuyer sur ou pour mettre en surbrillance Set Time Réglage de l heure 4 Appuyer sur ou pour passer d un champ à un autre puis sur ou pour modifier les paramètres 5 Appuyer sur MENU ou EXIT Quitter pour fermer le menu Réglage de l arrêt différé L arrêt différé permet de sélectionner la durée avant la mise hors tension automatique de l appareil Pour régler l arrêt d...

Page 24: ...e façon répétée sur ou pour mettre en surbrillance Set Password Configuration du mot de passe L écran Mot de passe s affiche 4 Utiliser les touches numériques pour saisir l ancien mot de passe Si aucun mot de passe n a été configuré entrer 0000 5 Appuyer sur les touches numériques pour saisir le nouveau mot de passe 6 Appuyer sur les touches numériques pour ressaisir le nouveau mot de passe pour c...

Page 25: ...ur fermer le menu Classifications américaines MPAA Classifications des directives parentales TV Certaines des classifications des directives parentales TV basées sur une tranche d âge spécifique ont aussi un classement en fonction du contenu Classifications MPAA du Canada anglophone Classifications MPAA du Canada francophone Classification Description OFF Désactivés Non classifié G Tous publics PG...

Page 26: ... luminosité pour assombrir les zones claires de l image 0 100 Contrast Contraste Augmente le niveau des zones blanches de l image Diminue le niveau de l image pour régler les zones sombres de l image 0 100 Position Uniquement disponible en mode VGA Permet de régler la position horizontale et verticale de l image Video noise Réduction du bruit vidéo Uniquement disponible en mode VGA Permet de régle...

Page 27: ...t TV Program no Numéro de programme Permet de sélectionner le numéro de canal Tuning Mode Mode de syntonisation Sélectionne la source du signal TV Air Réception hertzienne ou Cable Câble Standard TV Permet de sélectionner le standard TV Les options sont NTSC M PAL M PAL N et Auto Il est recommandé de le régler sur Auto Auto Search Recherche automatique Recherche automatiquement les canaux disponib...

Page 28: ...cer le téléviseur Image neigeuse et parasitée Vérifier que les câbles audio vidéo A V et d antenne sont fermement connectés L image VGA est instable ou non synchronisée Vérifier que le mode VGA sélectionné sur l ordinateur est correct Pas de sortie sonore sur l un des haut parleurs Régler la balance dans le menu Sound Son Les touches de commande ne fonctionnent pas Débrancher le cordon d alimentat...

Page 29: ...le récepteur Brancher l équipement sur la prise électrique d un circuit différent de celui auquel le récepteur est relié Contacter le revendeur ou un technicien radio télévision qualifié pour toute assistance Utiliser uniquement un câble d interface blindé Modifications La FCC exige que l utilisateur soit notifié que tous changements ou modifications qui ne seraient pas expressément approuvés par ...

Page 30: ...28 Téléviseur ACL de 19 po Insignia NS LCD19F www insignia products com ...

Page 31: ...sistance technique établira un diagnostic et corrigera le problème au téléphone ou enverra un technicien agréé par Insignia pour la réparation à domicile OÙ CETTE GARANTIE S APPLIQUE T ELLE Cette garantie ne s applique qu à l acheteur original du Produit aux États Unis et au Canada CE QUI N EST PAS COUVERT PAR CETTE GARANTIE LIMITÉE La présente garantie ne couvre pas la formation du client l insta...

Page 32: ...30 Téléviseur ACL de 19 po Insignia NS LCD19F www insignia products com ...

Page 33: ...31 Téléviseur ACL de 19 po Insignia NS LCD19F www insignia products com ...

Page 34: ...55423 3645 www Insignia Products com 2007 Insignia Products All rights reserved All other products and brand names are trademarks of their respective owners 2007 produits Insignia Tous droits réservés Tous les autres produits ou nomsde marques sont des marques de commerce qui appartiennent à leurs proprié ...

Reviews: