background image

6

Insignia NS-LCD19 19” LCD TV

www.insignia-products.com

Using the remote control

To use the remote control:

Point the remote control towards the remote 
sensor on the front of your TV.

Setting up your TV

Installing remote control batteries

To install the remote control batteries:
Remove the battery cover.

Insert two AAA batteries into the battery 

compartment. Make sure that you match the 
+ and – symbols on the batteries with the + 
and – symbols in the battery compartment.

Replace the cover.

Connecting your TV to a power outlet

To connect your TV to a power outlet:

Plug the power cord into a power outlet.

Connecting an outside antenna

Antenna cables come in two types: 75 ohm and 
300 ohm.

If your antenna cable has a 75 ohm 
connector, connect the cable to the coaxial 
jack on the back of your TV.

If your antenna cable has a 300 ohm 
connector, connect the cable to a 
300-75 ohm adapter (not included), connect 
the adapter to a 75 ohm cable, then connect 
the other end of the 75 ohm connector to the 
coaxial jack on the back of your TV.

Connecting cable TV

Your TV has a 75 ohm jack for connecting cable 
TV.
Some cable TV providers scramble the signals 
for “premium” (pay) channels. To view these 
channels, you need a converter/descrambler 
box.
If you do not have a converter/descrambler box, 
you can connect your cable TV directly to your 
TV. If you have a converter/descrambler box, you 
can connect your cable TV using an RF switch 
(not supplied). For more information about 
connecting a converter/descramble box, contact 
your cable TV provider.

To connect cable TV without a 
converter/descrambler box:
Connect one end of a 75 ohm cable to the 

coaxial jack on the back of your TV.

Connect the other end of the cable to the 

cable TV wall outlet.

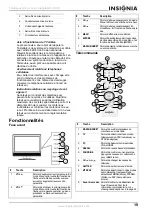
16


ENTER

Press the arrows to move down, up, left, 
or right in the on-screen menu.
Press the ENTER button to confirm 
changes or to toggle options on and off 
in the on-screen menu.

17

MENU

Press to open the on-screen menu.

18

FAVORITE

Press to toggle the Favorite/Normal 
mode. See “Setting up the channel list” 
on page 8 for more information.

19

VOL + or 

Press to adjust the volume up or down.

20

Use with the 0-9 number buttons and 
ENTER key to select digital channels.

21

[Number buttons] Press to enter channel numbers.

In the on-screen menu, press to enter 
your parental control’s password.

22

COMP

Press to select Component source 
mode.

23

VIDEO

Press to toggle between S-Video and 
Composite source modes.

24

INPUT

Press to select the video input signal 
source.

25

DISPLAY

Press to display status information.

Notes

Do not expose the remote control to shock or 
liquids.

Do not use the remote control in an area with 
high humidity.

Do not place the remote control in direct 
sunlight.

Do not place objects, such as furniture, 
between the remote control and the remote 
sensor.

The remote control may not work if direct 
sunlight or bright light shines on the remote 
sensor. Either move your TV or change the 
angle at which you use the remote control.

#

Button

Description

Notes

Do not mix batteries of different types.

Do not mix old and new batteries.

Remove batteries when the charge is depleted.

Battery chemicals can cause a rash. If the 
batteries leak, clean the battery compartment 
with a cloth. If chemicals touch your skin, wash 
immediately.

If the remote control is not going to be used for 
an extended period of time, remove the 
batteries.

Notes

Make sure that you use the correct type of 
power. See the label on your TV.

If you do not intend to use your TV for an 
extended period of time, unplug the power cord 
from the power outlet.

75 ohm cable

300 ohm cable

Summary of Contents for NS-LCD19 - 19" LCD TV

Page 1: ...19 LCD TV T l viseur ACL de 19 po Televisor con Pantalla LCD de 19 NS LCD19...

Page 2: ......

Page 3: ...likely to be walked on or pinched by items placed on or against them Pay particular attention to cords at plugs convenience receptacles and the point where they exit from your TV Attachments Use only...

Page 4: ...fire electric shock personal injury or other hazards Safety check After completing any service or repair to this TV ask the service technician to perform routine safety checks to determine that your...

Page 5: ...Press to select ATSC digital or NTSC analog TV source 3 PC Press to toggle between the VGA and HDMI modes 4 RECALL Press to watch the previous channel 5 MUTE Press to mute the sound Press again to res...

Page 6: ...end of the cable to the cable TV wall outlet 16 ENTER Press the arrows to move down up left or right in the on screen menu Press the ENTER button to confirm changes or to toggle options on and off in...

Page 7: ...ur TV and the other end into the S Video jack on external signal source OR For component video Plug the Y Pb and Pr video cables and the Audio L and Audio R cables into the component input jacks OR Fo...

Page 8: ...ighlighted 2 Press the button to enter the sub menu then or button to highlight Auto Ch Search 3 Press ENTER or to start the search Manually adding or deleting channels from the channel list After you...

Page 9: ...d or label field then press the or button to select a channel while the cursor is in the channel field or press the or button to select the character while the cursor is in the label field 4 Press the...

Page 10: ...Control level To set the Parental Control level 1 Press the MENU button The Main OSD On Screen Display menu opens with Setup highlighted 2 Press the or button repeatedly to highlight Feature The Feat...

Page 11: ...14 Parents strongly cautioned TV MA Mature audiences only Rating Description FV Fantasy violence L Adult language S Sexual situations V Violence D Sexually suggestive dialog Rating Description On scre...

Page 12: ...oaxial jack RAW AC 3 in AC 3 out PCM in PCM out PCM AC 3 in PCM out PCM in PCM out TV Speaker Turns the internal TV speaker On default or Off Does not affect the digital audio output the headphone out...

Page 13: ...dotted line Your TV may be too close to another electrical device such as a hair dryer or neon light Turn off the device or move your TV Ghost or double image This may be caused by obstructions to the...

Page 14: ...e that are not expressly approved by Insignia may void the user s authority to operate the equipment Cables Connections to this device must be made with shielded cables with metallic RF EMI connector...

Page 15: ...ction as the original packaging To obtain in home warranty service for a television with a screen 25 inches or larger call 1 888 BESTBUY Call agents will diagnose and correct the issue over the phone...

Page 16: ...16 Insignia NS LCD19 19 LCD TV www insignia products com...

Page 17: ...n plus large que l autre Une prise de type mise la terre est compos e de deux plots et d un troisi me de mise la terre Ce troisi me plot large ou rond a t pr vu pour la s curit de l utilisateur Si la...

Page 18: ...les instructions d utilisation en effet le r glage incorrect d autres commandes pourrait provoquer des d g ts entra nant souvent d importantes r parations par un technicien qualifi pour r tablir le f...

Page 19: ...nt ou augmenter la valeur d un param tre 2 VOL Permet de diminuer le volume sonore En mode Menu cette touche fait fonction de fl che vers la gauche pour aller au menu pr c dent ou diminuer la valeur d...

Page 20: ...ions dans le menu d cran 17 MENU Permet d acc der au menu d cran 18 FAVORIS Permet de basculer du mode Favoris au mode Normal Voir Setting up the channel list la page 23 pour de plus amples informatio...

Page 21: ...errupteur RF en position B et utiliser les commandes du d codeur d crypteur pour visualiser les canaux brouill s Connexion une source de signal externe Il est possible de connecter un lecteur de DVD o...

Page 22: ...yer de nouveau sur pour mettre l appareil en mode Veille Le t moin DEL de marche arr t devient orange S lection de la source du signal TV Pour s lectionner la source du signal TV Quand le t l viseur e...

Page 23: ...changer de canal Appuyer sur CH ou CH de la t l commande pour passer un canal inf rieur ou sup rieur OU Utiliser les touches num riques pour mettre un canal en surbrillance par exemple pour le canal...

Page 24: ...sur ou pour passer d un champ un autre puis sur ou pour modifier les param tres 5 Appuyer sur MENU ou EXIT Quitter pour fermer le menu R glage de l arr t diff r L arr t diff r permet de s lectionner...

Page 25: ...n du niveau de Contr le parental Pour configurer le niveau de Contr le parental 1 Appuyer sur MENU Le menu d cran principal OSD s affiche avec Setup Configuration en surbrillance 2 Appuyer de fa on r...

Page 26: ...Classification Description FV Violence fictive L Vulgarit s S Situations caract re sexuel V Violence D Dialogues caract re sexuel Classification Description Menu d cran Options Configuration Tuning B...

Page 27: ...tion compl mentaire voir Setting the clock la page 24 Sleep Timer Arr t diff r Pour configurer l arr t diff r Pour toute information compl mentaire voir Setting the sleep timer la page 24 Advanced Vid...

Page 28: ...ais pas de son Augmenter le volume V rifier que le son n est pas mis en sourdine V rifier que le mode audio correct est s lectionn Bonne qualit du son mais les couleurs sont m diocres R gler le contra...

Page 29: ...deur ou un technicien radio t l vision qualifi pour toute assistance Utiliser uniquement un c ble d interface blind Modifications La FCC exige que l utilisateur soit notifi que tous changements ou mod...

Page 30: ...classe B satisfait toutes les exigences du R glement sur le mat riel brouilleur du Canada Droits d auteurs 2007 Insignia Insignia et le logo Insignia sont des marques de commerce de Best Buy Enterpris...

Page 31: ...ira un diagnostic et corrigera le probl me au t l phone ou enverra un technicien agr par Insignia pour la r paration domicile O CETTE GARANTIE S APPLIQUE T ELLE Cette garantie ne s applique qu l achet...

Page 32: ...32 T l viseur ACL de 19 po Insignia NS LCD19 www insignia products com...

Page 33: ...ga ancha y la clavija de tierra se proveen para su seguridad Si el enchufe no cabe p ngase en contacto con un electricista para reemplazar el tomacorriente obsoleto Protecci n del cable de alimentaci...

Page 34: ...uerir trabajo intensivo de un t cnico calificado para restaurar la operaci n normal del televisor Si su televisor se ha ca do o da ado de cualquier forma Cuando su televisor exhiba un cambio significa...

Page 35: ...ara ir al siguiente men o reducir el ajuste 3 CH Permite ir al siguiente canal superior En el modo de men funciona c mo la flecha hacia arriba 4 CH Permite ir al siguiente canal inferior En el modo de...

Page 36: ...e pantalla 17 MEN Permite acceder al men de pantalla 18 FAVORITOS Permite cambiar entre el modo de Favoritos y el modo Normal Refi rase a Setting up the channel list en la p gina 39 para obtener m s i...

Page 37: ...e su televisor Mueva el conmutador de RF a la posici n B para ver los canales codificados usando el control de la caja convertidora decodificadora Conexi n a una fuente de se al externa Puede conectar...

Page 38: ...dido se ilumina color verde 3 Presione de nuevo para retornar su televisor al modo de suspensi n El indicador LED de encendido se ilumina color naranja Selecci n de la fuente de la se al de TV Para se...

Page 39: ...l m s abajo o m s arriba O Presione los botones num ricos para seleccionar directamente un canal por ejemplo si desea ver el canal 83 presione 8 y luego 3 O Presione RECALL para ir al ltimo canal vist...

Page 40: ...Feature Funci n 3 Presione para ingresar al submen y presione o para resaltar Sleep Timer Temporizador de apagado autom tico 4 Presione o para seleccionar la cantidad de tiempo Off Desactivado 5 min...

Page 41: ...del control de los padres 5 Presione o para seleccionar USA Parental Locks Bloqueos estadounidense de los padres o Canadian Parental Locks Bloqueos canadiense de los padres luego presione ENTER Se abr...

Page 42: ...ener m s informaci n refi rase a Automatically setting up channels en la p gina 39 Add On Ch Search B squeda de canales agregados Le permite agregar canales nuevos sin ver toda la lista de canales dis...

Page 43: ...y Cool predefinido Fr o 3D Y C filter Filtro 3D Y C Seleccione entre On predefinido Activado o Off Desactivado Setting Ajuste Restaura los ajustes a los valores de f brica Password Set Configurar con...

Page 44: ...os modos de TEXTO pueden bloquear la pantalla Buena imagen pero no hay sonido Suba el volumen Verifique que el sonido no est silenciado Verifique que se seleccion el modo de audio correcto Buen sonido...

Page 45: ...ar un cable de interfaz blindado Modificaciones La FCC requiere que se notifique al usuario de que cualquier cambio o modificaci n hecha a este equipo que no sea aprobada expresamente por Insignia pue...

Page 46: ...ent sur le mat riel brouilleur du Canada Derechos de reproducci n 2007 Insignia Insignia y el logotipo de Insignia son marcas de comercio de Best Buy Enterprise Services Inc Otras marcas y nombres de...

Page 47: ...micilio para un televisor con pantalla de 25 o m s llame al 1 888 BESTBUY El soporte t cnico diagnosticar y corregir el problema por tel fono o enviar un t cnico certificado por Insignia a su casa EN...

Page 48: ...48 www insignia products com...

Page 49: ...49 www insignia products com...

Page 50: ...s All rights reserved All other products and brand names are trademarks of their respective owners 2007 produits Insignia Tous droits r serv s Tous les autres produits ou nomsde marques sont des marqu...

Reviews: