background image

34

 NS-40D420NA18 / NS-40D420MX18 / NS-49D420NA18 / NS-55D420NA18 / NS-55D420MX18

www.insigniaproducts.com

Programming universal remote controls

You can operate your Insignia TV with a new or 
existing universal remote control.

1

See 

Viewing universal remote control codes

 on 

page

34 

for common codes. If you have problems 

programming your remote or need a different 
remote control code:

• Contact the universal remote control or 

cable/satellite company of the remote control 
you are trying to program.

• Visit 

www.insigniaproducts.com/remotecodes


for the latest remote control code information.

• Call the Insignia Customer Care Center at 

1-877-467-4289. 

2

Follow your universal remote control’s instructions 
to enter the TV code you found in Step 1.

Viewing universal remote control codes

You can view a list of universal remote control codes 
in the on-screen menu. 
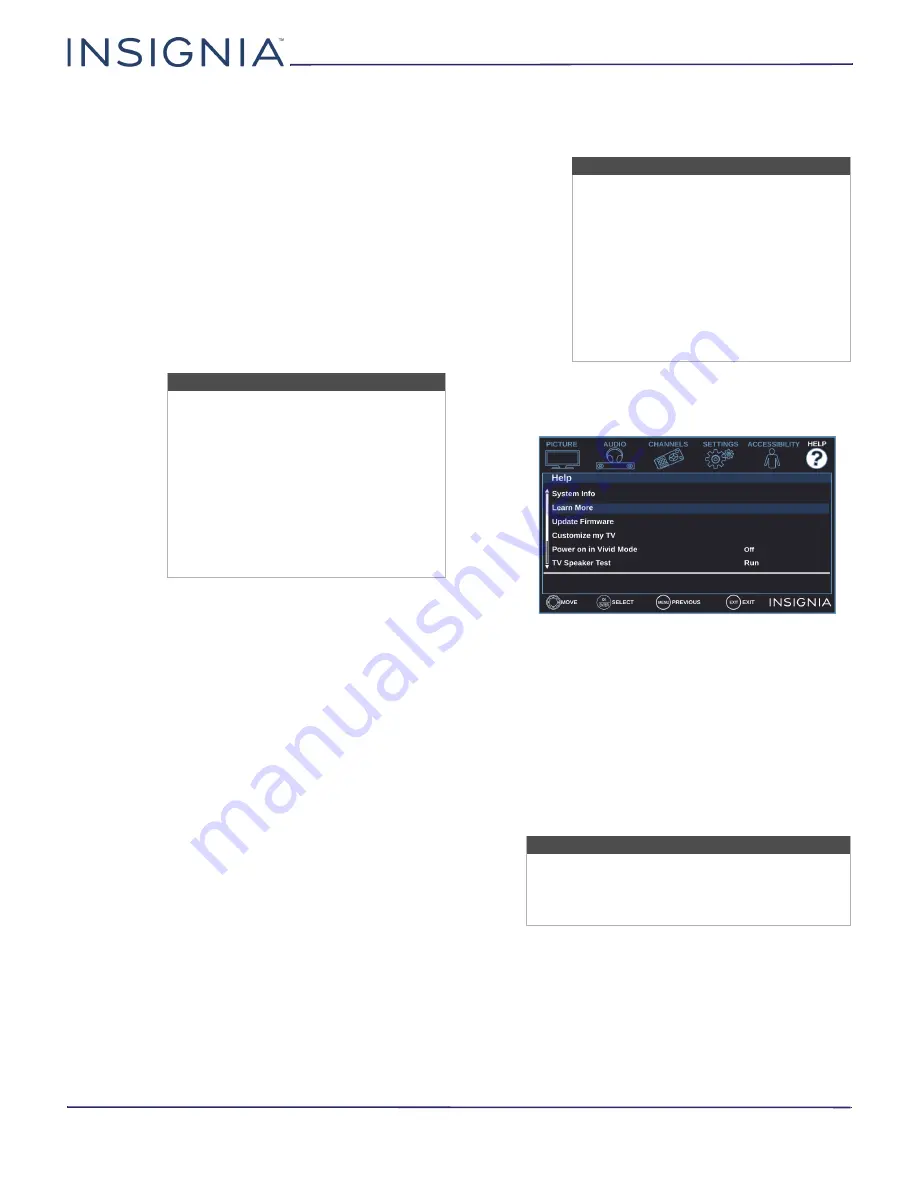
1

Press 

MENU

.

2

Press 

 or 

 to highlight 

HELP

, then press 

 or 

ENTER

.

3

Press 

 or 

 to highlight 

Learn More

, then press 

ENTER

.

4

Press 

 or 

 to highlight 

Remote control codes

then press 

ENTER

. Your TV displays information 

about the universal remote codes that you can use 
to make your TV work with a universal remote.

5

Press 

ENTER

 or 

. Your TV displays a list of remote 

control codes for various brands of universal 
remote controls.

6

Press 

MENU

 to return to the previous menu, or 

press 

EXIT

 to close the menu.

Tips

• If your universal remote control has a 

code search feature, run a code search 
to identify a code that matches your 
TV. See your universal remote control’s 
instructions for details.

• If your universal remote control has a 

“Learn” feature, you can manually 
program it using the Insignia TV 
remote to “teach” the commands one 
at a time. See your universal remote 
control’s instructions for details.

Tips

• The brand name is often visible on the 

front of the universal remote control, 
and the model number is often visible 
on the back.

• If your universal remote control isn’t 

listed on the chart, refer to your 
universal remote control’s instructions 
and try codes for the brands Orion, 
Emerson, Memorex, Sansui, Sylvania, 
or Zenith. You may need to try several 
codes before finding a match.

Note:

You can also find codes for other remote controls 
at: 

http://www.insigniaproducts.com/remotecodes

Or, check with your cable or satellite TV provider 
for the remote control code.

Summary of Contents for NS-40D420MX18

Page 1: ...USERGUIDE Before using your new product please read these instructions to prevent any damage 40 49 55 1080p 60Hz LED TV NS 40D420NA18 NS 49D420NA18 NS 55D420NA18 NS 40D420MX18 NS 55D420MX18...

Page 2: ...ion should I use 17 Connecting a cable or satellite box 18 HDMI best 18 AV good 19 Coaxial good 20 Connecting an antenna or cable TV no box 21 Connecting a DVD or Blu ray player 22 HDMI best 22 AV goo...

Page 3: ...4 Browsing photos 44 Viewing photos in a slideshow 45 Adjusting the picture 46 Adjusting the TV picture 46 Automatically adjusting the aspect ratio 48 Setting the power on picture mode 48 Adjusting th...

Page 4: ...TV screen 64 Troubleshooting 64 Viewing system information 64 Learning more about your TV 65 Updating the TV firmware 65 Customizing TV settings 66 Testing the TV speakers 67 Restoring settings to th...

Page 5: ...over pulled or grabbed WALL OR CEILING MOUNT YOUR TELEVISION ALWAYS contact your retailer about professional installation if you have any doubts about your ability to safely mount your television ALW...

Page 6: ...nd no objects filled with liquids such as vases should be placed on the apparatus 18 Your TV has four VESA mounting holes on the back If you attach a wall mount bracket or TV stand to the back of your...

Page 7: ...al Electrical Code ANSI NFPA No 70 provides information with respect to correct grounding of the mast and supporting structure grounding of the lead in wire to an antenna discharge unit size of ground...

Page 8: ...ifferent devices discover and communicate with each other See page 40 for instructions on how to use INlink DTS Sound DTS Sound delivers clear crisp and natural sound while providing deep enveloping b...

Page 9: ...Installing the stands If you want to mount your TV on a wall go to Installing a wall mount bracket Installing the stands 1 Carefully place your TV face down on a cushioned clean surface to protect the...

Page 10: ...roducts com 2 Align the screw holes on the TV stands with the holes on the bottom of your TV then secure each stand to your TV with two of the provided screws Model Screw type Screw length of screws 4...

Page 11: ...e back If you attach a wall mount bracket to the back of your TV the bracket must be securely attached using all four holes If you do not use all four mounting holes your TV may fall and cause propert...

Page 12: ...nt bracket you purchased We recommend that you use the wall mount screws and spacers that came with your TV They fit most wall mount brackets Make sure that the screws you use are the correct length T...

Page 13: ...l Package contents 40 49 or 55 LED TV Remote control and batteries 2 AAA TV stands 2 and screws 4 pcs Power cord 55 model User Guide for the NS 40D420MX18 or NS 55D420MX18 model Quick Setup Guide Impo...

Page 14: ...to this jack to listen to TV audio through external speakers For more information see Digital audio on page 29 4 VIDEO and L and R AUDIO Connect the video and audio for an AV device to these jacks Fo...

Page 15: ...information see Connecting headphones on page 28 or Analog audio on page 30 4 VIDEO and L and R AUDIO Connect the video and audio for an AV device to these jacks For more information see AV good on p...

Page 16: ...ess or to select the video input source then press ENTER See Selecting the video input source on page 37 13 return Return to the previous channel 14 FAVORITE Open the Favorite channel list See Setting...

Page 17: ...Better than coaxial AV composite video requires an audio connection Good Coaxial video audio Connection type and jack Cable connector Optical digital audio output Analog audio input 3 5mm analog audio...

Page 18: ...cted devices are turned off 2 Connect the incoming cable from the cable wall jack to the cable in jack on the cable or satellite box 3 Connect an HDMI cable not provided to an HDMI jack on your TV and...

Page 19: ...jacks on the cable or satellite box 4 Plug your TV s power cord into a power outlet turn on your TV then turn on the cable or satellite box 5 Press INPUT to open the INPUT SOURCE list 6 Press or to hi...

Page 20: ...lite box 4 Plug your TV s power cord into a power outlet turn on your TV then turn on the cable or satellite box 5 Press INPUT to open the INPUT SOURCE list 6 Press or to highlight TV then press ENTER...

Page 21: ...rom radio waves Do not bundle the coaxial cable with the power cord or other cables If the antenna is not installed correctly contact qualified service personnel to correct the problem If the signal l...

Page 22: ...that your TV s power cord is unplugged and the DVD or Blu ray player is turned off 2 Connect an HDMI cable not provided to an HDMI jack on your TV and to the HDMI OUT jack on the DVD or Blu ray playe...

Page 23: ...your TV s power cord into a power outlet then turn on your TV and DVD or Blu ray player 4 Press INPUT to open the INPUT SOURCE list 5 Press or to select AV then press ENTER Notes Cables are often col...

Page 24: ...cable not provided to an HDMI jack on your TV and to the HDMI OUT jack on the game console 3 Plug your TV s power cord into a power outlet then turn on your TV and the game console 4 Press INPUT to op...

Page 25: ...our TV and the game console 4 Press INPUT to open the INPUT SOURCE list 5 Press or to select AV then press ENTER Notes Cables are often color coded to match color coded jacks Important Some older game...

Page 26: ...d to an HDMI jack on your TV and to the HDMI OUT jack on the computer 3 Plug your TV s power cord into a power outlet then turn on your TV and the computer 4 Press INPUT to open the INPUT SOURCE list...

Page 27: ...the drive press INPUT to open the INPUT SOURCE list press or to select USB Photos then press ENTER The PHOTOS menu opens Caution Do not remove the USB flash drive or turn off the TV while using the US...

Page 28: ...For more information see Selecting the audio out mode on page 49 Warning Loud noise can damage your hearing When using headphones use the lowest volume setting on your headphones that still lets you...

Page 29: ...r 3 Plug your TV s power cord into a power outlet then turn on your TV 4 Turn on the digital speaker system or soundbar then set it to the correct source For more information see the documentation tha...

Page 30: ...V 4 Turn on the analog speaker system or soundbar then set it to the correct source For more information see the documentation that came with the analog speaker system or soundbar 5 On your TV set the...

Page 31: ...on your devices Refer to the documentation that came with your devices for connection information Just remember to use the best connection types available for the best picture and sound For informatio...

Page 32: ...uld only be operated from the power source indicated on the label Always unplug the power cord from the power outlet when you will not be using your TV for an extended period of time The power cord is...

Page 33: ...partment 3 Replace the battery compartment cover Aiming the remote control Point the remote control towards the remote sensor on the front of your TV Cautions Batteries should not be exposed to excess...

Page 34: ...ormation about the universal remote codes that you can use to make your TV work with a universal remote 5 Press ENTER or Your TV displays a list of remote control codes for various brands of universal...

Page 35: ...nguage then press ENTER 4 Press or to select Yes to turn on the Voice Guide or No to turn off the Voice Guide then press ENTER 5 Press or to highlight Home Use Mode or Store Display Mode then press EN...

Page 36: ...hlight a video input source then press to move to the label area 12 Press or to highlight a preset label or Custom 13 If you select a preset label press to select Next then ENTER OR If you select Cust...

Page 37: ...utlet 2 Press power to turn on your TV The power indicator turns off 3 Press power again to turn off your TV Your TV enters standby mode and the power indicator turns red Selecting the video input sou...

Page 38: ...On screen menu overview Picture menu TV mode Audio menu TV mode Channels menu TV mode Settings menu TV mode Accessibility menu Help menu PHOTOS menu USB mode Notes Depending on the signal source selec...

Page 39: ...he sound back on Viewing channel information Press INFO to view an information banner The information banner shows the current program information such as channel number video input source and resolut...

Page 40: ...ing an INlink compatible device s root menu Turning INlink on or off 1 Press MENU 2 Press or to highlight SETTINGS then press or ENTER 3 Press or to highlight INlink then press ENTER or 4 Press or to...

Page 41: ...nnected devices when you turn off your TV then press ENTER 6 Press MENU to return to the previous menu or press EXIT to close the menu Turning TV Auto Power On on or off TV Auto Power On automatically...

Page 42: ...ss or to highlight On your TV s remote control controls the connected audio receiver s volume or Off your TV s remote control does not control the connected audio receiver s volume then press ENTER 6...

Page 43: ...ENTER 6 Press MENU to return to the previous menu or press EXIT to close the menu Opening an INlink compatible device s root menu You can open an INlink compatible device s root menu then use your TV...

Page 44: ...SB mode on page 44 2 Press or to highlight Browse Photos then press ENTER or The screen displays folder names and photo files stored on the USB flash drive in a thumbnail index with the first folder o...

Page 45: ...lect Fill to fill the screen You can press or to pan the photo EXIT to return to the thumbnail index MENU to return to the PHOTOS menu Viewing photos in a slideshow You can view your photos in a slide...

Page 46: ...ndard a standard picture Moderately increases the contrast brightness and sharpness This selection is good for standard TV broadcasts Energy Savings the backlight brightness is decreased Your TV has a...

Page 47: ...ay make the color look faded A high setting may make the color look artificial Tint Adjusts the color balance of the picture Use this control to make skin tones look more natural Sharpness Adjusts the...

Page 48: ...before you turned it off then press ENTER 5 Press MENU to return to the previous menu or press EXIT to close the menu Adjusting the sound This section covers Adjusting sound settings Selecting the aud...

Page 49: ...if available Headphones Audio Out You can use the AUDIO OUT jack on your TV to connect headphones a home theater system soundbar or external speaker system When a device is connected to the AUDIO OUT...

Page 50: ...on yourTV goes to the next or previous channel in the channel list If the TV signal source changes for example you change from an outdoor antenna to cable TV no box you need to scan for channels 1 Pre...

Page 51: ...ress or to highlight CHANNELS then press or ENTER 3 Press or to highlight Add Skip Channels then press ENTER or 4 Press or to highlight the channel you want to hide then press ENTER Each channel has a...

Page 52: ...nnel 1 Press MENU 2 Press or to highlight CHANNELS then press or ENTER 3 Press or to highlight Favorite Channel List then press ENTER or The Favorite List opens 4 Press or to highlight a channel then...

Page 53: ...rs numbers or symbols 6 When you have completed the label press ENTER or MENU to save your label and return to the Channels menu 7 Press EXIT to close the menu Checking the digital signal strength You...

Page 54: ...unrated TV Setting parental control levels Downloading rating information Locking the power button on your TV Setting or changing the password 1 Press MENU 2 Press or to highlight SETTINGS then press...

Page 55: ...al controls for the U S and Canada U S rating levels Some of the age based TV Parental Guidelines ratings also have content based ratings Canadian rating levels U S TV ratings NONE Not rated TV Y All...

Page 56: ...or to highlight Movie Ratings or TV Ratings for USA ratings Canadian English or Canadian French for Canadian ratings 7 Press or to select the rating If a rating has sub ratings press or to highlight...

Page 57: ...ur digit password 5 Press or to highlight RRT5 then press ENTER The screen that opens may vary depending on the broadcaster 6 Press or to select the program and content types you want to block then pr...

Page 58: ...ing the digital closed captioning mode Customizing digital closed captioning settings Turning closed captioning on or off 1 Press MENU 2 Press or to highlight ACCESSIBILITY then press or ENTER 3 Press...

Page 59: ...g modes The CS1 mode usually displays a text version of the TV program audio in a small banner The other CS modes display information provided by the broadcaster 1 Press MENU 2 Press or to highlight A...

Page 60: ...lects the opacity level for the background Edge Effect Selects the style of the letter edge Edge Color Selects the color of the letter edge 7 Press or to adjust the setting then press ENTER 8 Press ME...

Page 61: ...Day or Year Press or to adjust the setting then press MENU 12 If you selected Manual for Mode press or to highlight Time then press ENTER Press or to highlight the Hour Minute or the AM PM field Press...

Page 62: ...select English Fran ais or Espa ol 5 Press MENU to return to the previous menu or press EXIT to close the menu Turning Input Sensor on or off When the Input Sensor feature is turned on your TV automat...

Page 63: ...s menu selections and some remote control functions You can select On or Off Closed Caption Displays a text version of the TV program audio or displays information provided by the broadcaster See Usin...

Page 64: ...cabinet Cleaning the TV screen Clean the screen with a soft lint free cloth Troubleshooting Use the following troubleshooting information to solve common problems Troubleshooting topics include Viewin...

Page 65: ...write down your model revision and firmware information See Viewing system information on page 64 2 On a computer go to www insigniaproducts com then under Support Service click Product Support 3 Und...

Page 66: ...Setup wizard the first time you turned on your TV you can run the wizard again to customize settings 1 Press MENU 2 Press or to highlight HELP then press or ENTER 3 Press or to highlight Customize my...

Page 67: ...n page 68 Restoring settings to the defaults When you restore default settings all the settings you have customized except parental controls are reset 1 Press MENU 2 Press or to highlight HELP then pr...

Page 68: ...able TV is connected correctly and securely See Connecting a cable or satellite box on page 18 or Connecting an antenna or cable TV no box on page 21 Adjust the brightness See Adjusting the TV picture...

Page 69: ...x on page 18 or Connecting an antenna or cable TV no box on page 21 If you are using an antenna the digital channel signal may be low To check the digital channel signal strength see Checking the digi...

Page 70: ...et top antenna with a built in amplifier The audio cables you are using may be bad Try a new set Problem Solution Poor picture Make sure that the room is not too bright Light reflecting off the screen...

Page 71: ...ing to use If you are using a cable or satellite box use the remote that came with that box to change channels After Auto Channel Search there are no channels Reception can vary by channel depending o...

Page 72: ...picture See Adjusting the TV picture on page 46 Problem Solution My TV is not playing the audio from theconnected CEC device Make sure that the HDMI cable is connected securely to your TV and the dev...

Page 73: ...hat the device is connected to your TV with an HDMI cable Make sure that the INlink feature is turned on See Turning INlink on or off on page 40 Make sure that the device is a CEC device See the docum...

Page 74: ...pears one for the TV volume and one for the audio receiver volume I cannot select the Root Menu option on the INlink menu OR The device s root menu does not open when I select Root Menu on the INlink...

Page 75: ...00 1 Comb filter 3d y c digital Response time 9 5 ms Horizontal viewing angle 178 Vertical viewing angle 178 Analog NTSC Digital ATSC Clear QAM HDMI 3 Composite video 1 USB 1 Supports JPEG Antenna Cab...

Page 76: ...d y c digital Response time 6 5 ms Horizontal viewing angle 178 Vertical viewing angle 178 Analog NTSC Digital ATSC Clear QAM HDMI 3 Composite video 1 USB 1 Supports JPEG Antenna Cable 1 Analog audio...

Page 77: ...Response time 8 ms Horizontal viewing angle 178 Vertical viewing angle 178 Analog NTSC Digital ATSC Clear QAM HDMI 3 Composite video 1 USB 1 Supports JPEG Antenna Cable 1 Analog audio Headphone 1 Digi...

Page 78: ...c RF EMI connector hoods to maintain compliance with FCC Rules and Regulations Canadian Notice Standard Television Receiving Apparatus Appareil de r ception t l vision ordinaire Canada BETS 7 NTMR 7 I...

Page 79: ...ction education Installation Set up adjustments Cosmetic damage Damage due to weather lightning and other acts of God such as power surges Accidental damage Misuse Abuse Negligence Commercial purposes...

Page 80: ...ento en nuestra red de servicio que m s adelante se detallar CONDICIONES 1 Notificaci n de las reclamaciones Solamente ser necesario para ejercer la garant a presentar el Producto y la p liza de garan...

Page 81: ...rant a las partes consumibles del Producto Esta garant a cubrir defectos y o fallos dentro del per odo de garant a derivado de cualquier defecto de los materiales en la fabricaci n del Producto 4 Vali...

Page 82: ...C 7601 Penn Ave South Richfield MN 55423 U S A 2017 Best Buy All rights reserved Made in China Mexico 01800 926 3000 Best Buy Imports S DE R L DE C V Avenida Santa Fe No 440 Piso 2 Ofna 202Y 203 P3Y P...

Reviews: