background image

18

Insignia NS-37LCD 37” LCD TV

www.insignia-products.com

Programming the remote control

Programming a device connected to your TV

The remote control can control four devices, 
such as a VCR, DVD player, cable or satellite 
receiver, amplifier or tuner, or similar device.

To program the remote control:
Find the code for the device you want to 

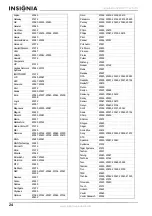
program. See “Appendix” on page 20 for a list 
of codes. If there is more than one code listed 
for a device, write down all of the codes.

Turn on the device you want to program, and 

load media if required (for example, a DVD).

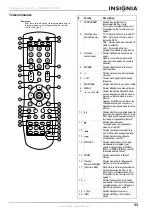
Press a device key on the remote control (for 

example, DVDCBL, or AUX).

Press and hold the SET button on the remote 

control until the LED blinks twice, then 
release the button.

Enter the first five-digit code for your device. 

The LED blinks once as each digit is entered. 
If the code is correct, the LED blinks twice.

Aim the remote at the device, then press the 

 button. The device should turn off.

Repeat Steps 1 through 6 to program 

additional devices.

Press the SET button to save the code and 

exit.

Searching for a code

To search for a code:
Press a device key.

Press and hold the SET button until the LED 

blinks twice, the release the button.

Enter 991, then the device group number 

(0=cable, 1=TV, 2=VCR, 3=audio). The LED 
blinks twice.

Aim the remote control at the device, then 

press the 

 button. If the device responds, 

go to Step 7.

If the device does not respond, press the 

CH+ button. Your remote control will try the 
next code. Keep pressing the CH+ button 
until the device responds. You can press the 
CH– button to try a previous code.

To search for a code for another device, 

repeat Steps 1 through 5.

Press the SET button to save the code and 

exit.

Checking the code

If you programmed a device by searching for a 
code, you may want to know what four-digit code 
the remote is using.

To check the code:
Press the device button on the remote 

control.

Press and hold the SET button until the LED 

blinks twice, then release the button.

Enter 990. The LED blinks twice.

Press 1 and count the LED blinks. This is the 

first digit of the code (for example, if the LED 
blinks twice, the first digit is 2. If the LED 
does not blink, the first digit is 0).

Repeat Step 4 using 2 for the second digit, 3 

for the third digit, 4 for the fourth digit, and 5 
for the fifth digit.

Press the SET button to exit.

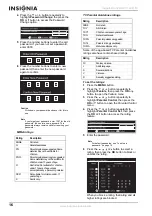
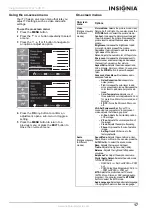
Setup

Tuning Band–Selects the TV signal source. For 
more information, see “Selecting the TV 
source”
 on page 12.
DTV Signal–Displays the digital TV signal 
strength. For more information, see “Checking 
the DTV signal strength”
 on page 14.
Auto Ch Search–Automatically sets up a list of 
the channels available in your area. For more 
information, see “Automatically setting up 
channels
” on page 13.
Manual Ch Set–Lets you add or delete 
channels from the channel list. For more 
information, see “Manually adding or deleting 
channels from the channel list”
 on page 13.
Channel Labels–Lets you add a label to a 
channel. For more information, see “Adding a 
channel label” o
n page 14.

Feature

Source–Selects the video source. You can 
select:

• TV
• Composite1
• Composite2
• Component1
• Component2
• VGA
• HDMI
• S-Video

You can also press the INPUT button to select 
the video source.
Time Set–Sets the clock. For more 
information, see “Setting the clock” on 
page 14.
Sleep Timer–Sets the sleep timer. For more 
information, see “Setting the sleep timer” on 
page 15.
Parental Control–Accesses V-chip controls. 
For more information, see “Setting parental 
controls”
 on page 15.
Closed Caption Options–Customizes closed 
captions for digital broadcasting systems. You 
can adjust Size, Font, Text Color, Text Opacity, 
Background Color, Background Opacity, Edge 
Effect, and Edge Color. 
CC when Mute–Automatically displays closed 
captions when the volume is muted.
Menu Language–Selects the language for the 
on-screen menu. You can select English, 
French, or Spanish.

On-screen 
menu

Options

Note

If the LED does not blink twice, repeat Steps 3 
through 5 using a different code.

Note

If the device does not turn off, repeat Steps 4 
through 6 using a different code. If you cannot find 
a code that works, see “Searching for a code” on 
page 18.

Note

For future reference, write down each working 
code.

Summary of Contents for NS-37LCD

Page 1: ...37 LCD TV Téléviseur ACL de 37 po Televisor Pantalla LCD de 37 NS 37LCD ...

Page 2: ......

Page 3: ... to be walked on or pinched by items placed on or against them Pay particular attention to cords at plugs convenience receptacles and the point where they exit from your TV Attachments Do not use attachments not recommended by Insignia because they may cause hazards Stand Do not place your TV on an unstable cart stand tripod bracket or table Your TV may fall causing serious personal injury and ser...

Page 4: ...e characteristics as the original part Unauthorized substitutions may result in fire electric shock personal injury or other hazards Safety check After completing any service or repair to this TV ask the service technician to perform routine safety checks to determine that your TV is in correct operating condition Power source Operate your TV only from the type of power source indicated on the mar...

Page 5: ...ns 2 VOL VOL Press to increase or decrease the volume In the on screen menu press to adjust a setting or change a value 3 MENU Press to open the on screen menu 4 INPUT Press to select the video input 5 Power Press to turn your TV on or off 1 2 3 4 5 Jack 1 S PDIF digital audio output optical 2 HDMI input 3 D SUB AUDIO input 4 D SUB PIC video input 5 COMPONENT INPUT Y 6 COMPONENT INPUT Cb Pb 7 COMP...

Page 6: ...ve down up left or right in the on screen menu Press the OK button to confirm changes or to toggle options on and off in the on screen menu 10 Press to pause a video tape or DVD Press again to resume playback 11 Press to start recording a video tape or DVD 12 Press to fast reverse a DVD or video tape 13 Press to skip to the previous chapter on a DVD 14 MTS SAP Press to select one of the preset aud...

Page 7: ...DIO Press to select the sound mode 31 A B C D E These buttons do not have any function for this TV They may however be used with other devices when this remote is used as a universal remote control The exact function depends on the specific device being controlled Notes Do not expose the remote control to shock or liquids Do not use the remote control in an area with high humidity Do not place the...

Page 8: ...nd of the 75 ohm connector to the coaxial jack on the back of your TV Use the following illustration to connect an outside antenna Connecting cable TV Your TV has a 75 ohm jack for connecting cable TV Some cable TV providers scramble the signals for premium pay channels To view these channels you need a converter descrambler box If you do not have a converter descrambler box you can connect your c...

Page 9: ...eo cable into the AUDIO L AUDIO R and VIDEO in jacks on the back of your TV 2 Plug the other end of the audio video cable into the audio and video out jacks on the VCR OR Plug in the audio cables as described above then plug one end of an S Video cable into the S Video jack on the back of your TV and the other end into the S Video jack on the VCR 3 Turn on your TV 4 Press the INPUT button repeated...

Page 10: ...ert a videotape then press the record button on the VCR Connecting an amplifier To connect to an amplifier 1 Plug the audio cables into the AUDIO L and AUDIO R jacks on the back of your TV 2 Plug the other end of the audio cables into the audio and video in jacks on the amplifier Warning Make sure that you turn off and unplug your TV before installing devices HEADPHONE TV Y yellow video W white au...

Page 11: ...nnect a DVD player and play a DVD 1 Plug the HDMI cable into the HDMI jack on the back of your TV and to the HDMI Output jack on the back of the DVD player 2 Turn on your TV 3 Press the INPUT button repeatedly to select HDMI 4 Turn on the DVD player 5 Insert a DVD then press the Play button on the DVD player Warning Make sure that you turn off and unplug your TV before installing devices TV Y yell...

Page 12: ...able into the PIC input jack on the back of your TV 4 Plug the other end of the D SUB cable into D SUB jack on your computer 5 Turn on your TV 6 Press the INPUT button repeatedly to select VGA 7 Turn on your computer then set up your computer for external VGA input See your computer documentation for more information Using your TV Turning your TV on and off To turn your TV on and off 1 Make sure t...

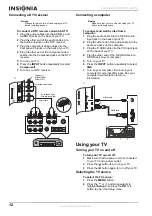
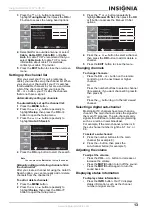
Page 13: ...or button repeatedly to highlight Setup then press the OK or button to open the Setup menu 3 Press the or button repeatedly to highlight Manual Ch Set then press the OK or button to access the Manual Ch Set options 4 Press the or button to select a channel then press the OK button to add or delete a channel 5 Press the EXIT button to close the menu Changing channels To change channels Press the CH...

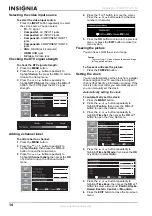
Page 14: ... move the cursor Press the or button select a channel number or character 5 Press the OK button to return to the previous menu or press the EXIT button to close the menu system Freezing the picture You can freeze still the screen image To freeze or unfreeze the picture Press the FREEZE button Setting the clock You can automatically set the clock from a digital channel signal Your TV searches for a...

Page 15: ...alogue and commentaries for TV programs while providing a clear picture of the program TEXT mode shows information not related to the program such as TV program schedules and weather forecasts In TEXT mode part of picture may be covered by the text To view closed captions Press the CCD button repeatedly to select a closed caption mode You can select CC1 CC2 CC3 CC4 TEXT1 TEXT2 TEXT3 TEXT4 Off Sett...

Page 16: ...t a rating then press the OK button to block or unblock the rating When you block a rating that rating and all higher ratings are blocked Caution Write down your password and save it for future use Note If you forget your password enter 1397 for the old password then enter a new password This password always remains valid for resetting your password Rating Description NONE Not rated G General audi...

Page 17: ... You can also press the ZOOM button to select the aspect ratio Advanced Video Menu Provides access to advanced features Noise Reduction Reduces picture noise snow Tint Increases the color level to add more green to skin tones Decreases the color level to add more purple to skin tones Color Temperature Selects one of three automatic color adjustments Cool for more blue Warm for more red and Normal ...

Page 18: ...ase the button 3 Enter 990 The LED blinks twice 4 Press 1 and count the LED blinks This is the first digit of the code for example if the LED blinks twice the first digit is 2 If the LED does not blink the first digit is 0 5 Repeat Step 4 using 2 for the second digit 3 for the third digit 4 for the fourth digit and 5 for the fifth digit 6 Press the SET button to exit Setup Tuning Band Selects the ...

Page 19: ...llowing because it may cause damage to your TV Cleaning your TV with volatile substances such as insect sprays solvents and thinners Leaving items made from rubber or PVC in contact with your TV for long periods Letting liquids drip into the cabinet Warning Do not try to repair your TV yourself Refer all service to a qualified service technician Symptom Possible solution No power Make sure that th...

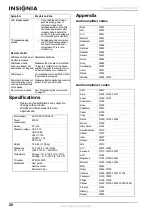
Page 20: ...evice Make sure that the device has a remote sensor then try another code No volume on a device See Programming the volume lock on page 19 Power supply AC 100 240 V 50 60 Hz Power consumption 200 W Screen 37 inch Channel coverage VHF 2 13 UHF 14 69 CATV 1 125 CADTV 1 135 DTV 2 69 Weight 70 4 lbs 31 93 kg Dimensions W H D 37 2 28 9 12 2 inches 944 9 734 1 309 9 mm Temperature Storage 32 to 122 F 0 ...

Page 21: ...7 00237 Panasonic 00000 00008 00107 Panther 00637 Paragon 00000 Philips 00317 01305 Pioneer 01877 00877 00144 00533 Pulsar 00000 Quasar 00000 RadioShack 00883 Regal 00279 00273 Runco 00000 Samsung 00000 00144 Scientific Atlanta 01877 00877 00477 00008 Sony 01006 Starcom 00003 00014 Supercable 00276 Supermax 00883 Tocom 00012 Torx 00003 Toshiba 00000 Trans PX 00276 Tristar 00883 TS 00003 V2 00883 V...

Page 22: ...nterprise 20591 Fisher 21919 Funai 20675 Gateway 21158 21073 GE 20522 20717 Go Video 20744 20833 21099 20783 21075 20869 21730 Greenhill 20717 Harman Kardon 20582 20702 Hitachi 20573 20664 21919 Hiteker 20672 Initial 20717 Integra 20627 21924 JBL 20702 JVC 20558 20623 20867 Kenwood 20490 20534 KLH 20717 21020 21149 Koss 20651 21980 Lasonic 20798 LG 20591 20869 20801 Liquid Video 21980 Lite On 2115...

Page 23: ... 01749 00724 01076 00722 00099 01442 Proscan 00392 00566 Proton 01535 RadioShack 00869 RCA 00392 00566 00855 00143 01392 Samsung 01276 01109 01108 Sanyo 01219 SKY 00856 Sony 00639 01640 Star Choice 00869 Tivo 01142 01442 Toshiba 00749 01749 00790 01285 Ultimate TV 01640 01392 Uniden 00724 00722 US Digital 01535 USDTV 01535 Voom 00869 Zenith 00856 01856 ABS 21972 Admiral 20048 20209 Aiko 20278 Aiwa...

Page 24: ...e 21972 Olympus 20035 Optimus 21062 20162 20037 20048 20104 20432 Orion 20184 20209 20002 20479 Panasonic 21062 20035 20162 20616 20225 Penney 20035 20037 20240 20042 20038 Pentax 20042 Philco 20035 20479 Philips 20035 20081 20739 20618 Pilot 20037 Pioneer 20042 20067 Polk Audio 20081 Profitronic 20240 Proscan 20060 Protec 20072 Pulsar 20039 Qisheng 20060 Quasar 20035 20162 Radix 20037 Randex 2003...

Page 25: ...t names are trademarks or registered trademarks of their respective holders Specifications and features are subject to change without notice or obligation Victor 20067 Video Concepts 20045 Videomagic 20037 Videosonic 20240 Viewsonic 21972 Wards 20060 20035 20048 20047 20081 20240 20042 20072 White Westinghouse 20209 20072 XR 1000 20035 20072 Yamaha 20038 Zenith 20039 20033 20209 20479 ZT Group 219...

Page 26: ...26 Insignia NS 37LCD 37 LCD TV www insignia products com ...

Page 27: ...me amount of protection as the original packaging If you purchased the Product from an online web site mail your original receipt and the Product to the address listed on the web site Make sure that you put the Product in its original packaging or packaging that provides the same amount of protection as the original packaging Where is the warranty valid This warranty is valid only to the original ...

Page 28: ...28 Insignia NS 37LCD 37 LCD TV www insignia products com ...

Page 29: ...lots un plus large que l autre Une prise de type mise à la terre est composée de deux plots et d un troisième de mise à la terre Ce troisième plot large ou rond a été prévu pour la sécurité de l utilisateur Si la fiche ne s adapte toujours pas à la prise secteur contacter un électricien afin qu il remplace la prise inadéquate Protection du cordon d alimentation Les cordons d alimentation électriqu...

Page 30: ... instructions d utilisation en effet le réglage incorrect d autres commandes pourrait provoquer des dégâts entraînant souvent d importantes réparations par un technicien qualifié pour rétablir le fonctionnement normal de l appareil Si le téléviseur est tombé ou s il est endommagé de quelque façon que ce soit Si l appareil présente une détérioration marquée de ses performances Pièces de rechange Si...

Page 31: ...essus 4 Conducteurs de mise à la terre 5 Unité de décharge de l antenne 6 Serre fil de mise à la terre 7 Fil conducteur de l antenne Commande Description 1 Témoin de Marche Arrêt S allume quand l appareil est mis sous tension 2 Capteur de télécommande Reçoit les signaux de la télécommande Commande Description 1 CH CH Permet de changer le canal Dans le menu d écran permet de sélectionner les menus ...

Page 32: ...IC vidéo 5 ENTRÉE À COMPOSANTES Y 6 ENTRÉE À COMPOSANTES Cb Pb 7 ENTRÉE À COMPOSANTES Cr Pr 8 ENTRÉE À COMPOSANTES AUDIO D 9 ENTRÉE À COMPOSANTES AUDIO G 10 Entrée antenne RF 11 Entrée S VIDÉO 12 ENTRÉE AV VIDÉO 13 ENTRÉE AV AUDIO G 14 ENTRÉE AV AUDIO D 15 Interface de commande RS 232 16 Prise de sortie haut parleur droite 17 SORTIE AV VIDÉO 18 SORTIE AV AUDIO G 19 SORTIE AV AUDIO D 20 CASQUE D ÉC...

Page 33: ...ectionnelles pour se déplacer en bas en haut à gauche ou à droite dans le menu d écran Appuyer sur OK pour confirmer les changements ou pour activer ou désactiver les options dans le menu d écran 10 Permet d arrêter momentanément la lecture d une cassette vidéo ou d un DVD Appuyer de nouveau sur cette touche pour reprendre la lecture 11 Permet de commencer l enregistrement d une cassette vidéo ou ...

Page 34: ...e 44 28 IMAGE Permet de sélectionner le mode d image 29 ARRÊT SUR IMAGE Permet d effectuer un arrêt sur l image vidéo Appuyer de nouveau pour reprendre la lecture Ne pas effectuer un arrêt sur l image vidéo pendant une durée prolongée L écran du téléviseur pourrait être endommagé 30 AUDIO Permet de sélectionner le mode audio 31 Touches A B C D E Ces touches n ont aucune fonctionnalité sur cet appa...

Page 35: ...es plaques fixes 4 Connecter les haut parleurs aux prises pour haut parleurs situées sur les panneaux latéraux de l appareil S assurer de connecter les câbles audio des haut parleurs aux prises de sortie des haut parleurs de façon à correspondre aux symboles et de ces derniers par la couleur Connexion d une antenne externe Les câbles d antenne sont de deux types 75 ohms et 300 ohms Remarques Ne pa...

Page 36: ... prise coaxiale à l arrière de l appareil 2 Brancher l autre extrémité sur la prise secteur de la TV câblée Pour le raccordement à la TV câblée avec un décodeur décrypteur Se référer au schéma ci après pour la connexion d un décodeur décrypteur l interrupteur RF et le répartiteur de signal ne sont pas fournis Régler l interrupteur RF en position A et utiliser la télécommande de l appareil pour vis...

Page 37: ...io du magnétoscope OU Brancher les câbles audio tels que décrit ci dessus puis connecter une extrémité du câble S Vidéo à la prise S Vidéo à l arrière de l appareil et l autre extrémité à la prise S Vidéo du magnétoscope 3 Allumer le téléviseur 4 Appuyer plusieurs fois sur INPUT Entrée pour sélectionner Composite1 ou S Video si le magnétoscope est connecté à la prise S Vidéo 5 Mettre le magnétosco...

Page 38: ...érer une cassette vidéo puis appuyer sur la touche enregistrement du magnétoscope Connexion d un amplificateur Pour connecter un amplificateur 1 Brancher les câbles audio sur les prises AUDIO L gauche et AUDIO R droite à l arrière de l appareil 2 Brancher l autre extrémité des câbles audio sur les prises d entrée vidéo et audio de l amplificateur Avertissement S assurer d éteindre et de débrancher...

Page 39: ... DVD et lire un DVD 1 Brancher le câble HDMI sur la prise HDMI à l arrière de l appareil et sur la prise de sortie HDMI sur le panneau arrière du lecteur de DVD 2 Allumer le téléviseur 3 Appuyer plusieurs fois sur INPUT Entrée pour sélectionner HDMI 4 Mettre le lecteur de DVD sous tension 5 Insérer un DVD et appuyer sur Play Lecture Avertissement S assurer d éteindre et de débrancher l appareil av...

Page 40: ...io sur les prises de sortie audio de l ordinateur 3 Connecter le câble D SUB à la prise d entrée PIC à l arrière de l appareil 4 Brancher l autre extrémité du câble D SUB sur la prise D SUB de l ordinateur 5 Allumer le téléviseur 6 Appuyer plusieurs fois sur INPUT Entrée pour sélectionner VGA 7 Mettre l ordinateur sous tension puis le régler en mode d entrée VGA externe Pour plus d informations se...

Page 41: ...eurs fois sur ou pour sélectionner Auto Ch Search Recherche automatique des canaux 4 Appuyer sur OK ou pour lancer la recherche des canaux Ajout ou suppression manuel de canaux de la liste des canaux Après avoir créé la liste des canaux à partir de l option Recherche automatique des canaux il est possible d ajouter ou de supprimer des canaux de la liste manuellement Pour ajouter ou supprimer des c...

Page 42: ...ordinateur HDMI Prise HDMI S Video Prise S Vidéo Vérification de la puissance du signal TVN Pour vérifier la puissance du signal TVN 1 Appuyer sur MENU 2 Appuyer plusieurs fois sur ou pour sélectionner Setup Configuration puis sur OK ou pour ouvrir le menu Setup Configuration 3 Appuyer plusieurs fois sur ou pour sélectionner DTV Signal Signal TVN puis sur OK ou Le téléviseur affiche la puissance d...

Page 43: ...d écran Réglage manuel de l horloge Pour régler l horloge manuellement 1 Appuyer sur MENU 2 Appuyer plusieurs fois sur ou pour sélectionner Feature Fonctions puis sur OK ou pour ouvrir le menu Feature Fonctions 3 Appuyer plusieurs fois sur ou pour sélectionner Time Set Réglage de l horloge puis sur OK ou pour ouvrir le menu Time Set Réglage de l horloge 4 Appuyer plusieurs fois sur ou pour sélecti...

Page 44: ... contrôle total Avant de sélectionner les classifications il est nécessaire de configurer le mot de passe du contrôle parental Pour configurer un mot de passe 1 Appuyer sur MENU 2 Appuyer plusieurs fois sur ou pour sélectionner Feature Fonctions puis sur OK ou pour ouvrir le menu Feature Fonctions 3 Appuyer plusieurs fois sur ou pour sélectionner Parental Control Contrôle parental puis sur OK ou p...

Page 45: ...s du téléviseur tels que l image vidéo et le son Pour utiliser le menu d écran 1 Appuyer sur MENU 2 Appuyer plusieurs fois sur ou pour sélectionner un menu 3 Appuyer sur ou pour naviguer entre les options ou pour régler une option 4 Appuyer sur OK ou pour confirmer un réglage ouvrir un sous menu ou défiler parmi les paramètres 5 Appuyer sur MENU pour retourner au menu précédent ou sur EXIT Quitter...

Page 46: ...verticale de l image Clock Horloge Définit la fréquence d échantillonnage Phase Améliore la netteté d une image fixe Setting Réglage Réinitialise le mode VGA au défaut usine Audio Les options varient en fonction des différents modes disponibles Sound Mode Mode sonore Sélectionne le mode sonore User Utilisateur News Nouvelles Music Musique ou Movie Film Il est aussi possible d appuyer sur AUDIO pou...

Page 47: ...ue répéter les étapes 1 à 5 7 Appuyer sur SET Réglage pour enregistrer le code et quitter le menu Vérification du code Si lors de la recherche d un code un périphérique a été programmé il est recommandé de vérifier quel code à quatre chiffres est utilisé par la télécommande Pour vérifier le code 1 Appuyer sur la touche du périphérique de la télécommande 2 Appuyer sans relâcher sur SET Réglage jusq...

Page 48: ... déformer le boîtier ou entraîner un fonctionnement défectueux Température de stockage 32 à 122 F 0 à 50 C Température en fonctionnement 41 à 104 F 5 à 40 C Ne pas placer l appareil sous la lumière solaire directe ou à proximité d une source de chaleur Nettoyage de l appareil Nettoyer l écran et le boîtier avec un chiffon doux et non pelucheux Si l écran ou le boîtier est extrêmement sale humidifi...

Page 49: ...station d une image rémanente sur l écran Ces dommages ne sont pas couverts par la garantie Le téléviseur émet des craquements Les craquements se produisent quand le châssis du téléviseur se dilate ou se contracte sous l effet de variations de températures Ceci est normal Télécommande Le témoin à DEL ne clignote pas quand une touche est appuyée Remplacer les piles Le témoin à DEL clignote quand un...

Page 50: ... 30039 Philips 31189 31269 Pioneer 31023 30150 30014 30630 30531 Proscan 31254 Qisheng 31609 Quasar 30039 RadioShack 31263 RCA 31023 31609 31254 30531 31074 Sharper Image 31263 Silsonic 30176 Sony 31258 31759 Soundesign 30670 Stereophonics 31023 Sunfire 31313 Teac 31074 31267 Technics 31308 31518 30039 Thorens 31189 Victor 30074 Wards 30014 Yamaha 30176 31276 31176 ABC 00003 00008 00014 Americast ...

Page 51: ...30157 Onkyo 30868 30101 Optimus 31063 30000 30032 30037 30420 30179 31075 30145 Panasonic 30029 Parasound 30420 Philips 30626 30157 Pioneer 31063 31062 30032 Polk Audio 30157 Proton 30157 QED 30157 Quad 30157 Quasar 30029 RadioShack 31075 RCA 31062 30032 30420 30179 30053 Realistic 30420 30179 Rotel 30157 30420 SAE 30157 Sansui 30157 Sanyo 30179 SAST 30157 Sharp 30861 30037 Silsonic 30888 30036 So...

Page 52: ...695 Sharp 20630 20752 Sharper Image 21117 Sherwood 20770 Shinco 20717 Shinsonic 20533 Sonic Blue 20869 21099 Sony 20533 20864 21033 21904 21903 SVA 20717 Sylvania 20675 Symphonic 20675 Teac 20717 21984 20809 Technics 20490 Theta Digital 20571 Toshiba 20503 20695 Urban Concepts 20503 Xbox 20522 Yamaha 20490 20539 20545 Zenith 20503 20591 20869 AlphaStar 00772 Chaparral 00216 Crossdigital 01109 Dire...

Page 53: ...nic 20037 Emerex 20032 Emerson 20035 20037 20184 20240 20045 20121 20043 20209 20002 20278 20479 Fisher 20047 20104 Fuji 20035 20033 Fujitsu 20045 Gateway 21972 GE 20060 20035 20240 General 20045 Go Video 20432 GoldStar 20037 20209 20038 20225 Haojie 20240 Harman Kardon 20081 20038 Harwood 20072 Hewlett Packard 21972 HI Q 20047 Hitachi 20037 20042 20055 Howard Computers 21972 HP 21972 Hughes Netwo...

Page 54: ... 20060 20035 20240 20042 20880 Realistic 20035 20037 20048 20047 20104 ReplayTV 20616 Runco 20039 Sampo 20037 20048 Samsung 20240 20045 20432 Sanky 20048 20039 Sansui 20067 20209 20479 Sanyo 20047 20240 20104 Scott 20184 20045 20121 20043 Sears 20035 20037 20047 20042 20104 Sharp 20048 20209 Shintom 20072 Shogun 20240 Singer 20072 Sonic Blue 20616 Sony 20035 20032 20033 20636 21972 STS 20042 Sylva...

Page 55: ...compagné du reçu original à l adresse indiquée sur le site Web S assurer de remettre le Produit dans son emballage d origine ou dans un emballage qui procure la même qualité de protection que celui d origine Où cette garantie s applique t elle Cette garantie ne s applique qu à l acheteur original du Produit aux États Unis et au Canada Ce qui n est pas couvert par cette garantie limitée La présente...

Page 56: ...56 Téléviseur ACL de 37 po Insignia NS 37LCD www insignia products com ...

Page 57: ... enchufe con polarización o con conexión a tierra Un enchufe polarizado tiene dos espigas una más ancha que la otra Un enchufe del tipo de conexión a tierra tiene dos espigas y una clavija de tierra La espiga ancha y la clavija de tierra se proveen para su seguridad Si el enchufe no cabe póngase en contacto con un electricista para reemplazar el tomacorriente obsoleto Protección del cable de alime...

Page 58: ...esto a la lluvia o al agua Si su televisor no funciona normalmente aún siguiendo las instrucciones de operación Ajuste únicamente los controles que están cubiertos en las instrucciones de operación ya que el ajuste incorrecto de otros controles puede resultar en daño y frecuentemente requerirá trabajo intensivo de un técnico calificado para restaurar la operación normal del televisor Si su televis...

Page 59: ...ra el servicio de alimentación eléctrica 3 Abrazaderas de tierra 4 Conductores de conexión a tierra 5 Unidad de descarga de antena 6 Abrazadera de tierra 7 Cable conductor de entrada de antena Control Descripción 1 Indicador de encendido Se ilumina cuando su televisor está encendido 2 Sensor del control remoto Recibe las señales del control remoto 6 7 5 2 1 3 4 Control Descripción 1 CANAL CANAL Pr...

Page 60: ...DA DE COMPONENTE DE AUDIO IZQUIERDO 10 RF Entrada de antena Remueva la cubierta del conector 11 Entrada S VIDEO 12 VIDEO DE LA ENTRADA AV 13 AUDIO IZQUIERDO DE LA ENTRADA AV 14 AUDIO DERECHO DE LA ENTRADA AV 15 Interfaz de control RS 232 16 Conector de salida de audio derecho 17 VIDEO DE LA SALIDA AV 18 AUDIO IZQUIERDO DE LA SALIDA AV 19 AUDIO DERECHO DE LA SALIDA AV 20 AURICULARES 21 Conector de ...

Page 61: ...udio predefinidos Puede seleccionar entre MONO STEREO Estéreo y SAP 15 ZOOM Permite seleccionar la relación de aspecto 16 Encendido Permite encender su televisor o ponerlo en el modo de suspensión 17 LED Se ilumina cuando se programa el control remoto Para obtener más información refiérase a Programming the remote control en la page 74 18 Permite seleccionar un sub canal Para obtener más informaci...

Page 62: ... o líquidos No use el control remoto en un área con alta humedad No coloque el control remoto bajo la luz solar directa No coloque objetos tales cómo muebles entre el control remoto y el sensor del control remoto Puede ser que el control remoto no funcione si luz solar directa o luz fuerte brille sobre el sensor del control remoto Mueva su televisor o cambie el ángulo en que usa el control remoto ...

Page 63: ...elevisor Refiérase a la siguiente figura para conectar una antena exterior Conexión de TV por cable Su televisor tiene un conector de 75 ohmios para conectar TV por cable Algunos proveedores de TV por cable codifican las señales de los canales de pago especial Para ver estos canales necesita una caja convertidora decodificadora Si no tiene una caja convertidora decodificadora puede conectar su TV ...

Page 64: ... los conectores AUDIO L Izquierdo AUDIO R Derecho y VIDEO en la parte posterior de su televisor 2 Conecte el otro extremo del cable de audio video en los conectores de salida de audio y video del VCR O Conecte los cables de audio cómo se indica arriba y conecte un extremo de un cable de S Video en el conector de S Video en la parte posterior de su televisor y el otro extremo en el conector de S Vi...

Page 65: ...nta de video luego presione el botón de grabar en el VCR Conexión a un amplificador Para conectarse a un amplificador 1 Conecte el cable de audio en los conectores AUDIO L Izquierdo y AUDIO R Derecho en la parte posterior de su televisor 2 Conecte el otro extremo de los cables de audio en los conectores de entrada de audio y video del amplificador Advertencia Verifique que apague y desconecte su t...

Page 66: ...ar un reproductor de DVD y reproducir un DVD 1 Conecte el cable HDMI en el conector HDMI en la parte posterior de su televisor y al conector de salida HDMI en la parte posterior del reproductor de DVD 2 Encienda su televisor 3 Presione INPUT Entrada repetidamente para seleccionar HDMI 4 Encienda el reproductor de DVD 5 Inserte un DVD y presione Play Reproducir en el reproductor de DVD Advertencia ...

Page 67: ...ecte el cable D SUB en la entrada PIC en la parte posterior de su televisor 4 Conecte el otro extremo del cable D SUB en el conector D SUB en su computadora 5 Encienda su televisor 6 Presione INPUT Entrada repetidamente para seleccionar VGA 7 Encienda su computadora luego configure su computadora para una entrada de VGA externa Refiérase a los documentos de su computadora para obtener más informac...

Page 68: ...Después de crear una lista de canales usando la opción Auto Ch Search puede agregar o eliminar canales de la lista de canales Para agregar o borrar canales 1 Presione MENU Menú 2 Presione o repetidamente para resaltar Setup Configuración y presione OK Aceptar o para abrir el menú Setup 3 Presione o repetidamente para resaltar Manual Ch Set Establecimiento Manual de Canales luego presione OK Acepta...

Page 69: ... Agregando una etiqueta de canal Para agregar una etiqueta a un canal 1 Presione MENU Menú 2 Presione o repetidamente para resaltar Setup Configuración y presione OK Aceptar o para abrir el menú Setup 3 Presione o repetidamente para resaltar Setup Configuración y presione OK Aceptar o para abrir el menú Channel Labels Etiquetas de canal 4 Presione o para mover el cursor Press the or button select ...

Page 70: ...que su televisor se apague automáticamente Para ajustar el temporizador de apagado automático 1 Presione MENU Menú 2 Presione o repetidamente para resaltar Feature Función y presione OK Aceptar o para abrir el menú Feature 3 Presione o repetidamente para resaltar Sleep Timer Temporizador de apagado automático y presione OK Aceptar o para seleccionar la cantidad de tiempo Para desactivar el tempori...

Page 71: ...e los botones numéricos para ingresar la contraseña antigua Si no ha configurado una contraseña ingrese 0000 6 Presione el número de botones para ingresar una contraseña nueva luego ingrese la contraseña nueva de nuevo para confirmar Clasificaciones MPAA Clasificaciones de TV Parental Guidelines Pautas de TV para los padres Cuidado Escriba su contraseña y guárdela para uso futuro Nota Si olvida su...

Page 72: ...icación luego presione OK Aceptar para bloquear o desbloquear la clasificación Cuando bloquea una clasificación se bloqueará dicha clasificación y todas las clasificaciones por encima de ella Uso del menú de pantalla OSD Su televisor tiene un menú de pantalla que le permite ajustar los controles del televisor tal cómo los ajustes de video y audio Para usar el menú de pantalla 1 Presione MENU Menú ...

Page 73: ...Ajusta la frecuencia de muestreo Phase Fase Mejora el foco de una imagen estable Setting Ajuste Regresa el modo VGA a los valores de fábrica Audio Las opciones pueden variar en diferentes modos Sound Mode Modo de sonido Selecciona el modo de sonido User Usuario News Noticias Music Música o Movie Película También puede presionar AUDIO para seleccionar el modo de sonido Bass Graves Ajusta los sonido...

Page 74: ...uscando el código le podría gustar saber que código de 4 dígitos está usando el control remoto Para revisar el código 1 Presione el botón del equipo en el control remoto 2 Mantenga presionado SET Establecer hasta que el indicador LED parpadee dos veces luego suelte el botón 3 Ingrese 990 El indicador LED parpadeará dos veces 4 Presione 1 y cuente las veces que parpadee el indicador LED Este es el ...

Page 75: ... almacenamiento son 32 a 122 F 0 a 50 C Temperaturas de funcionamiento son 41 F a 104 F 5 a 40 C No coloque su televisor bajo luz solar directa ni cerca de una fuente de calor Limpieza de su televisor Limpie la pantalla y el gabinete con un paño suave y sin pelusa Si la pantalla o el gabinete se encuentran especialmente sucios humedezca un paño suave y sin pelusa en una solución detergente suave e...

Page 76: ...na imagen de computadora por un periodo de tiempo extendido Esto puede causar que una imagen permanente se queme en la pantalla Este tipo de daño no está cubierto por su garantía El televisor produce ruidos como un clic Estos sonidos ocurren cuando el gabinete de su televisor se expande o contrae debido a cambios en la temperatura Esto no es un mal funcionamiento Control remoto El indicador LED no...

Page 77: ... Panasonic 31518 30039 Philips 31189 31269 Pioneer 31023 30150 30014 30630 30531 Proscan 31254 Qisheng 31609 Quasar 30039 Radio Shack 31263 RCA 31023 31609 31254 30531 31074 Sharper Image 31263 Silsonic 30176 Sony 31258 31759 Soundesign 30670 Stereophonics 31023 Sunfire 31313 Teac 31074 31267 Technics 31308 31518 30039 Thorens 31189 Victor 30074 Wards 30014 Yamaha 30176 31276 31176 ABC 00003 00008...

Page 78: ...C 30420 NSM 30157 Onkyo 30868 30101 Optimus 31063 30000 30032 30037 30420 30179 31075 30145 Panasonic 30029 Parasound 30420 Philips 30626 30157 Pioneer 31063 31062 30032 Polk Audio 30157 Proton 30157 QED 30157 Quad 30157 Quasar 30029 Radio Shack 31075 RCA 31062 30032 30420 30179 30053 Realistic 30420 30179 Rotel 30157 30420 SAE 30157 Sansui 30157 Sanyo 30179 SAST 30157 Sharp 30861 30037 Silsonic 3...

Page 79: ...anyo 20695 Sharp 20630 20752 Sharper Image 21117 Sherwood 20770 Shinco 20717 Shinsonic 20533 Sonic Blue 20869 21099 Sony 20533 20864 21033 21904 21903 SVA 20717 Sylvania 20675 Symphonic 20675 Teac 20717 21984 20809 Technics 20490 Theta Digital 20571 Toshiba 20503 20695 Urban Concepts 20503 Xbox 20522 Yamaha 20490 20539 20545 Zenith 20503 20591 20869 AlphaStar 00772 Chaparral 00216 Crossdigital 011...

Page 80: ...honic 20037 Emerex 20032 Emerson 20035 20037 20184 20240 20045 20121 20043 20209 20002 20278 20479 Fisher 20047 20104 Fuji 20035 20033 Fujitsu 20045 Gateway 21972 GE 20060 20035 20240 General 20045 Go Video 20432 GoldStar 20037 20209 20038 20225 Haojie 20240 Harman Kardon 20081 20038 Harwood 20072 Hewlett Packard 21972 HI Q 20047 Hitachi 20037 20042 20055 Howard Computers 21972 HP 21972 Hughes Net...

Page 81: ...20035 20240 20042 20880 Realistic 20035 20037 20048 20047 20104 ReplayTV 20616 Runco 20039 Sampo 20037 20048 Samsung 20240 20045 20432 Sanky 20048 20039 Sansui 20067 20209 20479 Sanyo 20047 20240 20104 Scott 20184 20045 20121 20043 Sears 20035 20037 20047 20042 20104 Sharp 20048 20209 Shintom 20072 Shogun 20240 Singer 20072 Sonic Blue 20616 Sony 20035 20032 20033 20636 21972 STS 20042 Sylvania 200...

Page 82: ...82 Televisor Insignia NS 37LCD con Pantalla LCD de 37 www insignia products com ...

Page 83: ...un empaque que provea la misma protección que el original Si compró el Producto en un sitio Web envíe por correo su recibo original y el Producto a la dirección postal listada en el sitio Web Asegúrese de colocar el Producto en su empaque original o en un empaque que provea la misma protección que el original En dónde es válida la garantía Esta garantía sólo es válida al comprador original del Pro...

Page 84: ...84 Televisor Insignia NS 37LCD con Pantalla LCD de 37 www insignia products com ...

Page 85: ...85 Televisor Insignia NS 37LCD con Pantalla LCD de 37 www insignia products com ...

Page 86: ......

Reviews: