background image

29

Insignia 24" LED TV

www.insigniaproducts.com

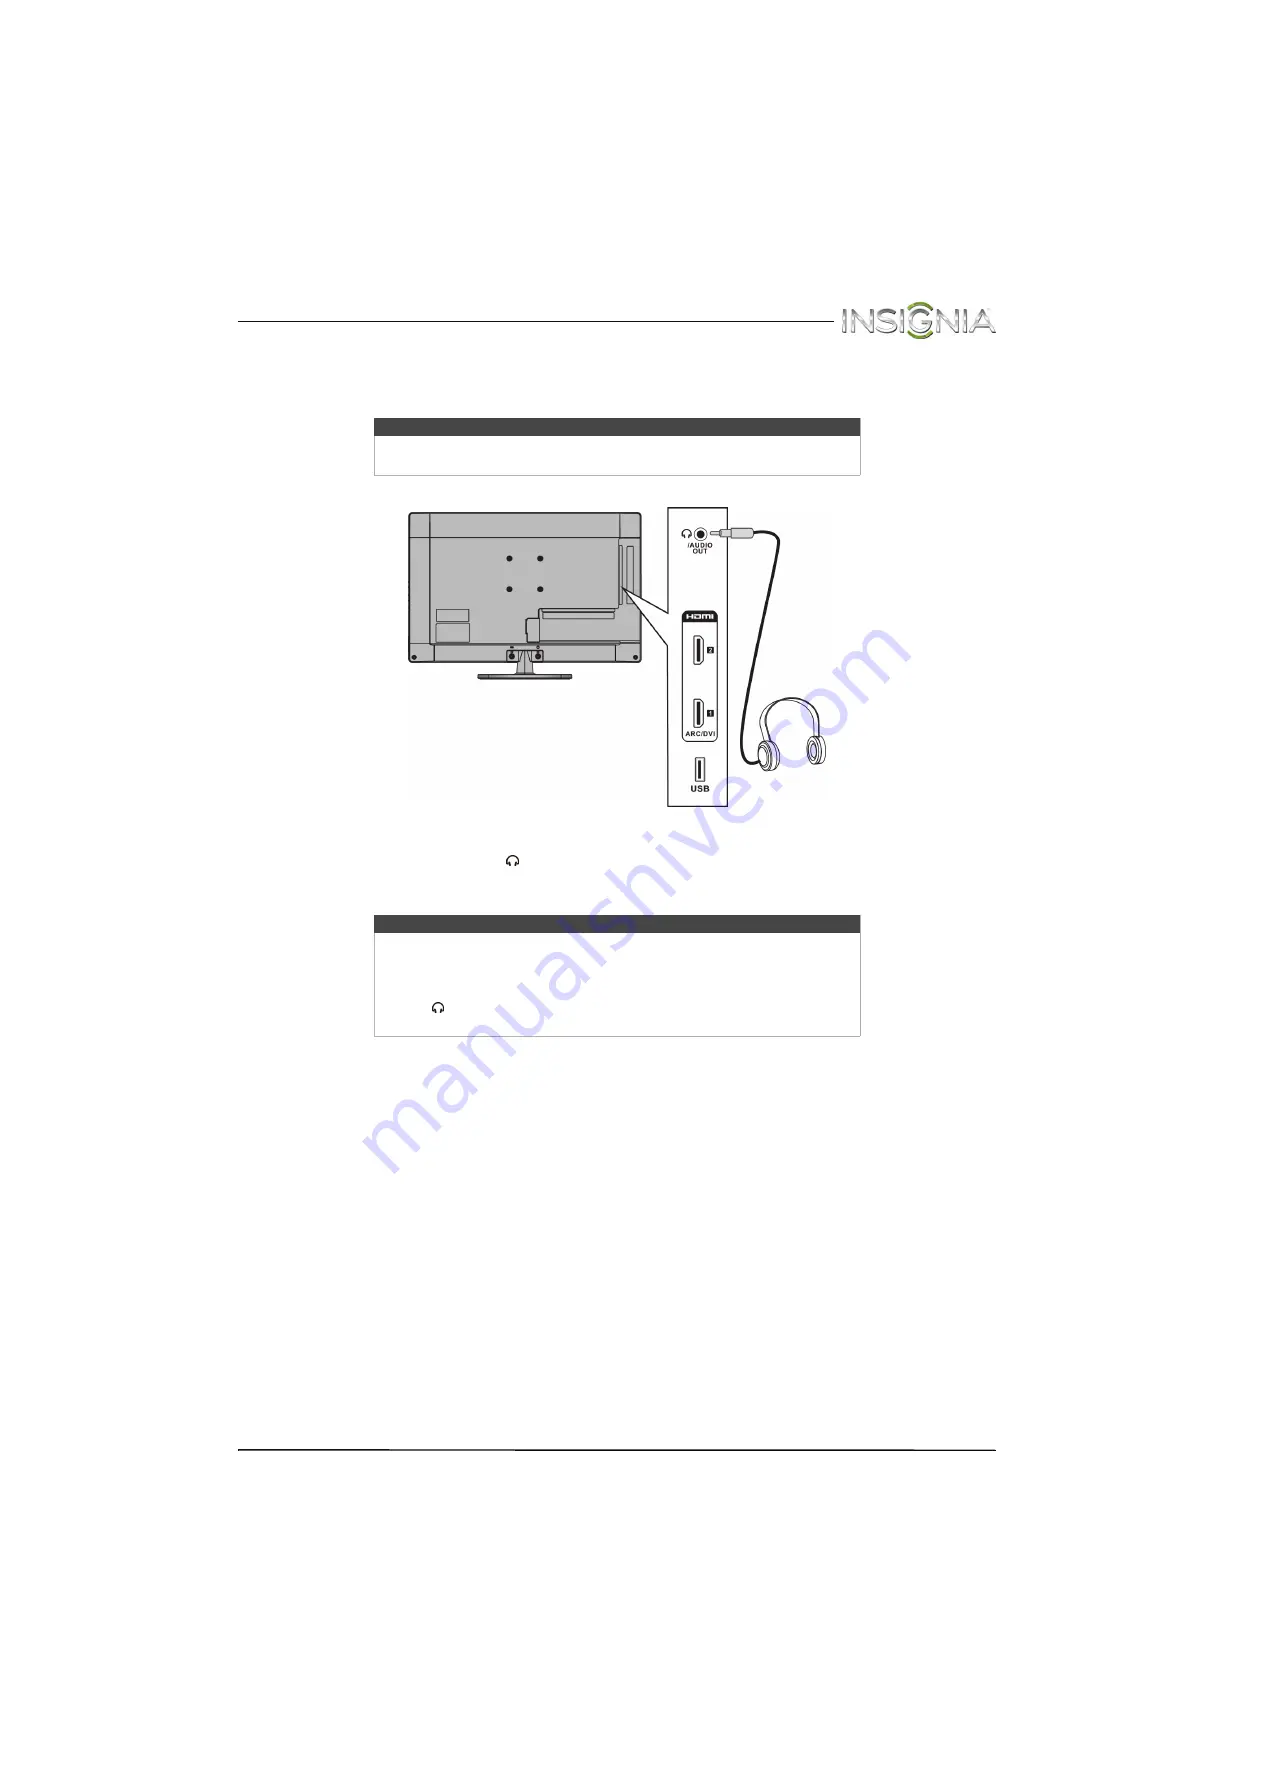
Connecting headphones

When you connect headphones, the TV speakers are muted.

To connect headphones:

1

Connect the headphones to the 

/AUDIO OUT

 jack on the side of your TV.

2

In the screen that opens, press 

W

 or 

X

 to highlight 

Headphone

, then press 

ENTER

. For more information, see 

Selecting the audio out mode

” on page

43

.

Warning

Loud noise can damage your hearing. When using headphones, use the 
lowest volume setting on your headphones that still lets you hear the sound.

Notes

• If you connect headphones when your TV is turned off, then you turn on 

your TV, the TV speakers are muted and the audio plays through the 
headphones.

• You can also connect an amplifier, home theater system, or sound bar to 

the 

/AUDIO OUT

 jack. If you want to connect an amplifier, home 

theater system, or sound bar, you need to disconnect the headphones.

Side of TV

Summary of Contents for NS-24E400NA14

Page 1: ...NS 24E400NA14 UserGuide 24 LED TV Before using your new product please read these instructions to prevent any damage ...

Page 2: ...ng DVI same as HDMI but requires an audio connection 13 Using component video better 14 Using composite video good 15 Using coaxial good 16 Connecting an antenna or cable TV no box 17 Connecting a DVD or Blu ray player 18 Using HDMI best 18 Using DVI same as HDMI but requires an audio connection 19 Using component video better 20 Using composite video good 21 Connecting a game console 22 Using HDM...

Page 3: ...hannel 39 Adjusting the volume 39 Viewing channel information 39 Adjusting the picture 39 Adjusting the TV picture 39 Setting the power on picture mode 41 Adjusting the computer image 41 Adjusting the sound 42 Adjusting sound settings 42 Selecting the audio out mode 43 Playing TV audio only 43 Changing channel settings 44 Automatically scanning for channels 44 Hiding channels 45 Setting up a favor...

Page 4: ...ff 59 Turning Audio Receiver on or off 59 Displaying a list of INlink compatible HDMI CEC devices 60 Waking INlink compatible HDMI CEC devices 60 Opening an INlink compatible device s root menu 61 Using a USB flash drive 61 Switching to USB mode 61 Browsing photos 62 Viewing favorite photos 63 Viewing photos in a slideshow 63 Customizing slideshow settings 64 Maintaining 64 Cleaning the TV cabinet...

Page 5: ...come excited while watching a program especially on a larger than life TV Make sure that you place or install the TV where it cannot be pushed pulled over or knocked down Make sure that you route all cords and cables so that they cannot be pulled or grabbed by curious children Wall mounting If you decide to wall mount your TV always remember One size of wall mount does not fit all Use only a wall ...

Page 6: ...ripping or splashing and no objects filled with liquids such as vases should be placed on the apparatus WARNING Electric shock hazard To reduce the risk of fire or electric shock do not remove any cover or expose the device to rain or moisture No user serviceable parts are inside Refer servicing to qualified service technicians Lightning For added protection for your device receiver during a light...

Page 7: ... the lead in wire to an antenna discharge unit size of grounding conductors location of the antenna discharge unit connection to grounding electrodes and requirements for the grounding electrode Note to CATV system installer Article 820 of the National Electrical Code ANSI NFPA No 40 provides guidance for correct grounding Specifically it states that the cable ground must be connected to the groun...

Page 8: ...products plug and play No setup is needed CEC technology lets different components discover and communicate with each other See page 58 for instructions on how to use INlink Installing the stand or wall mount bracket Installing the stand To install the stand 1 Secure the TV stand to the stand column with one of the provided screws Notes If you plan to wall mount your TV do not install the stand St...

Page 9: ...lace your TV face down on a cushioned clean surface to protect the screen from damages and scratches then insert the stand column 3 Secure the stand column to the TV with two of the provided screws Screw type Screw length of screws M4 16 mm 2 Front of TV stand ...

Page 10: ...bracket to your TV using the mounting holes on the back of your TV See the instructions that came with the wall mount bracket for information about how to correctly hang your TV Warning This TV is intended to be supported by a UL Listed wall mount bracket with suitable weight load See Miscellaneous on page 72 Notes The length of the wall mount screws vary depending on the wall mount bracket you pu...

Page 11: ... For more information see Navigating the menus on page 38 INPUT Press to open the INPUT SOURCE list press CH or CH to select the video input source then press INPUT again For more information see Selecting the video input source on page 37 In menu mode press to confirm selections VOL VOL Press to increase or decrease the volume CH CH Press to go to the next or previous channel in the channel list ...

Page 12: ...t on pages 12 18 22 or 26 HDMI 1 ARC DVI Connect an HDMI device to this jack For more information see Using HDMI best on pages 12 18 22 or 26 OR Connect the video for a DVI device to this jack For more information see Using DVI same as HDMI but requires an audio connection on pages 13 19 or 27 OR Connect a home theater to this jack USB Connect a USB flash drive to this jack to view compatible JPEG...

Page 13: ...re information see Using composite video good on page 15 21 or 24 L and R audio Connect the audio for a component video device to these jacks For more information see Using component video better on page 14 20 or 23 OR Connect the audio for a composite video device to these jacks For more information see Using composite video good on page 15 21 or 24 ANT CABLE Connect an antenna or cable TV to thi...

Page 14: ...source then press ENTER For more information see Selecting the videoinput source on page 37 return In TV mode press to return totheprevious channel S T W X Press to navigate in on screen menus and to adjust settings home Press to open the on screen menu INFO Press to display TVstatus information such as the channelnumber channelname ifavailable orsignal source For more information see Viewingchann...

Page 15: ...rdevices have HDMI HDMI video audio Better than composite or coaxial Component video requires an audio connection Better than coaxial Compositevideo requires an audio connection Good Coaxial video audio Connection type and jack Cable connectors Coaxial digital audio Analog audio input Analog audio output VGA computer video and audio Cautions Check the jacks for position and type before making any ...

Page 16: ... is turned off 2 Connect the incoming cable from the cable wall jack to the cable in jack on the cable or satellite box 3 Connect an HDMI cable not provided to one of the HDMI jacks on the side of your TV and to the HDMI OUT jack on the cable or satellite box 4 Plug your TV s power cord into a power outlet turn on your TV then turn on the cable or satellite box 5 Press INPUT to open the INPUT SOUR...

Page 17: ...ur TV 5 Connect a 3 5mm audio cable not provided to the PC DVI AUDIO IN jack on the back of your TV and to the AUDIO OUT jacks on the cable or satellite box 6 Plug your TV s power cord into a power outlet turn on your TV then turn on the cable or satellite box 7 Press INPUT to open the INPUT SOURCE list 8 Press S or T to highlight HDMI 1 then press ENTER Note You must use the HDMI 1 ARC DVI jack t...

Page 18: ...n the back of your TV and to the audio out jacks on the cable or satellite TV box 5 Plug your TV s power cord into a power outlet turn on your TV then turn on the cable or satellite box 6 Press INPUT to open the INPUT SOURCE list 7 Press S or T to select Component AV then press ENTER Note Cables are often color coded to match color coded jacks Notes The COMPONENT AV Y VIDEO PB and PR video jacks u...

Page 19: ...outlet turn on your TV then turn on the cable or satellite box 5 Press INPUT to open the INPUT SOURCE list 6 Press S or T to select Component AV then press ENTER Notes Cables are often color coded to match color coded jacks The yellow video connector on the AV cable connects to the green COMPONENT AV Y VIDEO jack Notes The COMPONENT AV Y VIDEO PB and PR video jacks used to connect a component devi...

Page 20: ... and to the coaxial out jack on the cable or satellite box 4 Plug your TV s power cord into a power outlet turn on your TV then turn on the cable or satellite box 5 Press INPUT to open the INPUT SOURCE list 6 Press S or T to select TV then press ENTER 7 If you cannot tune to channels you know exist scan for channels See Automatically scanning for channels on page 44 Notes Use a coaxial cable to el...

Page 21: ...Do not bundle the coaxial cable with the power cord or other cables If the antenna is not installed correctly contact qualified service personnel to correct the problem If the signal level for a channel is weak the picture may be distorted Adjust the antenna or use a highly directional outdoor or set top antenna with a built in amplifier If the picture quality is good on some channels and poor on ...

Page 22: ...s unplugged and the DVD or Blu ray player is turned off 2 Connect an HDMI cable not provided to one of the HDMI jacks on the side of your TV and to the HDMI OUT jack on the DVD or Blu ray player 3 Plug your TV s power cord into a power outlet then turn on your TV 4 Turn on the DVD or Blu ray player then set it to the correct output mode For more information see the documentation that came with the...

Page 23: ...e AUDIO OUT jacks on the DVD or Blu ray player 5 Plug your TV s power cord into a power outlet then turn on your TV 6 Turn on the DVD or Blu ray player then set it to the correct output mode For more information see the documentation that came with the player 7 Press INPUT to open the INPUT SOURCE list 8 Press S or T to select HDMI 1 then press ENTER Note You must use the HDMI 1 ARC DVI jack to co...

Page 24: ...into a power outlet then turn on your TV 5 Turn on the DVD or Blu ray player then set it to the correct output mode For more information see the documentation that came with the player 6 Press INPUT to open the INPUT SOURCE list 7 Press S or T to select Component AV then press ENTER Note Cables are often color coded to match color coded jacks Notes The COMPONENT AV Y VIDEO PB and PR video jacks us...

Page 25: ...mation see the documentation that came with the player 5 Press INPUT to open the INPUT SOURCE list 6 Press S or T to select Component AV then press ENTER Notes Cables are often color coded to match color coded jacks The yellow video connector on the AV cable connects to the green COMPONENT AV Y VIDEO jack Note The COMPONENT AV Y VIDEO PB and PR video jacks used to connect a component device share ...

Page 26: ...f the HDMI jacks on the side of your TV and to the HDMI OUT jack on the game console 3 Plug your TV s power cord into a power outlet then turn on your TV 4 Turn on the game console then set it to the correct output mode For more information see the documentation that came with the console 5 Press INPUT to open the INPUT SOURCE list 6 Press S or T to highlight HDMI 1 or HDMI 2 then press ENTER HDMI...

Page 27: ...mentation that came with the console 5 Press INPUT to open the INPUT SOURCE list 6 Press S or T to select Component AV then press ENTER Note Cables are often color coded to match color coded jacks Note Your game console may require a special component video cable See the documentation that came with your game console or check the manufacturer s website The COMPONENT AV Y VIDEO PB and PR video jack...

Page 28: ...5 Press INPUT to open the INPUT SOURCE list 6 Press S or T to select Component AV then press ENTER Notes Cables are often color coded to match color coded jacks The yellow video connector on the AV cable connects to the green COMPONENT AV Y VIDEO jack Note Most game consoles come with a special AV composite video cable See the documentation that came with your game console or check the manufacture...

Page 29: ...o cable with a stereo mini plug not provided to the PC DVI AUDIO IN jack on the back of your TV and to the AUDIO OUT headphone jack on the computer 4 Plug your TV s power cord into a power outlet then turn on your TV and the computer 5 Press INPUT to open the INPUT SOURCE list 6 Press S or T to select VGA then press ENTER 7 Adjust the display properties on the computer if necessary Audio cable wit...

Page 30: ...not provided to one of the HDMI jacks on the side of your TV and to the HDMI OUT jack on the computer 3 Plug your TV s power cord into a power outlet then turn on your TV and the computer 4 Press INPUT to open the INPUT SOURCE list 5 Press S or T to highlight HDMI 1 or HDMI 2 then press ENTER 6 Adjust the display properties on the computer if necessary HDMI cable Side of TV HDMI cable connector HD...

Page 31: ...he back of your TV and to the AUDIO OUT headphone jack on the computer 5 Plug your TV s power cord into a power outlet then turn on your TV and the computer 6 Press INPUT to open the INPUT SOURCE list 7 Press S or T to select HDMI 1 then press ENTER 8 Adjust the display properties on the computer if necessary Note You must use the HDMI 1 ARC DVI jack to connect a computer using DVI If you use anot...

Page 32: ... input source after you plug in the USB flash drive and want to switch back to the drive press INPUT to open the INPUT SOURCE list press S or T to select USB Photos then press ENTER The PHOTOS menu opens Caution Do not remove the USB flash drive or turn off the TV while using the USB flash drive You may lose data or damage the USB flash drive Note The Photos viewer only supports JPEG format images...

Page 33: ... audio out mode on page 43 Warning Loud noise can damage your hearing When using headphones use the lowest volume setting on your headphones that still lets you hear the sound Notes If you connect headphones when your TV is turned off then you turn on your TV the TV speakers are muted and the audio plays through the headphones You can also connect an amplifier home theater system or sound bar to t...

Page 34: ...e home theater system is turned off 2 Connect a digital coaxial audio cable not provided to the DIGITAL OUTPUT jack on the back of your TV and to the coaxial AUDIO IN jack on the digital home theater system 3 Plug your TV s power cord into a power outlet then turn on your TV and the home theater system Digital coaxial audio cable Home theater system Back of TV Digital coaxial audio cable connector...

Page 35: ... the AUDIO IN jacks on the analog home theater system 3 Plug your TV s power cord into a power outlet then turn on your TV and the home theater system Notes For information about selecting the audio out mode for a home theater see the Headphone Audio Out option in Adjusting sound settings on page 42 You can connect headphones an amplifier a home theater system or a sound bar to the AUDIO OUT jack ...

Page 36: ... Refer to the documentation that came with your devices for connection information Just remember to use the best connection types available for the best picture and sound For information about connection types see What connection should I use on page 11 DVD or Blu ray player Cable or satellite box AV receiver Game console USB flash drive Computer Antenna or cable TV connected directly to the wall ...

Page 37: ...cord into the POWER jack on the back of your TV 2 Plug the other end of the cable into a power outlet Caution Your TV should only be operated from the power source indicated on the label Always unplug the AC power cord from the power outlet when you will not be using your TV for an extended period of time ...

Page 38: ...ntrol To aim the remote control Point the remote control towards the remote sensor on the front of your TV For the location of the remote sensor see Front on page 7 Cautions Batteries should not be exposed to excessive heat such as sunshine heat registers or fire Battery chemicals can cause a rash If the batteries leak clean the battery compartment with a cloth If chemicals touch your skin wash im...

Page 39: ... Mountain Pacific Alaska Hawaii Atlantic or Newfoundland then press ENTER MENU or W 8 Press S or T to highlight Daylight Saving then press X to access the setting 9 Press S or T to select On if your viewing area observes Daylight Savings Time or Off if your viewing area does not observe Daylight Savings Time then press ENTER MENU or W 10 If you selected Manual for Mode Press S or T to highlight Ye...

Page 40: ...ected A message asks how you connected the cable box to your TV Select HDMI Component or AV then press ENTER if you connected a cable box to your TV using one of these cables Read the message then press ENTER to close the wizard Select Coaxial then press ENTER if you connected a cable box to your TV using a coaxial cable Read the message then press ENTER to start the channel scan VHF channels only...

Page 41: ...your TV is connected to a cable or satellite box using a component video cable select Component AV If your TV is connected to a cable or satellite box using a composite video cable select Component AV Understanding the basics Turning your TV on or off To turn your TV on or off 1 Make sure that the power cord is connected to a power outlet 2 Press power to turn on your TV The power indicator turns ...

Page 42: ...the Photos menu Menu items that are not selectable are grayed out Menus in this manual are described in TV mode unless otherwise indicated The screens shown in this manual are for explanation purposes and may vary from the actual screens on your TV Press MENU to open the on screen menu Press the right orleft arrow to move the cursor on the screen or to adjust a selected item Press the up or downar...

Page 43: ...ek date and resolution if provided by the broadcaster Adjusting the picture Adjusting the TV picture You can adjust various settings to improve the quality of the TV picture Also you can reset all picture settings to the factory default To adjust the TV picture 1 Press MENU The on screen menu opens with the PICTURE menu displayed 2 Press T or ENTER to access the menu 3 Press S or T to highlight an...

Page 44: ...elects the noise reduction mode to reduce picture noise snow You can select Off Low Middle or High Adaptive Contrast Automatically adjusts picture detail and brightness You can select On or Off Reset Picture Settings Resets all picture settings to factory mode 4 Press W or X to adjust the option or press S or T to select a setting 5 Press MENU to return to the previous menu or press EXIT to close ...

Page 45: ...r image to improve the quality To adjust the computer image 1 Make sure that your TV is in VGA mode For more information see Selecting the video input source on page 37 2 Press MENU The on screen menu opens 3 Press W or X to highlight SETTINGS then press ENTER The SETTINGS menu opens 4 Press S or T to highlight Computer Settings then press ENTER The SETTINGS COMPUTER SETTINGS menu opens 5 Press S ...

Page 46: ...an select RAW to pass through the original digital audio sound PCM to output audio in 2 channel stereo Audio Delay Fine tunes the audio when it is not in sync with the video MTS SAP Analog channels only Selects the audio mode You can select Mono Select this option if there is noise or static on weak stereo broadcasts Stereo Select this option for programs broadcast in stereo SAP Select this option...

Page 47: ...e AUDIO OUT jack to control the audio Audio Out Variable Select this option to use the remote control that came with your TV to control the audio from the amplifier home theater system or sound bar you connected to the AUDIO OUT jack Playing TV audio only You can turn off the picture on your TV and listen to the program audio only To play TV audio only 1 Press MENU The on screen menu opens 2 Press...

Page 48: ...R A If you select Antenna your TV scans for available channels The scan may take several minutes B If you select Cable a message asks if you have a cable box Select No then press ENTER if no cable box is connected Your TV scans for available channels The scan may take several minutes Select Yes then press ENTER if a cable box is connected A message asks how you connected the cable box to your TV S...

Page 49: ...er buttons for the channel To hide channels 1 Press MENU The on screen menu opens 2 Press W or X to highlight CHANNELS then press T or ENTER The CHANNELS menu opens 3 Press S or T to highlight Add Skip Channels then press ENTER The CHANNELS ADD SKIP CHANNELS screen opens 4 Press S T W or X to highlight the channel you want to hide then press ENTER The check mark disappears 5 Press MENU to return t...

Page 50: ...ot already labeled you can label the channel to make it easier to identify You can also relabel a channel that is already labeled To add or change a channel label 1 Press MENU The on screen menu opens 2 Press W or X to highlight CHANNELS then press T or ENTER The CHANNELS menu opens 3 Press S or T to highlight Channel Labels then press ENTER The CHANNELS CHANNEL LABELS screen opens with the channe...

Page 51: ...creen opens showing the signal strength meter 4 Press MENU to return to the previous menu or press EXIT to close the menu Automatically adjusting the aspect ratio Auto Aspect Ratio automatically changes how the picture looks on the screen aspect ratio based on the TV program you are viewing To automatically adjust the aspect ratio 1 Press MENU The on screen menu opens 2 Press W or X to highlight C...

Page 52: ...ress W or X to highlight SETTINGS then press T or ENTER The SETTINGS menu opens 3 Press S or T to highlight Parental Controls then press ENTER The Enter password screen opens 4 Press the number buttons to enter the four digit password The default password is 0000 You should change the password to a number you can remember The SETTINGS PARENTAL CONTROLS menu opens 5 Press S or T to highlight Change...

Page 53: ...ess MENU to return to the previous menu or press EXIT to close the menu Blocking unrated TV Some TV programs such as news and sports shows are not rated When Block Unrated TV is turned on TV programs that do not have ratings are blocked When you try to watch a blocked program you are prompted to enter the parental controls password To block unrated TV 1 Press MENU The on screen menu opens 2 Press ...

Page 54: ...G General audiences TV PG Parental guidance suggested TV 14 Parental guidance strongly suggested TV MA Mature audiences only U S TV content ratings All All ratings are blocked FV Fantasy violence L Strong language S Sexual situations V Violence D Suggestive dialog U S movie MPAA ratings None Movie not rated G General audiences PG Parental guidance suggested PG 13 Suitable forchildren13 and older R...

Page 55: ...EXIT to close the menu Downloading rating information If the program you are viewing has downloadable rating information you can download the information to use when setting parental controls To download rating information 1 Press MENU The on screen menu opens 2 Press W or X to highlight SETTINGS then press T or ENTER The SETTINGS menu opens 3 Press S or T to highlight Parental Controls then press...

Page 56: ...Using closed captioning Closed captioning displays a text version of the TV program audio or displays information provided by the broadcaster Turning closed captioning on or off To turn closed captioning on or off 1 Press MENU The on screen menu opens 2 Press W or X to highlight SETTINGS then press T or ENTER The SETTINGS menu opens 3 Press S or T to highlight Closed Caption then press ENTER The S...

Page 57: ...previous menu or press EXIT to close the menu Selecting the digital closed captioning mode Digital channels usually have one or more closed captioning modes The CC1 mode usually displays a text version of the TV program audio in a small banner The other CC modes display information provided by the broadcaster CS1 mode displays a text version of the audio in the same language as the audio To select...

Page 58: ...Digital CC Settings then press ENTER The SETTINGS CLOSED CAPTION DIGITAL CC SETTINGS menu opens with Style highlighted 6 Press ENTER then press S or T to select Custom 7 Press S or T to highlight an option then press ENTER You can select Size Selects the font size Font Selects the font style Text Color Selects the color for the words Text Opacity Selects the opacity level for the words Background ...

Page 59: ...ly set by the TV signal source 7 Press ENTER to close the menu 8 Press S or T to highlight Time Zone then press ENTER 9 Press S or T to select your time zone then press ENTER You can select Eastern Central Mountain Pacific Alaska Hawaii Atlantic or Newfoundland 10 Press ENTER to close the menu 11 If your viewing area observes daylight savings time press S or T to highlight Daylight Saving then pre...

Page 60: ...off the sleep timer select Off 6 Press MENU to return to the previous menu or press EXIT to close the menu Adjusting menu settings Selecting the menu language Your TV can display the on screen menu in English French or Spanish When you set your TV up for the first time the language was selected You can change the menu language to a different language To select the menu language 1 Press MENU The on...

Page 61: ...When you have completed the label press ENTER 7 Press MENU to save your label and return to the previous menu The next time you press INPUT your label will appear in the INPUT SOURCE list 8 Press EXIT to close the menu Turning Input Sensor on or off When the Input Sensor feature is turned on your TV automatically detects which video jacks have devices connected to them Your TV uses this informatio...

Page 62: ...link is set to On Device Auto Power Off automatically turns off HDMI CEC devices when you turn off your TV To turn Device Auto Power Off on or off 1 Press MENU The on screen menu opens 2 Press W or X to highlight SETTINGS then press T or ENTER The SETTINGS menu opens 3 Press S or T to highlight INlink then press ENTER The SETTINGS INlink menu opens 4 Press S or T to highlight Device Auto Power Off...

Page 63: ...6 Press MENU to return to the previous menu or press EXIT to close the menu Turning Audio Receiver on or off When INlink is turned on and you have connected an audio receiver to your TV turning on Audio Receiver lets you use your TV s remote control to control the volume on the audio receiver To turn Audio Receiver on or off 1 Press MENU The on screen menu opens 2 Press W or X to highlight SETTING...

Page 64: ...DMI CEC devices When a connected INlink compatible device is in turned off standby mode Connect wakes turns on the device When a connected INlink compatible device is turned on and you switch to a different video input source such as TV Connect switches to the device To wake INlink compatible HDMI CEC devices 1 Press INPUT press S or T to highlight the INlink compatible device you want to wake the...

Page 65: ...e previous menu or press EXIT to close the menu Using a USB flash drive You can connect a USB flash drive to your TV to view compatible JPEG pictures Switching to USB mode To switch to USB mode 1 Make sure that you have connected the USB flash drive to the USB port on your TV 2 If your TV is turned on when you connect the USB flash drive press S or T to highlight Yes in the message that appears th...

Page 66: ...orite photo list A heart appears on a photo that has been added to the favorite photo list Press EXIT to close the control bar When a photo is displayed full screen a control bar appears at the bottom of the photo The file name picture resolution size and date are displayed on the bottom of the control bar If you do not press a button within 10 seconds the control bar closes Press any button to op...

Page 67: ... Viewing photos in a slideshow You can view your photos in a slideshow To view photos in a slideshow 1 Switch to USB mode See Switching to USB mode on page 61 The PHOTOS menu opens 2 If the photos you want to view are in a folder on the USB flash drive select the folder For information about selecting a folder see Browsing photos on page 62 or Viewing photos in a slideshow on page 63 3 Press MENU ...

Page 68: ...ct None No transition effect Fade to Black Fades the screen to black between photos Vertical Wipe Wipes the screen from top to bottom between photos Horizontal Wipe Wipes the screen from left to right between photos Random Randomly selects a transition effect 4 Press S or T to select a setting then press ENTER 5 Press EXIT to close the menu Maintaining Do not use your TV in areas that are too hot ...

Page 69: ... default settings 5 Press S or T to select Yes to reset or No to not reset then press ENTER If you select Yes your TV turns off then turns on again The TV SETUP wizard opens 6 Go through the TV SETUP wizard For more information see Turning on your TV for the first time on page 35 Viewing system information You may need to view system information during troubleshooting To view system information 1 ...

Page 70: ...ee Connecting a cable or satellite box on page 12 or Connecting an antenna or cable TV no box on page 17 Adjust the brightness See Adjusting the TV picture on page 39 Make sure that the correct picture mode is selected See Adjusting the TV picture on page 39 If you are using an antenna the digital channel signal may be low To check the digital channel signal strength see Checking the digital signa...

Page 71: ...t top box Problem Solution Dotted lines or stripes appear on the screen Make sure that the antenna or cable TV is connected correctly and securely See Connecting a cable or satellite box on page 12 or Connecting an antenna or cable TV no box on page 17 If you are using an antenna the digital channel signal may be low To check the digital channel signal strength see Checking the digital signal stre...

Page 72: ...ove it further from the TV to eliminate the interference Problem Solution No output from one of the speakers Adjust the audio balance See Adjusting sound settings on page 42 Make sure that the audio cables are connected correctly and securely to your TV After images appear Do not display a still image such as a logo game or computer image for an extended period of time This can cause a permanent a...

Page 73: ...e sure that the channels are not hidden The channel may have been deleted from the channel list You can tune to the channel by pressing the number buttons or you can add the channel back to the channel list See Hiding channels on page 45 If you are using a cable or satellite box use the remote that came with that box to change channels Make sure that you have the correct input selected to view cha...

Page 74: ...gnia device it may not be compatible with your TV My TV s remote control does not control the device Make sure that there are no obstructions between the remote control and the remote control sensors on your TV and the device If the device is not an Insignia device all the buttons may not work Make sure that the INlink feature is turned on See Turning INlink on or off on page 58 If you are trying ...

Page 75: ...er for example turn the volume knob or press a button Audio Receiver is automatically set to On To prevent this from happening turn off the INlink feature See Turning INlink on or off on page 58 Problem Solution Two volume bars appear when adjusting the volume When you adjust the volume on the audio receiver or with the TV remote control a double volume bar appears one for the TV volume and one fo...

Page 76: ...alog NTSC Digital ATSC 8 VSB Clear QAM HDMI 2 side E EDID compliant HDCPcompliant Component video 1 back Composite video 1 back Sharedwith component Y Shared audio component and composite Yes S Video No PC VGA 1 back 3 5mm PC audio input 1 back DVI 1 side HDMI1 DVIjack USB 1 side Supports JPEG andfirmware upgrade Antenna Cable 1 back Video No Analog audio Headphone 1 side Digital audio 1 coaxial b...

Page 77: ...ll Insignia TVs manufactured after Jan 1 2007 Tips If your universal remote control has a code search feature run a code search to identify a code that matches your TV See your universal remote control s instructions for details If your universal remote control has a Learn feature you can manually program it using the Insignia TV remote to teach the commands one at a time See your universal remote...

Page 78: ...rty responsible for compliance could void the user s authority to operate the equipment Cables Connections to this device must be made with shielded cables with metallic RF EMI connector hoods to maintain compliance with FCC Rules and Regulations Canadian Notice CAN ICES 3 B NMB 3 B Standard Television Receiving Apparatus Appareil de réception télévision ordinaire Canada BETS 7 NTMR 7 IC Statement...

Page 79: ...rchase was made What does the warranty not cover This warranty does not cover Customer instruction education Installation Set up adjustments Cosmetic damage Damage due to acts of God such as power surges Accident s Misuse unintentional or intentional Abuse unintentional or intentional Negligence Commercial purposes use including but not limited to use in a place of business or in communal areas of...

Page 80: ...hasing LLC 7601 Penn Avenue South Richfield MN55423 3645USA 2013BBY Solutions Inc All rights reserved INSIGNIAis a trademark of BBY Solutions Inc Registeredin some countries All other products andbrand namesare trademarks of their respective owners V1 ENGLISH 13 0016 ...

Reviews: