background image

7

19" 720p LED HDTV/ 22" 1080p LED HDTV

www.insigniaproducts.com

Back

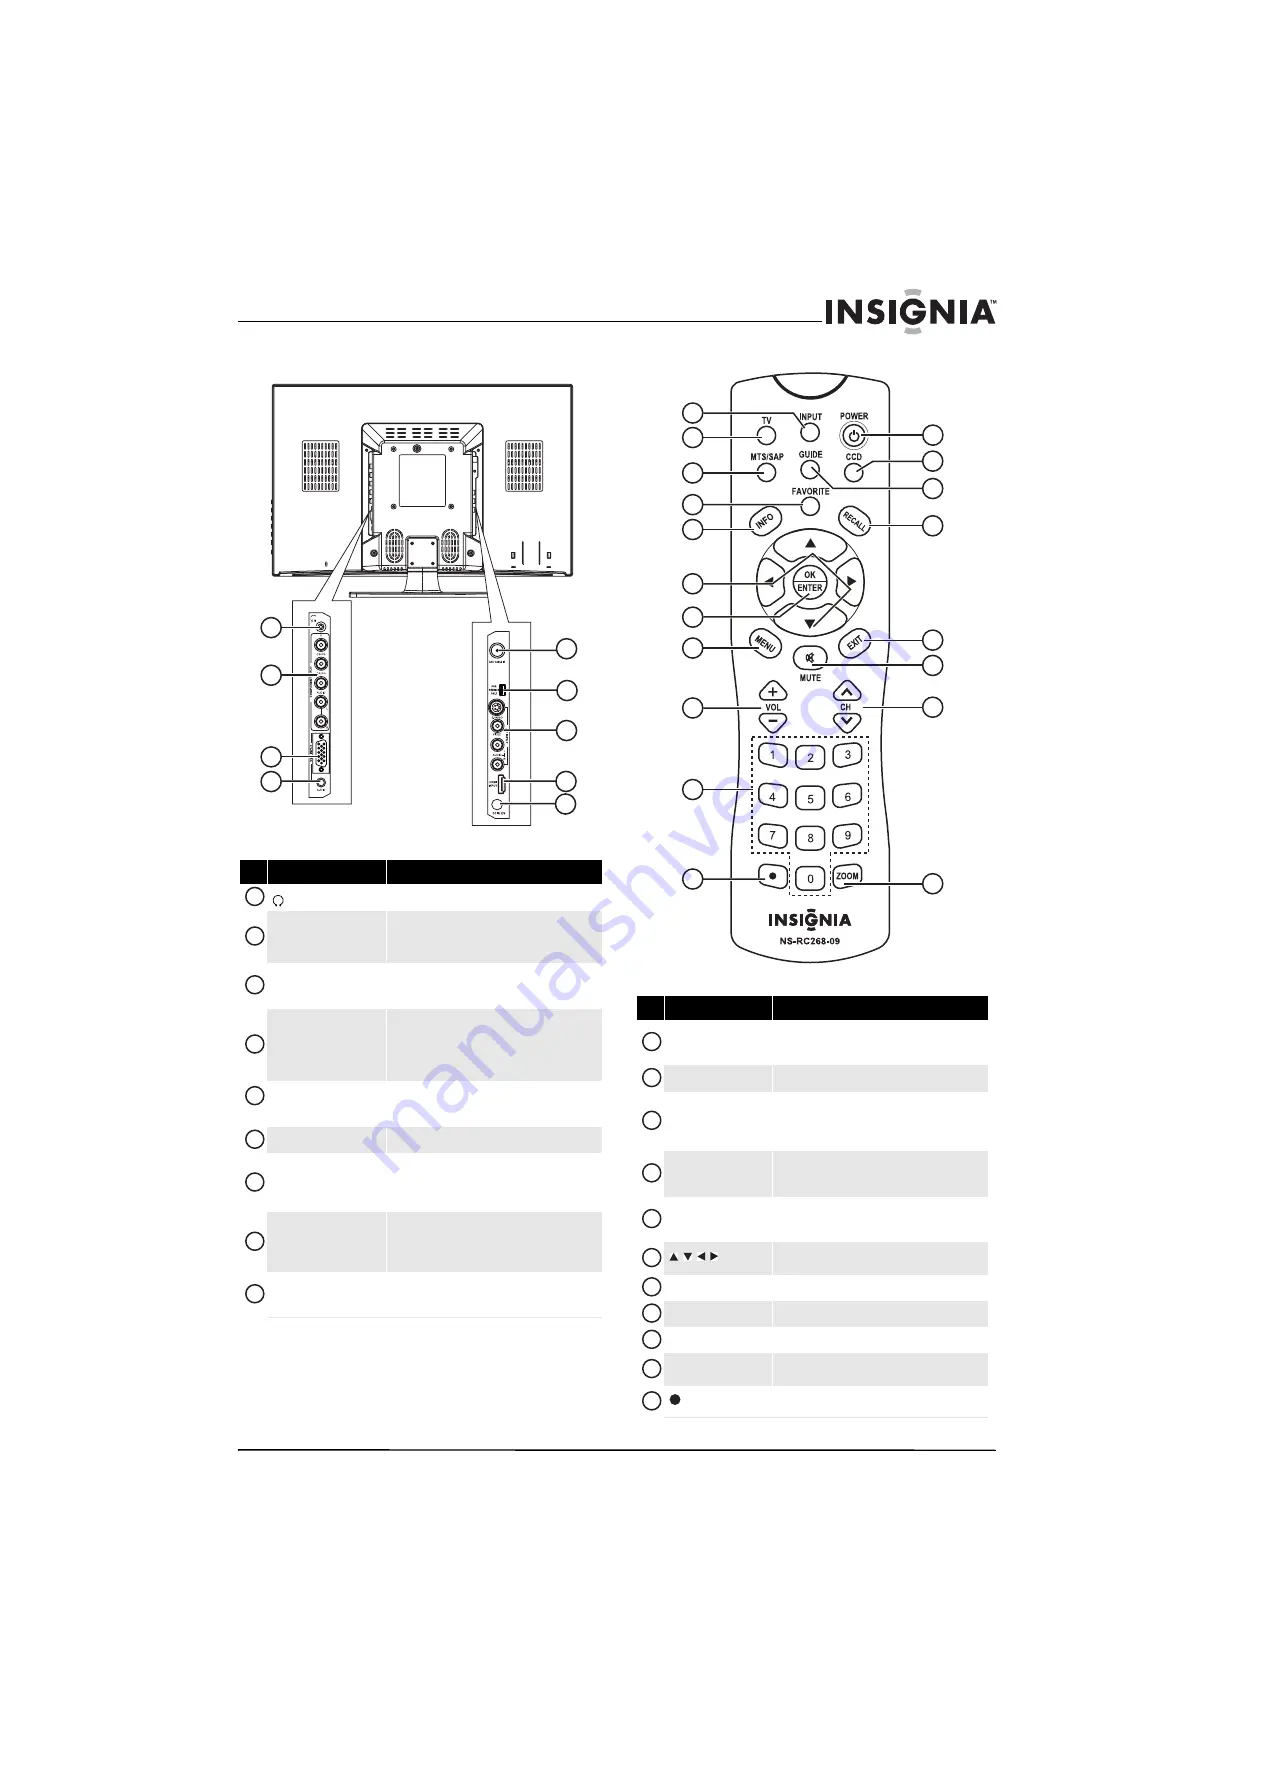
Remote Control

#

Jack

Description

 (headphone)

Plug headphones into this jack

COMPONENT INPUT
(Y, CB/PB, CR/PR, and 
L/R AUDIO)

Connect a component video device to these jacks. 
For more information, see “Connecting a 
component video device” o
n page 12.

VGA INPUT

Connect a computer’s video to this jack. For more 
information, see “Connecting a computer using 
VGA
” on page 13.

VGA AUDIO INPUT

Connect a computer’s line out jack to this jack. For 
more information, see “Connecting a computer 
using VGA” 
on page 13. If you are connecting a 
computer using DVI, see “Connecting a computer 
using HDMI or DVI” o
n page 14.

ANT/CABLE IN

Connect an antenna, cable TV, or satellite TV to this 
jack. For more information, see “Connecting an 
antenna, cable TV, or satellite TV
” on page 10.

FOR SERVICE ONLY

For service only.

AV INPUT (S-VIDEO, 
VIDEO, and L/R AUDIO)

Connect a standard AV device or S-Video device to 
these jacks. For more information, see “Connecting 
a standard video device” on
 page 11 or 
“Connecting an S-Video device” o
n page 11.

HDMI INPUT

Connect an HDMI or DVI device to this jack. For 
more information, see “Connecting an HDMI 
device
” on page 12 or “Connecting a DVI device” on 
page 13.

DC IN 12V

Connect the AC adapter to this jack. When your TV 
is on, power still flows into it. To disconnect power, 
unplug the power cord.

5

6

9

8

7

2

1

3
4

1

2

3

4

5

6

7

8

9

#

Button

Description

INPUT

Press to select the video input mode. For more 
information, see “Selecting the video input mode” 
on page 15.

TV

Press to view TV.

MTS/SAP

In analog TV mode, press to select 

STEREO

Mono

or 

SAP

. In digital TV mode, press to select the audio 

language. For more information, see “Adjusting the 
sound” 
on page 18.

FAVORITE

Press to open the favorite list. For more 
information, see “Setting up the favorite channel 
list
” on page 20.

INFO

Press to display information about the input source. 
For more information, see “Viewing channel 
information
” on page 15.

Press to select options and to adjust settings in the 
on-screen menus.

OK/ENTER

Press to confirm selections in the on-screen menus.

MENU

Press to open the on-screen menu.

VOL +/VOL–

Press to increase or decrease the volume.

Numbers

Press to enter channel numbers and the parental 
control password.

 (decimal)

Press to select digital sub-channels. For more 
information, see “Selecting a channel” on page 15.

12

1
2

3

4
5

6

7

8

9

10

11

13
14

15

16
17

18

19

1

2

3

4

5

6

7

8

9

10

11

Summary of Contents for 09-1082

Page 1: ...19 720p LED HDTV 22 1080p LED HDTV NS 19E430A10 NS 22E430A10 UserGuide...

Page 2: ...onnecting an antenna cable TV or satellite TV 10 Connecting a standard video device 11 Connecting an S Video device 11 Connecting a component video device 12 Connecting an HDMI device 12 Connecting a...

Page 3: ...source 23 Blocking U S TV programs 23 Blocking movies 25 Blocking Canadian TV programs 26 Using downloaded rating information 27 Changing the password 27 Using closed captioning 28 Selecting the clos...

Page 4: ...iv Contents www insigniaproducts com...

Page 5: ...excited while watching a program especially on a larger than life TV Make sure that you place or install the TV where it cannot be pushed pulled over or knocked down Make sure that you route all cords...

Page 6: ...apparatus shall not be exposed to dripping or splashing and that no objects filled with liquids such as vases shall be placed on the apparatus Warnings Electric shock hazard To reduce the risk of fir...

Page 7: ...trical Code ANSI NFPA No 40 provides guidance for correct grounding Specifically it states that the cable ground must be connected to the grounding system of the building as close to the point of cabl...

Page 8: ...to install the stand To install the stand 1 Insert the stand bracket into the bracket mouting hold on the stand then secure the bracket with the two included screws 2 Install the bracket cap on top of...

Page 9: ...pter into the holder 3 Insert the power cord into the AC adapter then insert the AC power adapter into the DC IN 12V jack on the back of your TV 4 Plug the power cord into a power outlet Warning These...

Page 10: ...le you do not have to use the AC power adapter holder When your TV is turned off power is still flowing into it To completely disconnect power unplug the power cord Item Description Power Standby indi...

Page 11: ...device to this jack For more information see Connecting an HDMI device onpage 12or ConnectingaDVIdevice on page 13 DC IN 12V Connect the AC adapter to this jack When your TV ison power still flows int...

Page 12: ...e28 and Setting closedcaptioning styles on page 28 GUIDE Press to display the DTV electronic program guide For more information see Usingthe electronic program guide on page 22 RECALL Press to go the...

Page 13: ...ote control in an area with high humidity Do not place the remote control in direct sunlight Do not place objects such as furniture between the remote control and the remote sensor The remote control...

Page 14: ...one end of a coaxial cable to the ANT CABLE IN jack on the back of your TV then connect the other end to the antenna cable TV or satellite TV jack 3 Turn on your TV 4 Press INPUT on the remote control...

Page 15: ...o connect an S Video device 1 Make sure that your TV is turned off and the power cord is disconnected 2 Connect one end of an S Video cable to the AV S VIDEO INPUT jack on the back of your TV then con...

Page 16: ...the external device 4 Turn on your TV 5 Press INPUT on the remote control or the side of your TV to display the input source menu then press INPUT repeatedly or press or to select Component Press OK E...

Page 17: ...cting a computer using VGA To connect a computer using VGA 1 Make sure that your TV is turned off and the power cord is disconnected 2 Connect a VGA cable to the VGA INPUT jack on the back of your TV...

Page 18: ...have Installed the remote control batteries For more information see Installing remote control batteries on page 8 Connected the antenna cable TV or satellite TV For more information see Connecting a...

Page 19: ...Wizard or when you scanned for channels To select an analog or main digital channel press the number buttons for the channel To select a digital sub channel press the number buttons for the main digit...

Page 20: ...or Temperature You can select Cool Normal or Warm Noise Reduction You can select Off Weak Middle Strong or Auto Auto is only available in analog TV mode AV mode and S Video mode Overscan You can selec...

Page 21: ...lay Properties dialog box opens 2 Click the Settings tab 3 Change the screen resolution setting to a supported resolution The ideal resolution for your TV is 1360 768 NS 19E430A10 1920 1080 NS 22E430A...

Page 22: ...rack for a digital channel Press MTS SAP If an audio track is available it plays Changing channel settings Automatically scanning for channels When you scan for channels your TV searches for channels...

Page 23: ...hannels then press or The Add Skip Channels menu opens 5 Press or to highlight the channel you want to hide then press OK ENTER If the channel has a check mark next to it the channel is in the channel...

Page 24: ...Press or to select a channel If the list has more than one page press or to scroll through the pages 3 Press FAVORITE to close the list and tune to the channel you selected Move Adjust channel option...

Page 25: ...lect the channel you want to label 5 Press or to move the cursor to the first label character space 6 Press or one or more times to select the first label character then press or to move to the next c...

Page 26: ...s 2 Press to access the Settings menu 3 Press or to highlight Parental Controls then press or The Enter Password screen opens 4 Press the number buttons to enter the password The default password is 0...

Page 27: ...s U S TV program ratings Some of the age based TV ratings also have content based ratings Move Set various TV options Select Previous Exit OK ENTER MENU EXIT Picture Settings Parental Controls Time Me...

Page 28: ...nu Settings Input Labels Computer Settings Closed Caption Reset to Factory Audio Channel Settings Move Enter your 4 digit password Default is 0000 Select Previous Exit OK ENTER MENU EXIT Picture Setti...

Page 29: ...under13 years of age R Restricted Not suitablefor children under 17yearsof age unless accompanied by a parent or guardian NC 17 Not suitable for children under17 years of age X Adults only None Not ra...

Page 30: ...f the system lock Switch the channel or source to reactivate the system lock Rating Description C Children C8 Children 8 years andabove G General audiences PG Parental guidance suggested 14 14 years a...

Page 31: ...000 The Parental Controls menu opens Note To unblock a rating select the rating then press OK ENTER until the lock icon disappears Note If the System Lock is not set to On the ratings you set do not w...

Page 32: ...revious menu 6 Press EXIT to close the menu Setting closed captioning styles In DTV mode you can change the way closed captioning looks To set closed captioning styles 1 Press MENU then press or to hi...

Page 33: ...ing information from a digital channel that broadcasts time information If you select Custom you can manually set the date and time For more information see Manually setting the current date and time...

Page 34: ...Sleep Timer then press or to open the Sleep Timer menu 5 Press or to select the amount of time you want your TV to wait before it automatically turns off Move Set various TV options Select Previous Ex...

Page 35: ...highlight Menu Settings then press or to open the Menu Settings menu 4 Press or to highlight a setting press or to open a setting menu then press or to adjust the setting You can select Transparency A...

Page 36: ...nput Source VGA TV AV Current Label TV New Label DV Default Antenna Yes No Problem Solution Nopicture or sound Check all cable connections Make sure that your TV is turnedon Picture is OK but no sound...

Page 37: ...T Y Pb Cb Pr Cr audio L R HDMI HDMI IN VGA VGA input audio minijack HEADPHONE Minijack Antenna in F type Operating conditions Temperature 41 F 95 F 5 C 35 C Humidity 20 80 RH Atmospheric pressure 86KP...

Page 38: ...s connected Consult the dealer or an experienced technician for help FCC warning Changes or modifications not expressly approved by the party responsible for compliance with the FCC Rules could void t...

Page 39: ...air person dispatched to your home Should the Insignia approved repair person not correct the issue on the first call an Insignia television size and features to be determined by Insignia will be loan...

Page 40: ...36 NS 19E430A10 NS 22E430A10 19 720p LED HDTV 22 1080p LED HDTV www insigniaproducts com...

Page 41: ...37 19 720p LED HDTV 22 1080p LED HDTV www insigniaproducts com...

Page 42: ...38 NS 19E430A10 NS 22E430A10 19 720p LED HDTV 22 1080p LED HDTV www insigniaproducts com...

Page 43: ...39 19 720p LED HDTV 22 1080p LED HDTV www insigniaproducts com...

Page 44: ...01 Penn Avenue South Richfield MNUSA 55423 3645 2009 BestBuy Enterprise Services Inc All rights reserved INSIGNIAis a trademark of Best BuyEnterpriseServices Inc Registered in some countries All other...

Reviews: