


4.29.22 357-00061-01 Rev A © Inovonics, 2022 - www.inovonics.com
2
a.
Ensure the frequency band is set for your geographic area.
b.
If the frequency band is not set for your geographic area, place a
selection jumper on the appropriate frequency band selection pins to
select Australia or New Zealand, or remove it for North America.
c.
If you have changed the frequency band, press the reset button to
complete configuration.
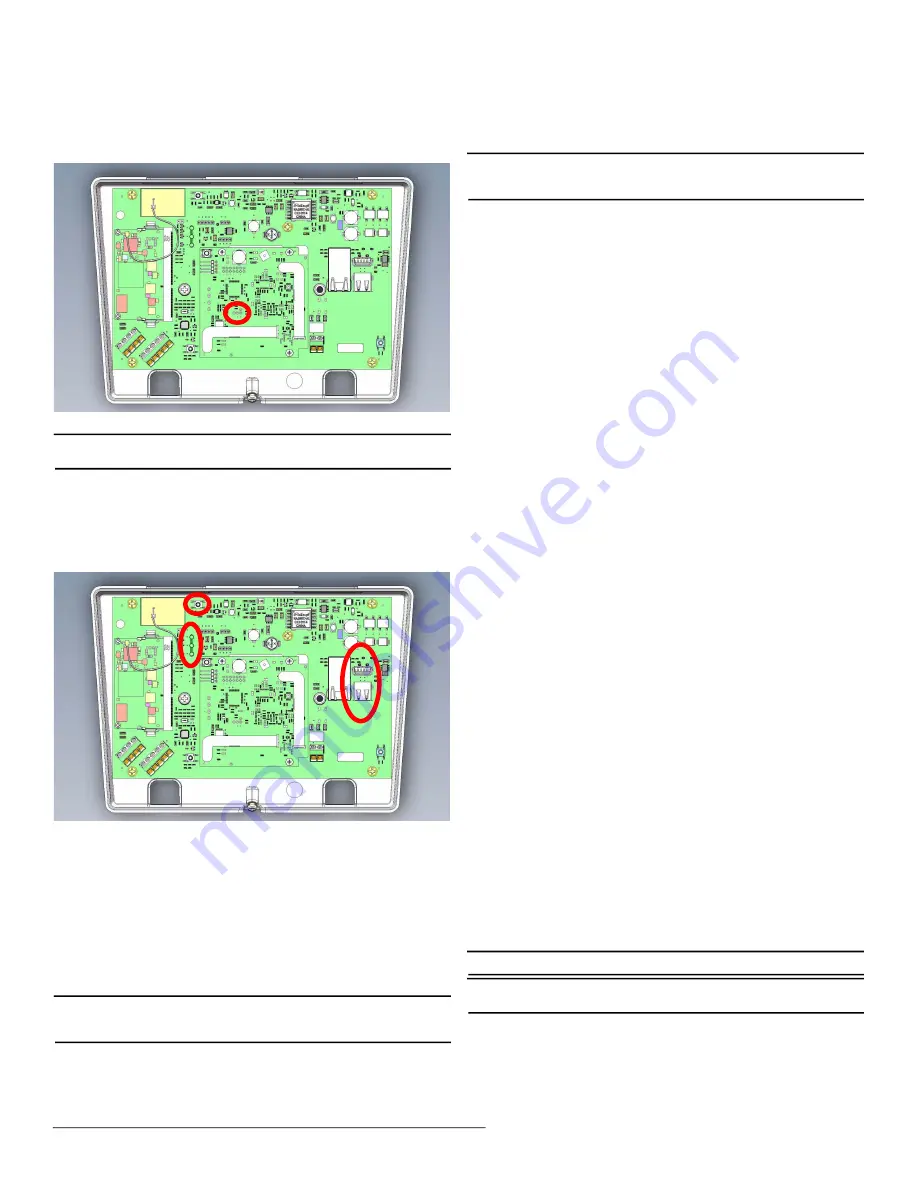
Figure 4
Frequency band selection pins
Note:
Steps 8 through 12 are required for EchoStream directed networking
support.
8.
If using an existing EN7380 configuration file, open the configuration file
and proceed to step 11; if using a new configuration file:
a.
Press the senior living gateway’s reset button.
b.
Wait for the green LED to flash.
c.
Insert a USB flash drive into either of the senior living gateway's USB
ports.
d.
When the red LED is solidly lit, remove the USB drive.
e.
Insert the USB drive into a PC.
Figure 5
Reset button, LEDs and USB ports
9.
On your PC, open the configuration file from the USB drive.
• It will be named en7380-XX-config-YYYYMMDD-HHMMSS.yaml,
where XX is the last two hex digits of the Ethernet MAC address, as
shown on the label on the back of the housing, and YYYYMMDD-
HHMMSS is the current date and time.
10.
Enter the configuration information into the .yaml file:
• Configure the network connectivity as desired. By default, only
Ethernet is enabled with DHCP; WiFi is disabled.
• Configure the senior living gateway for a directed network by setting
the NID value in the .yaml file. The keyword NID and value is required
in the radio section of the configuration file.
Note:
When using the senior living gateway with a directed network, the
EN6040 network coordinator needs to remain powered at all times to
ensure continuous operation.
11.
Save the configuration file onto the USB drive as
en7380-config.yaml.
12.
Load the configuration file onto the senior living gateway:
a.
Safely eject the USB drive from the PC.
b.
Press the senior living gateway’s reset button.
c.
Wait for the green LED to flash.
d.
Insert the USB flash drive into either of the senior living gateway's
USB ports.
e.
When the red LED is solidly lit, indicating the gateway has finished
processing the configuration file, remove the USB drive.
Note:
If the red LED is not solidly lit, the yaml file did not load. Please
check formatting, ensure you are using N+ or a similar yaml editor
and use a yaml validator such as yamllint.com.
13.
Use a Phillips screwdriver to close the senior living gateway housing.
Once the senior living gateway is functional and all transmitter TXIDs have
been registered, the LEDs will function as follows:
• Green: Blinks when powering up; solid when power up is complete.
• Orange: Blinks while establishing an IP connection; solid when IP
connected.
• Red: Blinks upon message receipt from any transmitter.
3 Tips and Notes
3.1 Installation Notes
• These products are designed to be maintained by professional
technicians.
• Products are tested for indoor use.
• Inovonics recommends registering and testing end devices prior to
installation, using a floor plan or something similar to indicate
installation locations. Consider marking or applying descriptive labels
to the end device cases to ensure proper installation. Conduct a site
survey with an Inovonics survey kit prior to installation to assist with
RF gateway, repeater and end device placement.
• Use a brand name USB flash drive with a FAT32 (vfat) filesystem for
configuration.
• The senior living gateway configuration file is YAML formatted. See
yaml.org for details.
• If using line power, keep cable length to less than 10 feet to minimize
noise pickup.
• To resolve connectivity issues, check for loose/disconnected cabling,
ensure power to Ethernet routers and/or switches, and connect a
laptop to the Ethernet cable attached to the senior living gateway’s
RJ45 port and attempt to open a web site. If you are still unable to
establish an Internet connection, contact a facility IT representative.
• Metal will reduce radio frequency (RF) range. Mount the senior living
gateway in a location removed from metal, including duct work, wire
mesh screens, IT closets, metal boxes, and etc. For additional
information, see the "EchoStream Device Installation
Recommendation" tech note at www.inovonics.com.
• The EchoStream system should be tested regularly to ensure
operation. To test, place the system in test mode, activate an end
device, and ensure an appropriate response.
4 Specification
Dimensions: 9.556” x 6.65” x 1.208” (243 mm x 169 mm x 31 mm).
Power requirements: Line power: The Inovonics ACC610 transformer, or a
12-14V AC intrinsically safe power supply capable of supplying at least
16W, or a 12-15V DC power supply capable of supplying at least 15W;
POE: IEEE 802.3af-2003 compliant.
Ethernet: 10/100 BASE-T, DHCP, static IP.
WiFi: 802.11b/g/n, 2.4GHz, WPA/2-Personal, DHCP, static IP.
Operating frequencies: EchoStream: 902 - 928 MHz North America, 915 -
928 MHz Australia, 921 - 928 MHz New Zealand; Wi-Fi® and Bluetooth®:
2.400 GHz to 2.485 GHz.
Operating environment: Temperature: 32°F to 140°F; humidity: Up to 90%
non-condensing.
Regulatory certifications: FCC, RoHS, RCM, ISED.
Note:
Specifications and data are subject to change without notice.
Note:
Inovonics supports recycling and reuse whenever possible. Please
recycle these parts using a certified electronics recycler.


