background image

SD / MMC Card


1.


For Mini SD and RS-MMC cards, a card adapter (not provided) must be attached before inserting 
them into the 4-in-1 card slot. 

2.


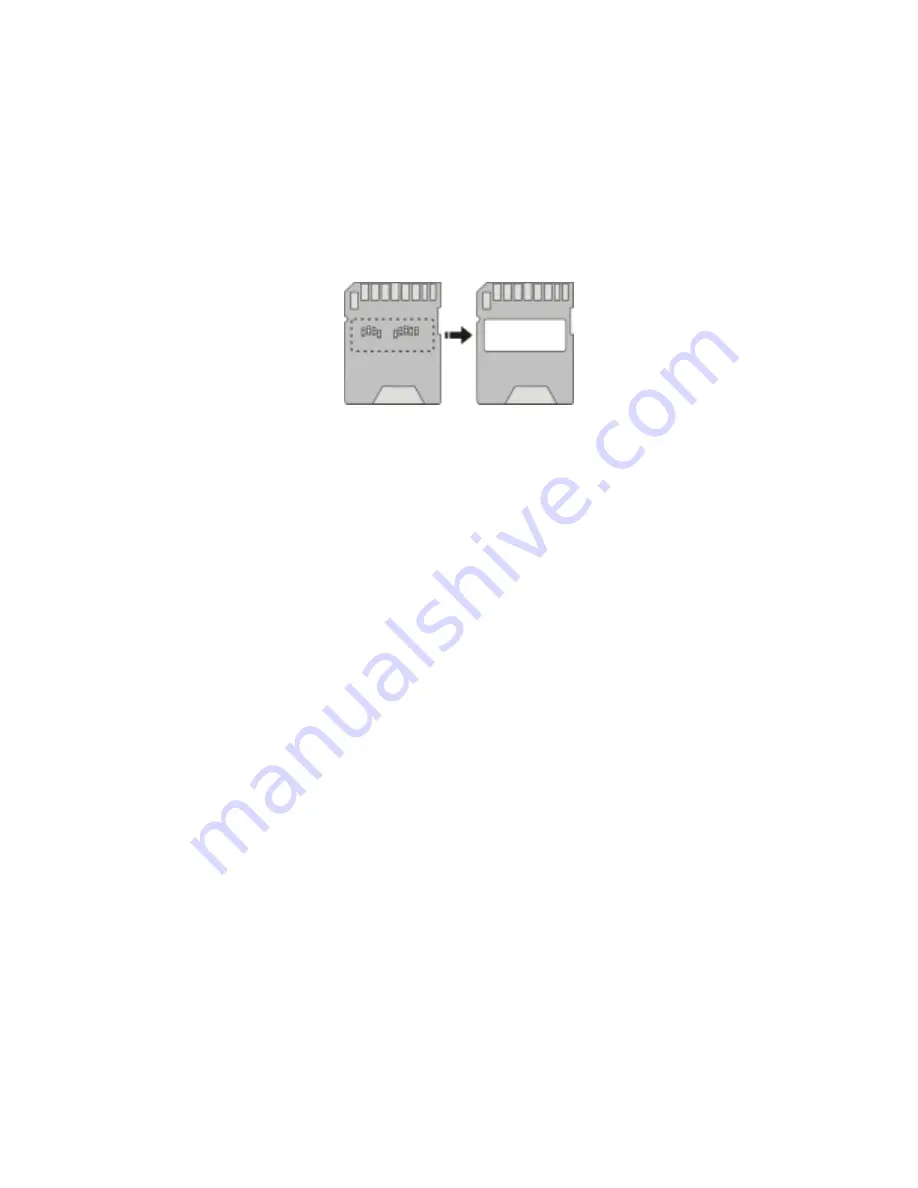
For Mini SD card in particular, insulation paper (provided) needs to be taped on the card adapter 
before use to prevent any malfunctions from happening.    Please refer to the following illustration 
for taping location: 


The dotted line on the left figure shows the location where the insulation paper needs to go.   

The white-out area on the right figure show after the insulation tape is applied. 


Please note that the insulation paper needs to cover the pins exposed in the middle of the card. 


The insulation paper will not affect the operation of the memory card with other appliances. 


To make an insulation tape yourself, you can take a paper label of 0.1mm thickness and cut it to 

the size of 8.0mm (W) x 20.5mm (L). 

3.


Insert your memory card into the 4-in-1 card slot, PHOTO HARDDISK will turn on automatically if 

not already turned on. 

4.


Select “COPY” from menu, and press ENTER key. 

5.


If both card slots have memory cards inside, the screen will ask which memory card slot is to be 

backed up. Select the card source and press the ENTER key again to continue. 

6.


The LCD will display memory card capacity and the remaining capacity of PHOTO HARDDISK. 

7.


Press the ENTER key to start the back up operation. 

8.


This screen will display memory card capacity and the remaining capacity of PHOTO HARDDISK. 

9.


While backup is in progress, press and hold the BACK key for 2~3 seconds will cancel the backup 

operation.    Backup Log screen will be displayed after the backup is complete or cancelled. 

Note: Do not remove memory card while backup is still in progress. 

10.


To take the memory card out of the 4-in-1 card slot, just pull it out directly from the slot. 


Summary of Contents for HD182

Page 1: ...PHOTO HARDDISK User Manual V2 0 ...

Page 2: ...tandalone Operation 4 Battery Operation 4 Turn on and Turn off PHOTO HARDDISK 5 Icon Description 6 Memory Cards Back Up 7 Backup Log 10 Date and Time Setup 10 Menu Language 11 Password Setup 11 PC Operation 12 Software Installation 12 Connecting to PC 14 PHOTO HARDDISK Utility Program 15 Troubleshooting 17 ...

Page 3: ...outlet Do not use if the AC adapter cord is damaged Unplug the AC adapter when cleaning or not in use When cleaning use a soft and dry clean cloth and wipe the product gently Do not use inflammable products such as alcohol benzene or paint thinner to clean this product System Requirements Windows PC Windows XP Windows Me Windows 98SE Windows 2000 SP3 or above USB 2 0 or USB 1 1 port Macintosh Mac ...

Page 4: ...to the Photo HARDDISK with on one press of a button Your photos are now safely stored on the Photo HARDDISK allowing you to erase your flash card so you can take more pictures Also the Photo HARDDISK can be used with any PC or MAC computer for additional mobile storage of your data files All your computer need is a USB port Just plug in the Photo HARDDISK and you can quickly upload files to your c...

Page 5: ...D Green Power is good Yellow Low power warning Flashing Orange Copy failed or interrupted Cycling 7 Color Powering up or copying in progress Orange Battery charging No light Battery charging complete 4 in 1 Card Slot Flip open cover to reveal card slot Support SD MMC card group Support MS MS Pro card group CF MD Card Slot Support CF Card Type I II and Micro Drive Reset Use a pointy object to press...

Page 6: ...B mini plug of the AC adapter into the connector slot Plug the other end of into the electrical outlet When charging battery via AC adapter the LCD will display and the LED will show Orange color Once the battery is fully charged the LED light will go out and the screen will display You can still operate the PHOTO HARDDISK to back up flash memory cards when the unit is being recharged The Photo HA...

Page 7: ...tery connector as and the enlarged drawing indicates To install new battery just follow the steps above in reverse To use new battery please refer to the former USE of Battery paragraph Turn on and Turn off PHOTO HARDDISK Two ways to power on 1 Insert a memory card to automatically turn the unit on 2 Press and hold the POWER key for 2 3 seconds to turn the unit on Three ways to power off 1 PHOTO H...

Page 8: ...ower left You should charge battery immediately Battery power is very low will stop all operations and shut off Battery charging in progress Battery charging complete Fault detected please contact service You can still use it with computer If there is a question mark next to battery power indicator it usually means there is something wrong with the battery If this happens please remove AC adapter ...

Page 9: ...5 The LCD will display memory card capacity and the remaining capacity of PHOTO HARDDISK 6 Press the ENTER key to start the back up operation 7 While backup is in progress press and hold the BACK key for 2 3 seconds will cancel the backup operation Backup Log screen will be displayed after the backup is complete or cancelled Note Do not remove memory card while backup is still in progress 8 When y...

Page 10: ...of 0 1mm thickness and cut it to the size of 8 0mm W x 20 5mm L 3 Insert your memory card into the 4 in 1 card slot PHOTO HARDDISK will turn on automatically if not already turned on 4 Select COPY from menu and press ENTER key 5 If both card slots have memory cards inside the screen will ask which memory card slot is to be backed up Select the card source and press the ENTER key again to continue ...

Page 11: ...y card with other appliances To make an insulation tape you can take a paper label of 0 1mm thickness and cut it to the size of 8 0mm W x 20 5mm L 3 Insert your memory card into the 4 in 1 card slot PHOTO HARDDISK will turn on automatically 4 Select COPY from menu and press ENTER key 5 If both card slots have memory cards inside the screen will ask which memory card slot is to be backed up Select ...

Page 12: ... Use the UP or DOWN key to move to the previous or next log 3 Backup Log includes Log Number n 5 new folder name created date and time of backup number of total folders and files Created If the backup is cancelled before finished Copy Aborted message will be displayed 4 The folder name e g CF0000 SD9999 created in the internal hard disk is derived from the memory card type abbreviation 2 character...

Page 13: ...on for procedures to set up 2nd language for the unit Password Setup Setting password will protect confidential information in PHOTO HARDIDSK from being accessed by a PC If password is set after connecting the Photo HARDDISK to a computer password needs to be entered before the computer can access PHOTO HARDDISK However password setting does not affect the operation of memory card backup To set up...

Page 14: ...ove Windows 2000 SP2 or under must be upgraded to SP3 or above before using PHOTO HARDDISK XP and W2K SP3 and above already support PHOTO HARDDISK with their native driver the installation software will therefore only install the Utility program If you do not wish to install the utility program you can connect PHOTO HARDDISK directly to PC and manage it like a regular disk drives under My Computer...

Page 15: ...w will appear 3 Select and click Install Driver and Utility follow the on screen instructions to install the utility software or device driver for Windows 98SE 4 After the software is successfully installed you can connect PHOTO HARDDISK to computer Please refer to Connecting to Computer for cable connection instructions 5 When PHOTO HARDDISK is connected to computer the operating system will reco...

Page 16: ...has been set to ON you must use the UP and DOWN key to enter the password before the computer can recognize the PHOTO HARDDISK 4 While PHOTO HARDDISK is connecting to PC all the keys are disabled until the unit is disconnected 5 Once the three new drives are added to the system you can access them like system hard drive or card reader When accessing the two card readers flash memory card needs to ...

Page 17: ...he utility program is supported by Windows XP and Windows 200 SP3 and above Please follow the procedures below for detailed instruction 1 Before using the utility connect PHOTO HARDDISK to computer with USB Cable 2 Click PHOTO HARDDISK Utility in Start Program Files to start up the utility The following window will appear 3 You can setup change the startup screen by checking the Startup Screen You...

Page 18: ... connected to the computer If there is only one PHOTO HARDDISK connected to the computer the utility program will find it automatically and there will be only one drive available Press the Update button and the new settings will be transferred to the PHOTO HARDDISK 6 Wait until the computer screen displays New settings have been transferred message and then you can Safely Remove the PHOTO HARDDISK...

Page 19: ...will fail Note MAC OS does not recognize NTFS file system PHOTO HARDDISK can only back up contents on memory cards to the first primary partition of the internal hard disk If the PHOTO HARDDISK becomes non responsive use a paper clip and insert it into the Reset hole to reset PHOTO HARDDKISK This should solve most problems If the computer does not detect the PHOTO HARDDISK after it is connected to...

Reviews: