background image

NV11 Manual Set – Section 4 


18 

Copyright © Innovative Technology Ltd 2012


GA963-2


4.10


Spare Parts 


ITL Part Number 

Description 

Details 

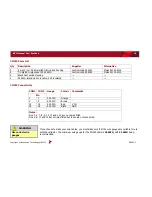
CN215 

Ribbon interface cable 

Provides connection between DA2 and NV11 


Comments: 

Please consult the tables on the next page for pin out and connector information. 


Summary of Contents for NV11

Page 1: ...NV11 MANUAL SET...

Page 2: ...NV11 MANUAL SET INTRODUCTION...

Page 3: ...logy Ltd 2012 GA963 2 MANUAL AMENDMENTS Document Base Details Spec Used Issue Date Receipt Date Comments GA963 1 09 09 10 29 07 11 GA138 01 11 10 22 01 11 GA959 29 03 11 29 07 11 Amendment Details Rev...

Page 4: ...ive Technology Ltd Derker Street Oldham England OL1 4EQ Tel 44 161 626 9999 Fax 44 161 620 2090 E mail support innovative technology co uk Web site www innovative technology co uk BRAZIL suporte belli...

Page 5: ...nditioned The foregoing warranties and remedies are exclusive and are in lieu of all other warranties expressed or implied either in fact or by operation of law statutory or otherwise including warran...

Page 6: ...ote Float module removable bezel and a cashbox as shown below The NV11 is a device that can accept validate and store 300 or 600 bank notes of mixed denominations and also has the capability of storin...

Page 7: ...Innovative Technology Ltd datasets can be downloaded from the Support section of the ITL website FEATURES The NV11 validator has many innovative features including 300 or 600 note storage capacity No...

Page 8: ...king at how to make it work project engineers evaluating their first unit or installation engineers installing the unit into a host machine This section contains the essential information that a user...

Page 9: ...idator into a host machine Software Implementation Guide Software engineers looking at how to implement the NV11 validator in their host machine or design engineers looking at including the unit in th...

Page 10: ...NV11 MANUAL SET QUICK START AND CONFIGURATION GUIDE SECTION 1...

Page 11: ...ICK START AND CONFIGURATION GUIDE 3 1 1 Assembly 3 1 2 Bezel Removal and Refitting 6 1 3 Interfacing 7 1 4 Connector and Pinouts 8 1 5 Configuration 9 1 6 Status Indicators 10 1 7 Programming 10 1 8 T...

Page 12: ...or ready for installation into the host machine Information Validator compatibility The NV11 validator is pin for pin compatible with the NV7 NV8 NV9 NV10 series of validators but NOT with earlier ver...

Page 13: ...lanking plate with the validator head closed will cause unit damage 3 Remove the blanking plate by disengaging the two side clips and lifting the blanking plate upwards 4 Close the validator head and...

Page 14: ...00 note capacity 7 If not already attached the validator can be fitted with a horizontal bezel of your choice 8 The cashbox is attached to the validator by locating and sliding until the cashbox is cl...

Page 15: ...and sliding the bezel away from the locking arms Lift the bezel off once the bezel has been slid fully across and is clear of the locating pins The bezel is refitted by pushing the bezel back onto th...

Page 16: ...et Section 1 7 Copyright Innovative Technology Ltd 2012 GA963 2 1 3 Interfacing The connector needed to set up and interface with the NV11 validator is easily accessible on the side of the unit Interf...

Page 17: ...host machine The pin numbering of the socket is shown below as well as an overview of the socket connections To use a USB connection with the NV11 a USB cable fitted with a 16 way connector on one en...

Page 18: ...e DIP switches to configure the unit configuration and setting is carried out by using a Configuration Button mounted on the front of the Note Float module Configuration Button Status LED There are se...

Page 19: ...nd the front bezel of the NV9USB validator head If there is a fault or other issue with the unit the LEDs will flash as described in subsection 1 9 1 7 Programming Full details on programming the NV11...

Page 20: ...face Logic Levels Logic Low Logic High Inputs 0 V to 0 5 V 3 7 V to 12 V Outputs 2 2 k pull up 0 6 V Pull up voltage of host interface Maximum current sink 50 mA per output WARNING Use suitable power...

Page 21: ...s Long Short 0 0 None 1 2 Note path obstructed Remove obstruction and follow the cleaning procedure in Section 2 of this manual set 3 Unit not initialised Contact ITL technical support 2 2 Cash box pr...

Page 22: ...ansport error Remove trapped note from the Note Float module and press the configuration button once 2 Software error Download new dataset firmware 3 Calibration error Return to service centre for rep...

Page 23: ...machine is ready to accept notes and that the maximum allowed credit hasn t been exceeded If a coin hopper is fitted make sure it isn t empty Check there is sufficient clearance for note ejection aft...

Page 24: ...ossible replace damaged components see Section 4 of this manual set IF YOU HAVE ANY DOUBTS RETURN THE UNIT TO ITL FOR REPAIR Bezel LEDs are flashing Various reasons Check the flash code tables for an...

Page 25: ...tor Check the ITL website to see the currently available range of cashboxes and bezels c How do I check which interface has been set You can check which interface has been selected by using the config...

Page 26: ...t innovative technology co uk Web site www innovative technology co uk BRAZIL suporte bellis technology com br CHINA support innovative technology co uk GERMANY supportDE innovative technology eu SPAI...

Page 27: ...NV11 MANUAL SET FIELD SERVICE MANUAL SECTION 2...

Page 28: ...ve Technology Ltd 2012 GA963 2 NV11 MANUAL SET SECTION 2 2 FIELD SERVICE MANUAL 3 2 1 Cleaning 3 2 2 Fault Finding Flash Codes 10 2 3 Technical Specifications 12 2 4 Fault Finding Flow Chart 13 2 5 Fr...

Page 29: ...e design means there is very little user maintenance required 2 1 Cleaning The NV11 validator has been designed in a way to prevent damage and airborne contamination reaching the optical sensors howev...

Page 30: ...er BEFORE any cleaning operation Unless stated otherwise you should disconnect the power BEFORE carrying out any cleaning operations to avoid the risk of causing damage to the validator Lozenge releas...

Page 31: ...mble the Note Float module there are no user serviceable parts inside and trying to disassemble the module could cause personal injury and will also damage the unit beyond repair 1 Open both the Note...

Page 32: ...ed with a water and mild detergent solution i e household washing up liquid be very careful when cleaning around the sensor lenses and make sure they are clean and dry before closing the cover and res...

Page 33: ...is a simple operation Ensure the validator is enabled i e bezel lights are illuminated then remove the bezel The bezel is removed by pushing the red locking arms on both sides of the validator upwards...

Page 34: ...a DRY lint free cloth to remove any excess moisture and refit the bezel The bezel is refitted by pushing the bezel back onto the locating pins and sliding backwards until all six pins are engaged in t...

Page 35: ...could cause personal injury and will damage the unit beyond repair Open the top of the unit using the Release catch Release the lozenge by gently pressing the Lozenge release catch Remove and place th...

Page 36: ...ments Long Short 0 0 None 1 2 Note path obstructed Remove obstruction and follow the cleaning procedure in Section 2 of this manual set 3 Unit not initialised Contact ITL technical support 2 2 Cash bo...

Page 37: ...ansport error Remove trapped note from the Note Float module and press the configuration button once 2 Software error Download new dataset firmware 3 Calibration error Return to service centre for rep...

Page 38: ...face Logic Levels Logic Low Logic High Inputs 0 V to 0 5 V 3 7 V to 12 V Outputs 2 2 k pull up 0 6 V Pull up voltage of host interface Maximum current sink 50 mA per output WARNING Use suitable power...

Page 39: ...et Check the host machine is ready to accept notes and that the maximum allowed credit hasn t been exceeded If a coin hopper is fitted make sure it isn t empty Check there is sufficient clearance for...

Page 40: ...ator are within the tolerances specified in the Technical Specification see subsection 2 3 of this manual Check and clean the note path see subsection 2 1 of this manual Unit damage If possible replac...

Page 41: ...what orientation can I use the NV11 validator The NV11 can only be mounted horizontally see Section 1 subsection 1 1 of this manual for more information on mounting the validator Please check the ITL...

Page 42: ...of the interface cable connector pinouts connector types makes and other related information can be found in Section 4 of this manual set The user can obtain the following parts for the NV11 validator...

Page 43: ...NV11 Manual Set Section 2 17 Copyright Innovative Technology Ltd 2012 GA963 2 ITL Part Number Description Details CN292 Interface cable Provides connection between DA2 and NV11...

Page 44: ...V11 Manual Set Section 2 18 Copyright Innovative Technology Ltd 2012 GA963 2 ITL Part Number Description Details CN392 Power and USB Communication Cable USB 2 0 Compliant Type A to 16 way header cable...

Page 45: ...ction 2 19 Copyright Innovative Technology Ltd 2012 GA963 2 Bezels ITL Part Number Description PA189 Horizontal Bezel Assembly PA268 69mm Fixed Width Horizontal Bezel No image available PA896 Horizont...

Page 46: ...NV11 Manual Set Section 2 20 Copyright Innovative Technology Ltd 2012 GA963 2 Cashboxes PA186 Locking Cashbox Assembly 300L PA192 Slide on Cashbox Assembly 300S PA898 Standard Cashbox Assembly...

Page 47: ...2 Information Check website for options There are many variants of bezel and cashbox type available for the NV11 validator Please check the ITL website www innovative technology co uk for up to date i...

Page 48: ...t innovative technology co uk Web site www innovative technology co uk BRAZIL suporte bellis technology com br CHINA support innovative technology co uk GERMANY supportDE innovative technology eu SPAI...

Page 49: ...NV11 MANUAL SET ITL SOFTWARE SUPPORT GUIDE SECTION 3...

Page 50: ...tware 3 3 1 1 Preparing for Installation 3 3 1 2 BV Interface Drivers 7 3 1 3 Installing the Drivers 10 3 1 4 Installing the PiPS Software 18 3 1 5 Starting the PiPS Software 21 3 1 6 Preferences Sett...

Page 51: ...NV11 devices 3 1 1 Preparing for Installation If you do not have the PiPS software on CD you can easily download it from the Innovative Technology website Visit www innovative technology co uk and sel...

Page 52: ...played in the top right hand corner of the screen The padlock icon for each file will change from locked to unlocked To download a file just click on the padlock icon opposite the file name If you wan...

Page 53: ...oftware so we click on the padlock icon opposite the SMART PIPS Pay In Pay Out System filename After clicking the link a file download dialog box will appear choose the option to save the file You can...

Page 54: ...NV11 Manual Set Section 3 6 Copyright Innovative Technology Ltd 2012 GA963 2 After choosing where to save the file a file transfer dialog box will appear showing the progress of the file download...

Page 55: ...versions are available 32 bit and 64 bit so choose the correct type for your operating system Again remember where you saved the file Both files are provided in a zipped compressed form you will need...

Page 56: ...y Ltd 2012 GA963 2 Extract the files to a convenient location this might be an existing folder or you may want to save them into a new folder In this example the BV Interface driver files are being sa...

Page 57: ...NV11 Manual Set Section 3 9 Copyright Innovative Technology Ltd 2012 GA963 2...

Page 58: ...tion from computer to validator with a CN392 validator to USB cable or by using a special interface unit called a DA2 Use of the DA2 is not covered here please refer to ITL Document number GA338 2 for...

Page 59: ...the host machine you will need to provide power to the 16 way interface connector first The connection information and pin numbering is as follows Before connecting the USB cable to the computer make...

Page 60: ...Technology Ltd 2012 GA963 2 Information Only use V2 drivers Please make sure that you are using the V2 drivers for the installation Select this option as you already have the drivers Select this optio...

Page 61: ...al Set Section 3 13 Copyright Innovative Technology Ltd 2012 GA963 2 The next dialog box will ask you where to search for the drivers Click the Browse button to find the driver files in this example C...

Page 62: ...NV11 Manual Set Section 3 14 Copyright Innovative Technology Ltd 2012 GA963 2 Click the Next button to install the drivers Uncheck this option to speed up the installation...

Page 63: ...ection 3 15 Copyright Innovative Technology Ltd 2012 GA963 2 You may see a warning dialog saying that the drivers have not passed Windows logo testing you can ignore this warning Just click the Contin...

Page 64: ...NV11 Manual Set Section 3 16 Copyright Innovative Technology Ltd 2012 GA963 2 Click the Finish button to complete the installation...

Page 65: ...er and click on the Plus symbol next to the Ports entry This will expand the list of installed communications ports You should see an entry for an ITL BV Serial V2 port as shown here The actual commun...

Page 66: ...4 Installing the PiPS Software Installing the PiPS software is very straightforward Find the PiPS installation file you downloaded earlier extract the installation file from the zipped file and doubl...

Page 67: ...pyright Innovative Technology Ltd 2012 GA963 2 You can choose where you would like to install the software or just accept the default location as shown above Clicking on the Next button will then ask...

Page 68: ...ew program group called ITL Smart Tools in the Windows Start Menu similar to the one shown here You can run the PiPS software by clicking the Pay in Pay Out system menu entry however before you can us...

Page 69: ...3 1 5 Starting the PiPS Software The PiPS software is launched by clicking the Pay in Pay out system entry in the ITL Smart Tools menu group The initial program screen looks like this Make sure that t...

Page 70: ...connect to the NV11 Depending on the number and types of communications ports on your computer you may get an error message similar to the one shown on the right saying Unable to open this port this...

Page 71: ...und two windows will appear on the screen More details of the program options and operations that can be carried out will be covered in the next subsection This window shows the installed currency lev...

Page 72: ...nerally the system will need to be halted before any changes to setup options can be made Pay in pay out operations are only available when in Run state Halt State If the system is in Halt state the u...

Page 73: ...Copyright Innovative Technology Ltd 2012 GA963 2 The main screen should look something like this The various settings and options can be accessed from a right click when the mouse cursor is over any...

Page 74: ...NV11 Manual Set Section 3 26 Copyright Innovative Technology Ltd 2012 GA963 2...

Page 75: ...SSP address and eSSP keys by double clicking on the required option Get Error Status This option displays any device error messages in the System Events window Download Update File This option allows...

Page 76: ...Float module select the desired domination s and click the required route The system will send the commands to the device and store these preferences so that they will be set again on the next start...

Page 77: ...ause the validator to stop working The NV11 validator firmware and dataset can be updated very easily using the PiPS software The process uses NV9USB dataset files which can be downloaded from the Inn...

Page 78: ...NV11 Manual Set Section 3 30 Copyright Innovative Technology Ltd 2012 GA963 2...

Page 79: ...right Innovative Technology Ltd 2012 GA963 2 After selecting the dataset a dialog will prompt you to save or open the file select the Save option You can then choose where to save the file choose a lo...

Page 80: ...e NV11 validator by connecting the USB cable and starting the PiPS software as described previously With the PiPS software in Halt mode right click on one of the currency entries and select Download U...

Page 81: ...software will then ask you to confirm that this is file you want to use to update the NV11 unit with click the Yes button to continue A new dialog will then appear showing the update status After the...

Page 82: ...ded from the Innovative Technology Ltd website When the file download dialog box appears click the Save button and select a suitable location to save the file in Installing the Diagnostics tools softw...

Page 83: ...hortcut to ITL Diagnostics exe item near the top of the Windows Start menu Make sure that the NV11 Validator is powered up and the USB cable is connected before starting the program The main screen of...

Page 84: ...ialog box will open allowing you to choose the correct serial port Select the required port from the dropdown list and then click the OK button to confirm your selection This will close the dialog box...

Page 85: ...stics by clicking on the left hand icon below the menu bar this will open the Diagnostics screen Click the Start Diagnostic button to start the diagnostic process The software will then prompt you to...

Page 86: ...Technology Ltd 2012 GA963 2 Diagnostics Pass Sensor test results are shown in this window Motor test results are shown in this window A summary of the validator type and related information is display...

Page 87: ...lts can be found in the program help file Motor test results are shown in this window in this example all the motors have passed testing Sensor test results are shown in this window in this example se...

Page 88: ...n one end ITL Part Number CN392 should be used The CN392 cable fits into the 16 way connector and allows high speed programming and serial communications when used in SSP and ccTalk modes When using t...

Page 89: ...D Data USB Data 13 USB Vcc Power USB V 5V 14 Factory use only Do not connect 15 V In Power V 16 GND Ground GND NV11 ccTalk Interface Pin Name Type Description 1 TxD Output ccTalk data must also be co...

Page 90: ...ont of the Note Float module see Section 1 subsection 1 5 of this manual set for more information b Are 64 bit drivers available Both 32 and 64 bit drivers can be downloaded from the Support section o...

Page 91: ...t innovative technology co uk Web site www innovative technology co uk BRAZIL suporte bellis technology com br CHINA support innovative technology co uk GERMANY supportDE innovative technology eu SPAI...

Page 92: ...NV11 MANUAL SET MECHANICAL AND ELECTRICAL MANUAL SECTION 4...

Page 93: ...2 Assembly and Fitting Instructions 5 4 3 Bezel Removal and Refitting 8 4 4 Technical Specifications 9 4 5 Cable Specifications 10 4 6 Electrical Interfaces 11 4 7 Configuration Button 14 4 8 Programm...

Page 94: ...the NV11 validator into a host machine 4 1 Introduction The NV11 validator is made up of four basic components an NV9USB validator head Note Float module removable bezel and a cashbox as shown below T...

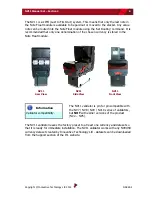
Page 95: ...hosen currency is stored in the Note Float module NV11 Rear View NV11 Side View NV11 Front View Information Validator compatibility The NV11 validator is pin for pin compatible with the NV7 NV8 NV9 NV...

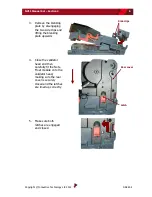
Page 96: ...V2 NV5 1 If the validator head has a blanking plate fitted you will need to remove this BEFORE attempting to fit the Note Float module If the Note Float module is already fitted please go to step 6 2...

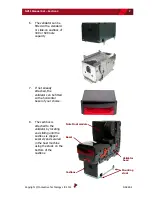
Page 97: ...ng the two side clips and lifting the blanking plate upwards 4 Close the validator head and then carefully fit the Note Float module onto the validator head making sure the rear cover is securely clos...

Page 98: ...00 note capacity 7 If not already attached the validator can be fitted with a horizontal bezel of your choice 8 The cashbox is attached to the validator by locating and sliding until the cashbox is cl...

Page 99: ...g The bezel is removed by pushing the red locking arms on both sides of the validator upwards and sliding the bezel away from the locking arms Lift the bezel off once the bezel has been slid fully acr...

Page 100: ...l Maximum Absolute limits 10 8 V 12 V 13 2 V Supply ripple voltage 0 V 0V 0 25 V 100 Hz Supply Current Standby 350 mA Running 3 A Peak motor stall 3 5 A Interface Logic Levels Logic Low Logic High Inp...

Page 101: ...The minimum specification for wire used in power cables for the NV11 validator is given here Do not use wire of an inferior specification as this can cause operating problems with the validator Minimu...

Page 102: ...Section 4 11 Copyright Innovative Technology Ltd 2012 GA963 2 4 6 Electrical Interfaces Interface Connector The connector needed to set up and interface the NV11 validator is easily accessible on the...

Page 103: ...one end ITL Part Number CN392 should be used The CN392 cable fits into the 16 way connector and allows high speed programming and serial communications when used in SSP and ccTalk modes When using th...

Page 104: ...D Data USB Data 13 USB Vcc Power USB V 5V 14 Factory use only Do not connect 15 V In Power V 16 GND Ground GND NV11 ccTalk Interface Pin Name Type Description 1 TxD Output ccTalk data must also be co...

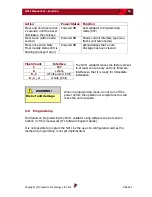
Page 105: ...t use DIP switches to configure the unit configuration and setting is carried out by using a Configuration Button mounted on the front of the Note Float module Configuration Button Status LED There ar...

Page 106: ...d in Section 3 of this manual set ITL Software Support Guide It is not possible to program the NV11 by the use of a configuration card as this method of programming is not yet implemented Action Power...

Page 107: ...NV9USB validator head front bezel will flash in a particular sequence a summary of the Flash Codes for both units is shown below NV9USB Bezel Flash Codes Flashes Indicated Error Comments Long Short 0...

Page 108: ...ansport error Remove trapped note from the Note Float module and press the configuration button once 2 Software error Download new dataset firmware 3 Calibration error Return to service centre for rep...

Page 109: ...tive Technology Ltd 2012 GA963 2 4 10 Spare Parts ITL Part Number Description Details CN215 Ribbon interface cable Provides connection between DA2 and NV11 Comments Please consult the tables on the ne...

Page 110: ...WG stranded 4 core cable PVC insulated CN215 Connectivity CON1 CON2 Gauge Colour Comments Pin 1 1 24 AWG Orange 5 5 24 AWG Brown 15 15 24 AWG Red V IN 16 16 24 AWG Black GND Notes Pins 3 4 7 8 9 10 13...

Page 111: ...right Innovative Technology Ltd 2012 GA963 2 ITL Part Number Description Details CN292 Interface cable Provides connection between DA2 and NV11 Comments Please consult the tables on the next page for...

Page 112: ...WG stranded 4 core cable PVC insulated CN292 Connectivity CON1 CON2 Gauge Colour Comments Pin 1 1 24 AWG Orange 5 5 24 AWG Brown 15 15 24 AWG Red V IN 16 16 24 AWG Black GND Notes Pins 3 4 7 8 9 10 13...

Page 113: ...ive Technology Ltd 2012 GA963 2 ITL Part Number Description Details CN392 Power and USB Communication Cable USB 2 0 Compliant Type A to 16 way header cable Comments Please consult the tables on the ne...

Page 114: ...Comments Pin 1 13 Red USB V 5V 2 12 White USB Data twist together with Data 3 11 Green USB Data twist together with Data 4 16 Black USB GND see figure 1 for connection detail Screen 16 Black See figur...

Page 115: ...ction 4 24 Copyright Innovative Technology Ltd 2012 GA963 2 Bezels ITL Part Number Description PA189 Horizontal Bezel Assembly PA268 69mm Fixed Width Horizontal Bezel No image available PA896 Horizont...

Page 116: ...NV11 Manual Set Section 4 25 Copyright Innovative Technology Ltd 2012 GA963 2 Cashboxes PA186 Locking Cashbox Assembly 300L PA192 Slide on Cashbox Assembly 300S PA898 Standard Cashbox Assembly...

Page 117: ...2 Information Check website for options There are many variants of bezel and cashbox type available for the NV11 validator Please check the ITL website www innovative technology co uk for up to date i...

Page 118: ...belt changing Caution Do not use solvent based cleaners on any part of the NV11 unit Do not use solvent based cleaners such as alcohol petrol methylated spirits white spirit or PCB cleaner Using thes...

Page 119: ...wer BEFORE any cleaning operation Unless stated otherwise you should disconnect the power BEFORE carrying out any cleaning operations to avoid the risk of causing damage to the validator Lozenge relea...

Page 120: ...mble the Note Float module there are no user serviceable parts inside and trying to disassemble the module could cause personal injury and will also damage the unit beyond repair 1 Open both the Note...

Page 121: ...NV11 Manual Set Section 4 30 Copyright Innovative Technology Ltd 2012 GA963 2...

Page 122: ...ed with a water and mild detergent solution i e household washing up liquid be very careful when cleaning around the sensor lenses and make sure they are clean and dry before closing the cover and res...

Page 123: ...is a simple operation Ensure the validator is enabled i e bezel lights are illuminated then remove the bezel The bezel is removed by pushing the red locking arms on both sides of the validator upward...

Page 124: ...a DRY lint free cloth to remove any excess moisture and refit the bezel The bezel is refitted by pushing the bezel back onto the locating pins and sliding backwards until all six pins are engaged in...

Page 125: ...could cause personal injury and will damage the unit beyond repair Open the top of the unit using the Release catch Release the lozenge by gently pressing the Lozenge release catch Remove and place th...

Page 126: ...e transport error To correct the problem follow the following steps Caution Risk of damage If you need to follow this procedure the NV11 should be powered off and the Note Float module removed from th...

Page 127: ...from the validator head as detailed previously There is a special cross point tool ITL part number PM979 used to manually operate the module s transport mechanism please do not use any other tool as...

Page 128: ...il all the bank notes have been removed After removing all the bank notes close the rear cover firmly place the cross point tool back in the stowage position and refit the module onto the validator WA...

Page 129: ...ation The NV11 validator has an in built self calibration system that keeps the optical sensors in optimum operating condition However if the NV11 is disassembled for any reason it also will need to b...

Page 130: ...NV11 Manual Set Section 4 39 Copyright Innovative Technology Ltd 2012 GA963 2 4 12 Drawings and Schematics NOTE If required IGES 3D models are available on request from ITL technical support NV11...

Page 131: ...NV11 Manual Set Section 4 40 Copyright Innovative Technology Ltd 2012 GA963 2 Cashbox Options...

Page 132: ...hing the door shaft flush to the door edge at one end and inserting the extended part of the shaft into the pivot hole in the cash box see View B 2 Secure the springs to the cash box floor using the 6...

Page 133: ...novative technology co uk Web site www innovative technology co uk BRAZIL suporte bellis technology com br CHINA support innovative technology co uk GERMANY supportDE innovative technology eu SPAIN su...

Page 134: ...NV11 MANUAL SET SOFTWARE IMPLEMENTATION GUIDE SECTION 5...

Page 135: ...ive Technology Ltd 2012 GA963 2 NV11 MANUAL SET SECTION 5 5 SOFTWARE IMPLEMENTATION GUIDE 3 5 1 Communication Protocols 3 5 2 Configuration Card Programming 5 5 3 SSP and eSSP 5 5 4 ccTalk 16 5 5 SSP...

Page 136: ...alidator is eSSP as this provides the highest level of data transfer security A ccTalk interface protocol is also available For detailed information and the full protocol specifications please read th...

Page 137: ...D Data USB Data 13 USB Vcc Power USB V 5V 14 Factory use only Do not connect 15 V In Power V 16 GND Ground GND NV11 ccTalk Interface Pin Name Type Description 1 TxD Output ccTalk data must also be co...

Page 138: ...yption algorithm used is AES with a 128 bit key this provides a very high level of security The encryption of the SSP protocol ensures superior protection and reliability of the data which is transfer...

Page 139: ...Poll 0x07 Get Serial Number 0x0C Synchronisation command 0x11 Disable 0x09 Enable 0x0A Program Firmware currency 0x0B Programming Type Manufacturers Extension 0x30 Command Data Set inhibits 0x02 Vali...

Page 140: ...ayout Device 0x5C Options Note Float Disable Payout Device 0x5B Set Routing 0x3B route value channel Country code Get Routing 0x3C value channel Country code Empty 0x3F Get Note Positions 0x41 Payout...

Page 141: ...commands specific to their unit Enable Payout Device Two byte command the first byte is the command and the second enables several different options Unused bits should be 0 Disable Payout Device Singl...

Page 142: ...value of the note or by the channel number of the value from the banknote validator If the channel number is used then the actual value must be determined using the data from the Validator command Uni...

Page 143: ...Parameter out of range 0xF4 Command cannot be processed 0xF5 Software Error 0xF6 FAIL 0xF8 Key Not Set 0xFA Slave Reset 0xF1 Validator Read n 0xEF Channel Number Credit n 0xEE Channel Number Rejecting...

Page 144: ...Channel Disable 0xB5 Dispensing 0xDA value channel dispensing Note Float Dispensed 0xD2 value channel dispensed Jammed 0xD5 value channel dispensing Halted 0xD6 Incomplete Payout 0xDD value channel di...

Page 145: ...s received by a peripheral but an incorrect number of parameters were received Parameter Out Of Range One of the parameters sent with a command is out of range Command Cannot Be Processed A command se...

Page 146: ...that was dispensed the next four are the value that was originally requested Emptying This event is given while the payout is being emptied of notes into the cashbox by the EMPTY command Empty This ev...

Page 147: ...Full This event is reported when the Note Float has reached its limit of stored notes This event will be reported until a note is paid out or stacked Channel Disable Indicates all note channels have...

Page 148: ...key is then calculated independently by both host and slave GET_SERIAL OK SERIAL NUMBER NV11 Serial Number SETUP_REQUEST OK SETUP INFORMATION NV11 Setup SET_ROUTING 01 14 00 00 00 OK Route notes of v...

Page 149: ...transmit and receives lines It operates at TTL voltages and is multi drop peripherals can be connected to a common bus and are logically separated by a device address each peripheral on the ccTalk bus...

Page 150: ...OUT1 OUT3 STR1 STR3 Enable Payout 027 KEY ACK NAK Dispense NV11 Notes 028 SEL SEC1 SEC8 BILL CNT EVENT NAK Request NV11 Status 029 SEL FLAG EVENT REMAIN PAID UNPAID STORED STORE Emergency Stop 030 SEL...

Page 151: ...161209 Request Last Mod Date 195 None 00 Calculate ROM Checksum 197 None 4 byte checksum Request Option Flags 213 None 3 stacker escrow Request Data Storage Av 216 None 00000 Enter Pin 218 Pin1 Pin2 P...

Page 152: ...As an example the values for Euro notes are Note Hex value Data to Send 5 00 0x000001F4 0xF4 0x01 0x00 0x00 10 00 0x000003E8 0xE8 0x03 0x00 0x00 20 00 0x000007D0 0xD0 0x07 0x00 0x00 50 00 0x00001388 0...

Page 153: ...ata bytes in the message Header Reply message 00 Data Data attached to Header specified by Len 1 N CRC Dst Len Header Data1 calculated value of CRC16 against Data N If encryption setting is enabled en...

Page 154: ...anual Set Section 5 21 Copyright Innovative Technology Ltd 2012 GA963 2 5 6 Connection Options The NV11 validator has a single connector that is used to allow interfacing and programming Interface Con...

Page 155: ...tion with the NV11 a USB cable fitted with a 16 way connector on one end ITL Part Number CN392 should be used The CN392 cable fits into the 16 way connector and allows high speed programming and seria...

Page 156: ...novative technology co uk Web site www innovative technology co uk BRAZIL suporte bellis technology com br CHINA support innovative technology co uk GERMANY supportDE innovative technology eu SPAIN su...

Page 157: ...NV11 MANUAL SET TECHNICAL APPENDICES SECTION 6...

Page 158: ...yright Innovative Technology Ltd 2012 GA963 2 NV11 MANUAL SET SECTION 6 6 TECHNICAL APPENDICES 3 APPENDIX A PRODUCT APPROVALS 3 APPENDIX B TECHNICAL SPECIFICATIONS 5 APPENDIX C GLOSSARY OF TERMS 7 APP...

Page 159: ...use of certain Hazardous Substances RoHS in Electrical and Electronic Equipment Product Description Lead free date NV11 Bank Note Acceptor Assembly All NV11 We hereby declare that lead Pb mercury Hg...

Page 160: ...tronic Equipment throughout the EU and to reduce the level of non recycled waste The directive was implemented into law by many EU member states during 2005 and 2006 Products and packaging that displa...

Page 161: ...V 0V 0 25 V 100 Hz Supply Current Standby 350 mA Running 3 A Peak motor stall 3 5 A WARNING Use suitable power supply Ensure that the supply voltage to the NV11 is not lower than 10 8 V and that the...

Page 162: ...td 2012 GA963 2 General Specifications Note Sizes Minimum Maximum Width 60 mm 82 mm in cashbox 80mm in Note Float module Length 115 mm 150 mm Capacity Storage 300 or 600 notes Note Float module 30 not...

Page 163: ...e AWG American Wire Gauge AWP Amusement With Prizes BNV Bank Note Validator ccTalk Coin Controls Talk COMMS Communications CRC Cyclic Redundancy Check DC Direct Current DIA Diameter DIP Dual Inline Pa...

Page 164: ...n minimum mm millimetre ms millisecond MOD Modified or Modification NV Note Validator PCB Printed Circuit Board PDF Portable Document Format PiPS Pay in Pay out System PROM Programmable Read Only Memo...

Page 165: ...ght Innovative Technology Ltd 2012 GA963 2 Term Meaning SWP Skill With Prizes SYNC Synchronize TTL Transistor Transistor Logic Tx Transmit USB Universal Serial Bus V Volt V_In Voltage In WEEE Waste El...

Page 166: ...d cash box Dataset Country code and variant Alternatively supply details of the currency and note types you wish to use Bezel Size 66 85 mm Please check the NV11 product page on the ITL website for de...

Page 167: ...t innovative technology co uk Web site www innovative technology co uk BRAZIL suporte bellis technology com br CHINA support innovative technology co uk GERMANY supportDE innovative technology eu SPAI...

Reviews:

Related manuals for NV11