background image

23

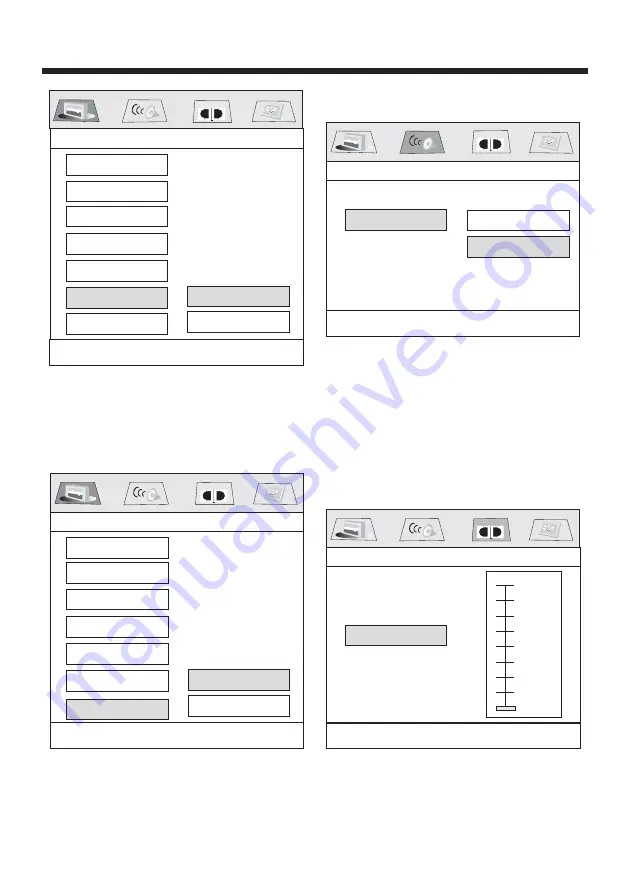
6.SCR SAVER SETUP

Select the SCR SAVER output
ON/OFF.

7.LAST MEMORY SETUP

Select the LAST MEMORY output
ON/OFF.

SPEAKER SETUP

--- SPEAKER SETUP PAGE ---

This is to activate the audio output from
DOLBY AC3 5.1 DOWNMIX to 2 channel
mode. Select the preferred SPEAKER
connection by using the cursor buttons.
Select the LT/RT to activate the Dolby
surround compatible output.
Select the STEREO to activate simple
stereo mode.

DOLBY DIGITAL SETUP

DYNAMIC RANGE CONTROL

Select DRC and adjust the dynamic
range of a Doby Digital encoded
program. There are 8 steps between
full compression and off compression.

Screen Saver

-----General setup page----

Angle Mark

Last Memory

TV Display

Spdif Output

OSDLang

Captions

ON

OFF

Set Last Memory State

-----General setup page----

Angle Mark

Last Memory

TV Display

Spdif Output

OSD Lang

Captions

ON

OFF

DOWNMIX

LT/RT

STEREO

Set Downmix Mode

-----Speaker Setup Page----

Screen Saver

Screen Saver

DOLBY

DOLBY

DOLBY

Set DRC OFF

FULL

6/8

4/8

OFF

2/8

-----Dolby Digital Setup----

DYNAMIC

DOLBY

SETUP

Summary of Contents for IN-431B

Page 1: ...AYER USB CONNECT OWNER s MANUAL Mobile Video System IN 431B REL PAIR RET VOL VOL AUX IN CAR DVD VCD CD MP3 MPEG4 TV PLAYER IR MU EQ BND CH 1 6 APS DIS P I MOD SEL MIC MENU DVD RECEIVER CONTROL DVD RECEIVER CONTROL SETUP ENTER 1 2 3 4 5 6 7 8 9 0 VOL SEL A PS MUTE STOP MO ST CLK PLAY PAUSE EQ ANGLE MODE BAND VOL OSD TITLE PBC LO DX GOTO 10 TOP INT RDM RPT PAIR LOUD REDIAL ...

Page 2: ...On Screen Display Function Multi Audio Language Function Multi Subtitle Language Function Multi Angle Function Title Menu Function TV Operation General Setup Speaker Setup Dolby Digital Setup Preferences Setup Defaults Table MP3 WMA JPEG Disc Play MPEG4 Player AUX Operation Video Quality Adjustment Rear View Camera Alternate Audio video Source 15 16 16 16 16 17 18 18 19 19 20 20 20 20 20 21 23 23 ...

Page 3: ...AND ANNOYING INTERFERENCE USE ONLY THE RECOMMENDED ACCESSORIES THIS DEVICE IS INTENDED FOR CONTINUOUS OPERATION This product incorporates copyright protection technology that is protected by method claims of certain U S Patents and other intellectual property rights owned by Macrovision Corporation and other rights owners Use of this copyright protection technology must be authorized by Macro visi...

Page 4: ...isc Cleaning Use a dry soft cloth to wipe the surface If the disc is quite dirty use a soft cloth slightly moistured with isopropyl rubbing alcohol Never use solvents such as benzine thinner or conventional record cleaners as they may mar the surface of the disc Handling and Cleaning Dirt dust scratches and warping disc will cause misoperation Do not place stickers or make scratches on discs Do no...

Page 5: ...does not get in the driver s way and cannot injure the passenger if there is a sudden stop like an emergency stop If installation angle exceeds 30 from horizontal the unit might not give its performance Avoid installing the unit where it would be subject to high temperature such direct sunlight or from hot air from the heater or where it would be dirt or excessive vibration This unit can be proper...

Page 6: ...ove the PLASTIC COVER of the both sides away then insert the two KEY PLATE into left and right side of chassis as above illustration DASH BOARD METAL MOUNTING STRAP HEX NUT SPRING WASHER PLAIN WASHER TAPPING SCREW CONSOLE SLIDE BRACKET HOUSING HEX BOLT KEY PLATE KEY PLATE PLASTIC COVER ...

Page 7: ...t Panel Before detaching the control panel be sure to turn off the power 1 Press the release button and the left hand side of the front panel will release FIG 1 2 Pull off the front panel FIG 2 and keep the front panel into the case FIG 3 Attaching The Front Panel 1 First insert the right hand side of the front panel into the hollow of the unit 2 Gently push the left hand side of the front panel u...

Page 8: ...r finger behind the control panel When you want to change the viewing angle of the operating unit to play you can press the angle button repeatedly to select the desired angle as follows CHANGING THE CONTROL PANEL ANGLE Angle 3 Angle 4 Angle 1 Angle 2 ...

Page 9: ...W COAXIAL OUT BROWN WHITE B 12V REAR CAMERA SWITCH GREEN YELLOW AUX optional RCA CABLE REAR CAMERA INPUT B PARKING BRAKE FRONT RCA WHITE L RCH RED LCH WHITE FRONT RCA RED R VIDEO OUT 1 YELLOW REAR RCA OUTPUT CABLE optional FRONT RCA OUTPUT CABLE FOR RCA LINE OUT VERSION ONLY GREY GREY BLACK FRONT Rch SPK VIOLET VIOLET BLACK WHITE WHITE BLACK GREEN GREEN BLACK REAR Lch SPK AUTO ANTENNA BLUE FUSE GR...

Page 10: ...anging between PBC ON and PBC OFF on the VCD disc Auto store and preset scan function in radio stations Press it to adjust the screen viewing angle See page 7 Changing of the view angle on multi angle DVD disc In TV mode Press it to search TV channel automatically In DISC mode Press it to start forward rapidly Confirm the Track Chapter selected with the number key or selected with the cursor butto...

Page 11: ...ery holder as the direction indicated by the arrow See 2 Replace the battery Set a new battery property with side up as illustrated See 3 Insert the battery holder Push in the holder to the original position See 1 2 3 4 Inserting the Batteries 24 SKIP 25 0 9 26 10 27 RADIO PRESET In TV mode press it to ADD and DELETE channel In DISC mode press it to reverse rapidly Tens digit select button coopera...

Page 12: ...rotate the VOL to adjust the selected mode The corresponding value will show on the display When mode has not been adjusted for several seconds display returns to normal radio or CD display Tint Contrast Bright Color BG Color Volume Bass Treble Balance Fader Bluetooth A Volume B Bass C Treble D Balance E Fader Adjust volume level by using VOL button Note The unit is initially set to volume mode Pr...

Page 13: ... it will hold at each band for about 5 seconds If you like one of them press the PLAY PAUSE button to stop the scanning In Disc mode swing the SEL knob briefly in the direction of APS DISP to turn off the display image the monitor on the unit only the sound will stay on Swing it again to resume the playback picture mode In Radio mode You can press SEL knob briefly to select the BG COLOR by repeate...

Page 14: ...s this button to use the Bluetooth function how to use it please refer to see page 17 14 RESET BUTTON RESET button is placed on the housing and must be activated with either a ballpoint pen or thin metal object The RESET button is to be activated for the following reasons A Initial installation of the unit when all wiring is completed B All the function buttons do not operate C Error symbol on the...

Page 15: ... current chapter track when selected REP ONE mode b Select REP ALL mode to continuously repeat all chapter track on the current disc c REPEAT feature does not support VCD2 0 with PBC ON SELECT DIGEST TYPE TRACK DIGEST DISC INTERVAL TRACK INTERVAL E Long Press button to scan disc a In the state of CD disc playing press the 3 INT button to play the previous 6 seconds part of each track chapter on di...

Page 16: ...ng an MP3 WMA JPEG disc Ex When MP3 file is detected MP3 WMA JPEG DISC PLAY In stop mode use on the remote control to select the item or folder then press ENTER button to confirm Pressing REPEAT button repeatedly can select two kinds of repeat play mode 00 56 04 07 003 112 Repeat one Mp3 Mp3 Mp3 K P woman 1 new ton 1 2 3 4 5 6 Current track file highlighted bar Elapsed playing time of the current ...

Page 17: ...n stop mode use on the remote control to select the item then press ENTER button to confirm Pressing REPEAT button repeatedly can select three kinds of repeat play mode REP ONE Play the same song over and over again REPEAT ALL Play all songs in the current directory in sequence over and over again DISC REPEAT Play all songs in the discover and over again In the playback use or to skip an item ahea...

Page 18: ...oth devices Select this Car Kit from the list if you connect successfully the ICON remains solid on the screen then you can operate the function of blue tooth about the unite Important a If the pairing can not be completed within approximately 2 minutes whiles the pairing mode is actived and you will need to reattempt pairing See steps 2 5 above b After pairing is completed if the ICON is stilling...

Page 19: ...ing the function of blue tooth about the unit you need make your call phone and the unit successfully for one time Afterwards you only need to take on the power and the function of blue tooth will work in three minutes automatically if you want to operate the function of blue tooth c If you want not to use the function of the Blue tooth about the unit you can select the Bluetooth OFF The method to...

Page 20: ...ice to the front panel USB port If it is properly connected the device will be mounted and start playing automatically Changing From USB to DISC Playback Modes Changing From DISC to USB Playback Modes If you are in USB Playback mode and wish to begin playback of a disc already in the player press the STOP button once Then press the GOTO button and the player will switch to DVD VCD CD MP3 Playback ...

Page 21: ...lti subtitle Language for DVD Only Function SUBTITLE 1 Connect the TV antenna to the TV IN from Ant jack on the back of the unit 2 Press the mode button on the remote control to select the TV mode Press the SEARCH button on the remote controller to star search channel automatically Press the button to choose the channel upward and downward The numeric button 0 9 allow you to select the correspondi...

Page 22: ... This setup page includes the item of TV display audio output feature The detail please refer to b SPEAKER SETUP This is to activate the audio output from DOLBY AC3 5 1 DOWNMIX to 2 channel mode Please refer to c DOLBY DIGITAL SETUP Please refer to d PREFERENCE SETUP This setup page includes all the configuration of support feature The detail please refer to SETUP GENERAL SETUP MENU SPEAKER SETUP ...

Page 23: ...DIF OFF mode to SPDIF RAW mode to SPDIF PCM mode Set Angle Mark General setup page Angle Mark Last Memory TV Display Spdif Output OSD Lang Captions ON OFF General setup page Angle Mark Last Memory TV Display Spdif Output OSD Lang Captions Set OSD Language Spanish German French English Portuguese Italian Closed Caption General setup page Angle Mark Last Memory TV Display Spdif Output Captions ON OF...

Page 24: ...te simple stereo mode DOLBY DIGITAL SETUP DYNAMIC RANGE CONTROL Select DRC and adjust the dynamic range of a Doby Digital encoded program There are 8 steps between full compression and off compression Screen Saver General setup page Angle Mark Last Memory TV Display Spdif Output OSDLang Captions ON OFF Set Last Memory State General setup page Angle Mark Last Memory TV Display Spdif Output OSD Lang...

Page 25: ...UAGE SETUP Select the preferred DISC MENU language by using the cursor buttons PREFERENCES PAGE Set TV standard Preference Page Audio Default TV Type Password Disc Menu Subtitle Parental AUTO NTSC PAL DOLBY Audio Default TV Type Password Disc Menu Subtitle Parental Preference Page Spanish German French English Portuguese Italian Preferred Subtitle Language OFF DOLBY Audio Default TV Type Password ...

Page 26: ... Parental Preference Page Set Parental Control 1KID SAF 2G 3PG 4PG13 5PGR 6R OFF 7NC 17 8 ADULT DOLBY Change Password Audio Default TV Type Password Disc Menu Subtitle Parental CHANGE Preference Page DOLBY Audio Default TV Type Password Disc Menu Subtitle Parental Preference Page Load Fcatory Setting RESET DOLBY DEFAULTS TABLE GENERAL SETUP SPEAKER SETUP DOLBY DIGITAL PREFERENCES TV DISPLAY ANGLE ...

Page 27: ...87 5 to107 9 MHz IF 10 7 MHz 10 7 M z 10 7 MHz Sensitivity S N 30 dB 15 MW MW AM Frequency Coverage 522 to1620 KHz 522 to1620 KHz 530 to1710 KHz IF 450 K z 450 KHz 450 KHz Sensitivity S N 20 dB 40 dBu 40 dBu 40 dBu LW Optional Frequency Coverage 144 to290 KHz IF 450 KHz Sensitivity S N 20 dB 45 dBu H dBu 15 dBu 15dBu H SPECIFICATION 26 Monitor Screen Size 4 3 Inch Wide Number of Pixels 480 X 3 RGB...

Page 28: ...due to noise The antenna cable is not connected Insert the antenna cable firmly The signals are too weak Select a station manually SYMPTOM CAUSE SOLUTION Television video imageappears black white The color system is set incorrectly Please switch to correct color system from menu No television video image appears The unit is not connected to the parking brake detection switch Make proper connection...

Reviews: