background image

11

OBD2 DIAGNOSTICS 

Performing a Scan – OBD2 Diagnostics

OBD2 DIAGNOSTICS 

The 

OBD2 Diagnostics

 function allows you to perform OBD2 scans, view & 

record Live Data, create RepairSolutions2


Reports, and Erase OBD2 DTCs.

PERFORMING A SCAN – OBD2 Diagnostics

1. 

Follow the 

AutoLink Connection 

steps. [

See page 9

]

2. 

Tap 

OBD2 Diagnostics

.

The tablet automatically starts a check of the vehicle’s computer to determine which 

communication protocol it is using. When the tablet identifies the computer’s communication 

protocol, a communication link is established.

NOTE:

 A PROTOCOL is a set of rules and procedures for regulating data 

transmission between computers, and between testing equipment and computers. 

As of this writing, five different types of protocols (ISO 9141, Keyword 2000, J1850 

PWM, J1850 VPW and CAN) are in use by vehicle manufacturers. 

If the Scan Tool fails to link to the vehicle’s computer, a “Scan Failed” message shows.


Ensure the vehicle is OBD2 compliant–check vehicle emission control information (VECI) 

label located in the vehicle’s engine compartment.


Verify the connection at the DLC, and verify the ignition is ON.


Turn the ignition OFF, wait 5 seconds, then back ON to reset the computer.


Tap 

Try Again

 to try again, or tap 

Cancel 

to return to the Home Page.

3. 

A progress dialog displays while the tablet retrieves any Diagnostic Trouble Codes, Monitor Status and Freeze 

Frame Data from the vehicle’s computer memory.

4. 

When the retrieval process is complete, the 

OBD2 Diagnostics

 screen displays with the scan results.

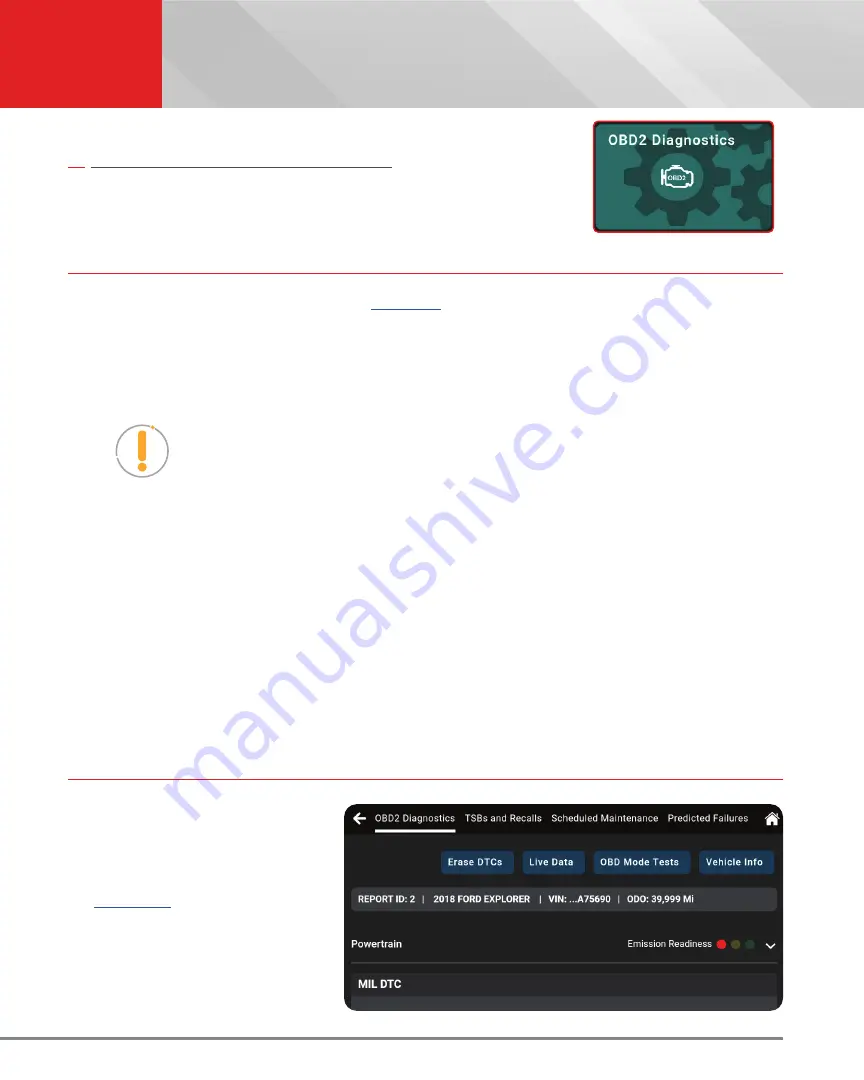
VIEWING SCAN RESULTS – OBD2 Diagnostics

Scan results are shown immediately 

following  completion  of  a  scan; 

and can also be viewed later using 

the 

PREVIOUS VEHICLE 

function 

available through the Home page 

[

See page 47

].

Scan results are shown in a multi-

page display, which includes 

OBD2 

Diagnostics, TSBs and Recalls, 

Scheduled Maintenance, 

and 

Predicted Failures.

Summary of Contents for 7111 Smart

Page 1: ...The most comprehensive scan tool for diagnosing 1996 and newer OBD2 vehicles 7111 SMART DIAGNOSTIC SYSTEM USER S MANUAL...

Page 2: ...iagnostic equipment Yours sincerely The Innova Technical Team P S Connect with us to see what we re up to The most complete automotive repair database with verified fixes from ASE Master Technicians F...

Page 3: ...ttings 6 The Home Screen 7 Technical Specifications 8 GETTING STARTED 9 Connecting the Tablet 9 AutoLink Connection 9 Scanning a Vehicle 10 OBD2 DIAGNOSTICS 11 Performing a Scan OBD2 Diagnostics 11 Vi...

Page 4: ...ording Capturing Live Data 22 Vehicle Information 22 Additional Vehicle Information Customer Information 22 Vehicle ID 23 Available Modules 23 In Use Performance Tracking IPT 23 Editing Customer Infor...

Page 5: ...le Service Status 35 Dashboard Warning Light Status 36 Diagnostic Report RepairSolutions2 36 WORKSHOP TOOLS 37 Oil Maintenance Reset 37 Battery Reset 38 Electronic Parking Brake EPB Reset 39 Steering...

Page 6: ...tings 57 Version Information 57 Report an Issue 58 View User s Manual 59 SUPPORT 60 Tool Library 60 Smog Check and I M Program LED Definition 61 Icon Monitor Status 61 DTC Library 61 Technical Support...

Page 7: ...mitters within this device must not be co located or operating in conjunction with any other antenna or transmitter n This equipment complies with IC radiation exposure limits set forth for an uncontr...

Page 8: ...isit https www innova com pages patents for additional information SOFTWARE VERSION Please note that the images and functions on this manual may differ based on the current Firmware Version FW and Sof...

Page 9: ...urn at high speed To avoid serious injury always be aware of moving parts Keep a safe distance from these parts as well as other potentially moving objects Engine parts become very hot when the engine...

Page 10: ...y or equipment They are characterized as follows Yellow Icon Provides a NOTE statement to offer special information or tip on what is being instructed Orange Icon Potential hazardous situation Provide...

Page 11: ...eadphone Port Supports connection of external headphones Future expansion 6 Display Color LCD display shows menus and sub menus test results tablet functions and vehicle status information 7 DLC Cable...

Page 12: ...ns off INITIAL TABLET SETUP Wi Fi Personal Settings Follow these steps to setup the tablet for the first time 1 Charge Tool use the included charging cable to completely charge your tool before conduc...

Page 13: ...re Pressure Battery and many Body control modules to view and erase their DTCs Perform bi directional tests on fuel pump injectors ignition coils and much more Plus get access to hundreds of additiona...

Page 14: ...cation range of 30 feet Operating System Proprietary user interface running on Android 9 0 Battery Built in 6000mAH rechargeable battery 6 hour life Wi Fi 802 11b g n Operating Temperature 23 F to 113...

Page 15: ...the tablet is off power ON the tablet by pushing the POWER button for 3 seconds 3 Turn the ignition ON DO NOT start the engine n Tablet begins communicating and displays Retrieving Vehicle Information...

Page 16: ...A progress bar appears One moment please 3 If successful the screen returns to the Home page and displays mileage in the Vehicle Info Bar 4 If unsuccessful an error dialog appears n Tap on the entry...

Page 17: ...he Scan Tool fails to link to the vehicle s computer a Scan Failed message shows Ensure the vehicle is OBD2 compliant check vehicle emission control information VECI label located in the vehicle s eng...

Page 18: ...ehicle can be tested for emissions and certified Many areas states countries allow an Emissions Test to be performed if the only code present is a PENDING code One or more monitors Have Not Run their...

Page 19: ...is cross referenced for accuracy against a database of millions of verified fixes It is real world data that has been collected for over 25 years by Innova s network of ASE Master Technicians across...

Page 20: ...o the matched part s n Purchase as usual via their secure shopping cart 4 Tap the X on the top right corner to exit and return to the OBD2 Diagnostics results page MONITOR STATUS Shows the current sta...

Page 21: ...onitor Test and refer to the service information before continuing Viewing Drive Cycle Procedures A Drive Cycle for a monitor requires that the vehicle is driven in such a way that all the required En...

Page 22: ...lities are also included under the OBD2 DIAGNOSTICS scan results ERASING OBD2 DTCS NOTE When the Erase function is used to erase DTCs from the vehicle s on board computer Freeze Frame data and manufac...

Page 23: ...tion OR n Place the vehicle in park or neutral set the parking brake and start the engine OBD MODE TESTS OBD mode tests are accessed from the OBD2 Diagnostic results page See page 11 1 Tap the OBD Mod...

Page 24: ...name to view the Drive Cycle procedure for the selected monitor n The page refreshes to display the Drive Cycle procedure for the selected monitor Oxygen Sensor Mode 05 The Oxygen Sensor Mode 05 lets...

Page 25: ...or Max Status is shown as either Low High or OK 3 Tap the X icon to close the test results screen and return to the OBD Mode Test screen Evaporative Test Mode 08 The Evaporative Test Mode 08 function...

Page 26: ...er person observes the tablet data Trying to drive and operate the tablet at the same time is dangerous and could cause a serious injury to you and bystanders Viewing Live Data 1 Connect with the vehi...

Page 27: ...he name of the PID and a numerical representation of the current value for the PID n Tap PID List to return to the full PID results list Step 4 above 8 Tap the Graph button to view the selected PIDs i...

Page 28: ...Recording Complete dialog displays the message Would you like to save the recorded live data n Tap Yes Save Live Data to save the recorded data to the tablet s memory for later playback See page 49 n...

Page 29: ...n s for the vehicle s control mod ule s n CVN The Vehicle s Calibration Verification Number s CVNs required by OBD2 regulations CVNs are used to determine if emission related calibrations for the vehi...

Page 30: ...desired information has been entered tap Save to save your changes n A confirmation message displays when customer information has been successfully saved If an invalid Phone number or Email address h...

Page 31: ...required n Probability of Failure Expressed as a percentage of 100 shows a bar graph and numerical value The higher the value the most likely the failure will occur n Price Estimated cost to accomplis...

Page 32: ...ING A SCAN OEM DIAGNOSTICS 1 Follow the AutoLink Connection steps to connect with the vehicle See page 9 2 Tap OEM Diagnostics 3 A selection dialog is provided 4 Select the type of test you wish to pe...

Page 33: ...t Verify the connection at the DLC and verify the ignition is ON Turn the ignition OFF wait 5 seconds then back ON to reset the computer Tap Try Again to try again or tap Cancel to return to the Home...

Page 34: ...7 VIEWING SCANNING AN INDIVIDUAL CONTROL MODULE Perform diagnostics for a single selected vehicle module Depending on the module selected you can Read DTCs Erase DTCs view Live Data and perform Active...

Page 35: ...r the selected module are currently stored in the vehicle s computer the message No DTCs displays 3 Continue as desired n Tap the Erase DTCs button to erase ALL retrieved Diagnostic Trouble Codes DTCs...

Page 36: ...linked to the vehicle start the engine 2 Select the module for which you wish to view Live Data See page 28 3 Tap Live Data in the Available Functions menu to place the tablet in Live Data mode 4 The...

Page 37: ...Functions menu n The tablet retrieves and displays a menu of Active Tests available for the vehicle under test NOTE If Active Tests are not supported for the vehicle under test the message Active Tes...

Page 38: ...Functions menu n The tablet retrieves and displays one or more menus of Special Functions available for the vehicle under test NOTE If Special Functions are not supported for the vehicle under test th...

Page 39: ...of the Scan All Systems results page n The tablet displays an attention message confirming deletion n If you want to proceed tap Continue n If you do not want to proceed choose Cancel to exit the eras...

Page 40: ...les n It can take several minutes depending on the number of available systems available on the vehicle being tested Tap Cancel to abort the scan n If the Vehicle Inspection was recently performed a A...

Page 41: ...ement The Battery Life field is color coded to provide a visual indication of battery status Green good Yellow poor Red replace battery n TPMS Tire Pressure Readings Shows the status of the vehicle Ti...

Page 42: ...n Airbag Dash Indicator Reports if the airbag dashboard light is currently ON or OFF It is color coded to provide a quick visual status Red ON Green OFF n TPMS Warning Light Reports if the Tire Pressu...

Page 43: ...ance Light 1 Tap Oil Maintenance Reset on the Workshop Tools screen n An instructional dialog displays to confirm selection n Select Yes to continue Or No to cancel n A One moment message displays whi...

Page 44: ...attery Connection and After Battery Connection NOTE If battery reset procedures are not available an advisory message shows Tap Back to return to the Workshop Tools screen 3 Tap the procedure you wish...

Page 45: ...Tap Exit to return to the Workshop Tools screen ELECTRONIC PARKING BRAKE EPB RESET The Electronic Parking Brake EPB reset procedures vary between vehicle makes and models NOTE If an error occurs while...

Page 46: ...op Tools screen STEERING ANGLE SENSOR SAS CALIBRATION The Steering Angle Sensor SAS Calibration function is available for BMW Chrysler Ford GM Hyundai KIA Nissan Toyota Honda Mitsubishi Subaru Jaguar...

Page 47: ...ibration procedure has completed 4 Tap End or Exit as appropriate to return to the SAS Reset menu 5 Tap on the icon at the top of the page to return to the Workshop Tools screen TRANSMISSION FLUID TEM...

Page 48: ...dures vary between vehicle makes and models NOTE If an error occurs while performing ABS bleeding procedures an advisory message displays Tap Exit or Back as necessary to return to the Service Reset m...

Page 49: ...attery and alternator Alternator Test BATTERY TEST ONLY To perform a battery check ONLY 1 Tap Battery Alternator Test on the Workshop Tools screen n The Battery Alternator Test menu displays 2 Tap Bat...

Page 50: ...did not detect cranking status for the vehicle s engine an advisory message shows Tap Retest to repeat the battery check or choose Exit to return to the Home Page 8 When the battery check is complete...

Page 51: ...Graph to view all PIDs in bar graph format or select the PIDs you wish to view and tap either the View Graph or Record buttons to proceed NOTE When using the Graph function selecting more than 10 PIDs...

Page 52: ...ine Graph button displays battery voltage PIDs in line graph format n The PID List button returns to the PID selection screen 7 The Record button records selected PIDs See 8 Tap on the icon at the top...

Page 53: ...h Bar Tap the search bar to enter a search criterion Customer Name Phone Number Email or Vehicle n Report No The auto generated reference report number for the scan n Date The date on which the scan w...

Page 54: ...email a PDF version of the report to a customer or yourself 1 Tap the email icon at the end of the entry n If the email icon is missing Tap on the report entry you wish to send Scroll to the Fix for D...

Page 55: ...h the recording was made To View Playback Recorded Live Data 1 Tap on Live Data tab to view all recoded entries 2 Tap an entry on the Live Data tab to play back recorded data n Loading Live data dialo...

Page 56: ...tapping on Settings n The Settings page displays 2 Swipe up or down to scroll to the desired option 3 Make adjustments and settings as outlined in the next pages To exit the Settings mode n Tap the M...

Page 57: ...enter your personal email address 4 To change an existing Email address n Tap Change The current Email address displays in an editable text box 5 Tap the Send button to send your email to Innova Tech...

Page 58: ...arts recommendations provide the name of the retailer where you purchased your INNOVA Smart Diagnostic System tablet Specifying the Retailer 1 Scroll the Settings page to the Retailer field n If you p...

Page 59: ...work name n To cancel changes and retain your current network connection tap Cancel to return to the Wi Fi Settings field n The Enter Password dialog displays 4 Tap the Password text box then enter th...

Page 60: ...of measurement LANGUAGE Lets you set the display language for the tablet to English or Spanish Setting the Display Language 1 Scroll the Settings page to the Language field 2 Tap the currently active...

Page 61: ...eaker Volume 1 Scroll the Settings page to the Volume Settings field 2 Use the Volume slider to increase or decrease speaker volume n Touch and slide right to make the volume louder n Touch and slide...

Page 62: ...or a specified vehicle Using the DLC Locator 1 Scroll the Settings page to the DLC Locator field 2 Tap Make to display the Select Make menu Select the radio button for the desired vehicle manufacturer...

Page 63: ...r related specifications This screen also lets you check for software updates or report an issue with the tablet Viewing Version Information 1 Scroll the Settings page to the Version Information field...

Page 64: ...Issue field 2 Tap the Report an Issue button n A selection page displays 3 Tap the type of issue you wish to report OBD II ECM DTC ABS DTC or SRS DTC n An instructional dialog displays 4 Tap the Home...

Page 65: ...are required fields n If an email is displayed tap Change to enter a new email address 9 Tap Submit to send your report or Cancel to exit and return to the Home screen VIEW USER S MANUAL Get access t...

Page 66: ...ia the tablet s email function TOOL LIBRARY Accesses definitions of tool icons and Diagnostic Trouble Codes DTCs Using the Tool Library 1 From the Home page tap SUPPORT You can also access it from the...

Page 67: ...p the Icon Monitor Status button n The Icon Monitor Status dialog displays 2 Tap Cancel to return to the Tool Library selection screen DTC LIBRARY Searches for the Diagnostic Trouble Code DTC definiti...

Page 68: ...by Email dialog displays n The Email field shows the most recently entered email address for the tablet If no address was previous entered the Email field shows an empty text box NOTE You MUST provid...

Page 69: ...paired by anyone other than the Manufacturer s Service Center The Manufacturer under no circumstances shall be liable for any consequential damages for breach of any written warranty of this unit This...

Page 70: ...the Monitor can run and complete its diagnostic testing n Monitor Has Has Not Run The terms Monitor has run or Monitor has not run are used throughout this manual Monitor has run means the PCM has co...

Page 71: ...talled in the vehicle s on board computer The program has several procedures and diagnostic strategies Each procedure or diagnostic strategy is made to monitor the operation of and run diagnostic test...

Page 72: ...NOx Adsorber Monitor Boost Pressure System Monitor Exhaust Gas Sensor Monitor PM Particulate Matter Filter Monitor ADDITIONAL TERMINOLOGY ACRONYMS n ABS Anti Lock Brakes n DLC Data Link Connector vehi...

Page 73: ...Copyright 2022 IEC All Rights Reserved v 1 86 00 Innova Electronics Corp 17352 Von Karman Ave Irvine CA 92614...

Reviews: