


SUMMARY OF SENSOR OPERATION
INSTALL BUTTON – Function Overview
• Press once to add or remove the sensor from a Z-Wave Network.
• Press and hold, approximately 10 seconds, until the STATUS LED starts
blinking to restore factory defaults.
• Press three times rapidly to send a “BATTERY_REPORT” and
“WAKE_UP_NOTIFICATION” (if installed on a network).
The sensor will stay awake for 30 seconds.
STATUS LED – Function following a button press:
The LED will give an indication for 30 seconds following a button press. In that
time the following will be seen:
• Continuous On: Device is enrolled on a Z-Wave Network.
• Slow Blinking: Device is not enrolled on a Z-Wave Network.
• Fast Blinking: Successfully added to or removed from a Z-Wave network.
ADD – Adding the sensor to an existing Z-Wave network
1. Set your home’s Z-Wave Bridge into ADD Mode.
2. Press and release the INSTALL button on the sensor.
3. The Status LED will blink rapidly for 3 seconds when it has been added to
your Z-Wave network. Your bridge will also indicate that the sensor was
successfully added.
REMOVE – Removing the sensor from a Z-Wave network
1. Set your home’s Z-Wave Bridge into REMOVE Mode.
2. Press and release the INSTALL button on the sensor.
3. The Status LED will blink rapidly for 3 seconds when it has been removed
from your Z-Wave network. Your bridge will also indicate that the sensor
was successfully removed.
TROUBLESHOOTING
SYMPTOM
CAUSE
CURE
Sensor fails
to add to
the network.
(slow blinking
of the Status
LED & no
pairing action
seen on the
bridge)
Out of range
Add a Z-Wave repeating device (e.g. light
module/dimmer) at a location between the bridge
and sensor. First add the repeater to the network
following that device’s instructions. Then try
to add the sensor to the network again at the
desired sensing location.
Improperly
removed
from network
previously.
Remove the sensor from the network, follow the
steps in Table 3. Then add it back to the network.
Sensor drops
connection
intermittently
Edge of
range
Add a Z-Wave repeating device (e.g. light
module/dimmer) at a location between the bridge
and sensor.
Button press
ignored
Button press
too fast or too
slow
Firm 1/2 second button press.
Sensor
goes from
“Online” to
“Offline”and
“Missing
Sensor”
alarm
TSO.001.00
is shown
Sensor is
enabled but
offline (not
reporting).
Change the batteries in the sensor.
Remove the offline sensor following the steps
from Table 3 then reinstall or add a new sensor.
Add a signal repeater.
“Low Battery”
alarm
TSO.004.00
Sensor is
reporting a
low battery.
Change the batteries in the sensor.
FACTORY RESET
Factory Reset should be used only when the primary controller is missing or
otherwise inoperable. Press and hold, approximately 10 seconds, until the Status
LED starts blinking.
** FOR INDOOR USE ONLY **
SPECIFICATIONS
SIZE (INCHES): 3.25 X 2.0 x 0.60 POWER: 2 X AAA Alkaline Batteries
WEIGHT:
0.25 LBS
RF:
Z-WAVE ZM5202,US 908.4 MHz
/ 916 MHz
NOTE: This sensor can be added to any Z-Wave network. It can also be added to a Trane or an American Standard connected thermostat with a built in Nexia bridge then assigned as
an indoor temperature sensor (IDT) from the Service Menu.
Table 4.
REMOVING A ZSENS930 FROM A THERMOSTAT
TCONT824, ACONT824, TCONT850, ACONT850, TZON1050, AZON1050
NOTE: This will work for both “
Offline
” and “
Online
” sensors and only ZSENS930 sensors may be removed this way. The Summary Table will also work.
Software
v
5.3
STEP 1
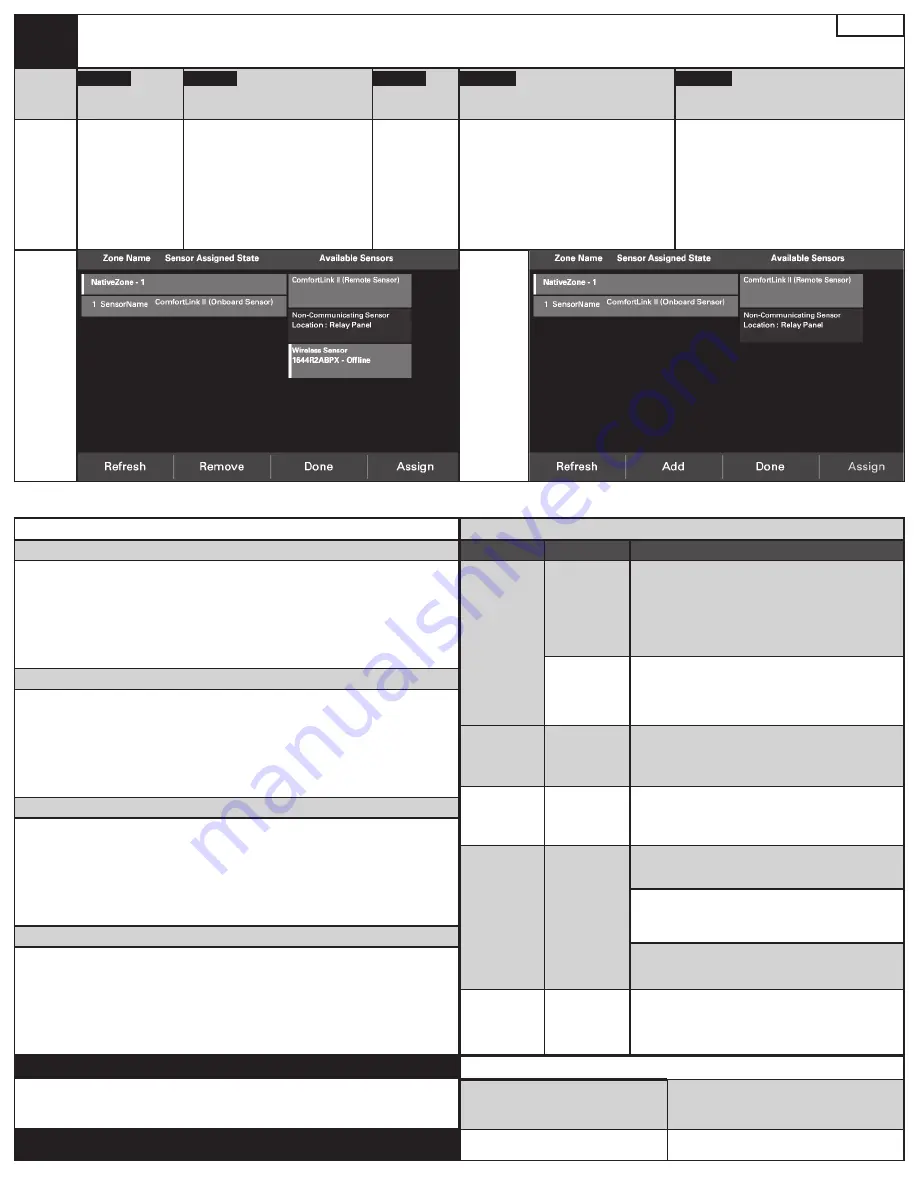
Unassign the sensor
STEP 2
Select the “
Offline
” sensor.
STEP 3
Screen change
STEP 4
Remove the sensor
STEP 5
Screen change
Action
Follow steps
1
through
3
in
Table 3
for the sensor(s) that
are to be removed.
They must be
unassigned to be
removed.
Once the sensor is in the “
Available
Sensors
” list, tap the sensor to be
removed. Use the serial number to
verify the device is the correct sensor.
NOTE: The selection indicator on the
left of the button turns green.
The Nav bar
button “
Add
” has
now changed to
“
Remove
”
(Screen 5)
Tap the “
Remove
” button
NOTE: If the sensor is “
Online
” you will
need to press the “
INSTALL
” button on the
inside of the sensor while it’s “
Waiting to
Remove Device
”.
The sensor is now no longer included in the
“
Available Sensors
” list. (Screen 6)
NOTE: To return a sensor to the list you will
have to go through the steps of
Table 1
.
Screen 5
Screen 6
Page - 3


