background image

IN8606HD User’s Manual 

5.  

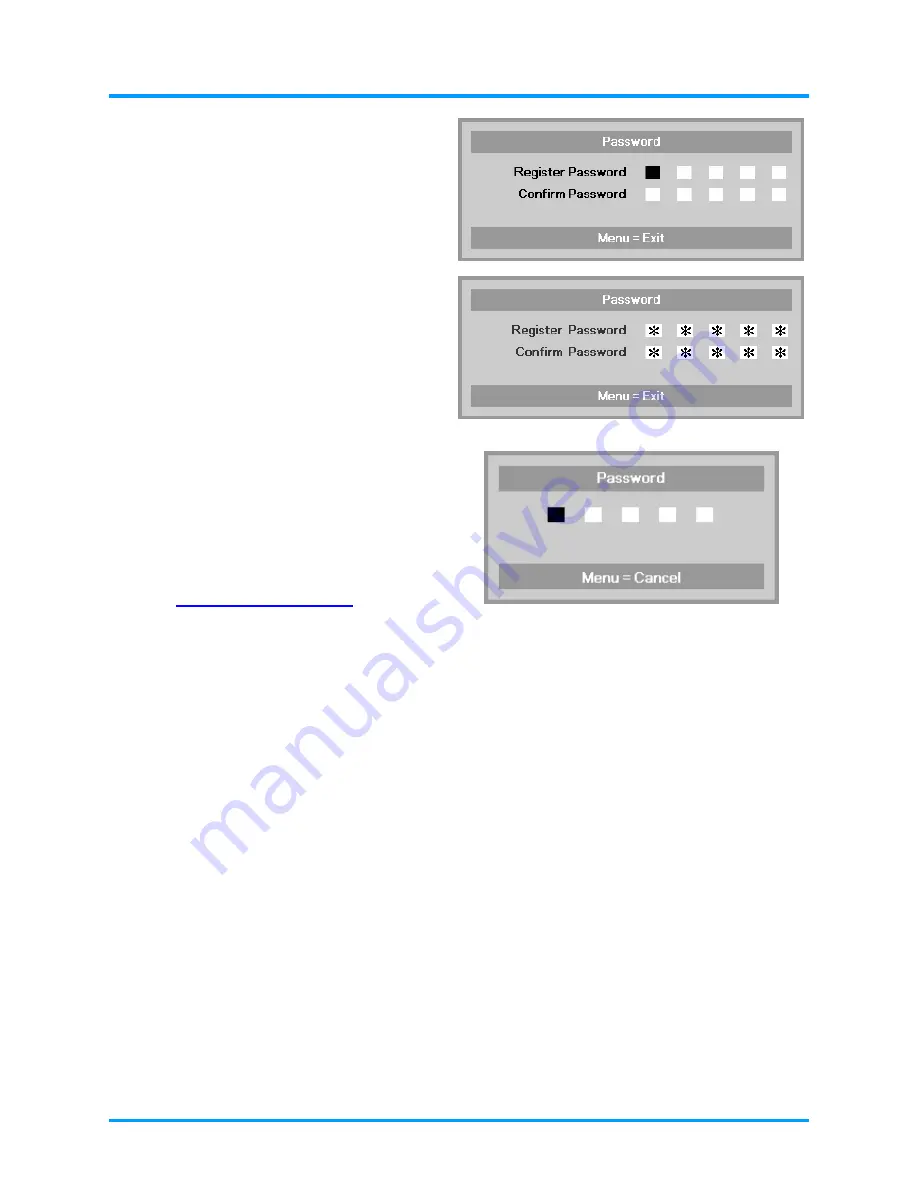
You can use the arrow buttons 

▲▼◄►


either on keypad or IR remote control 
for password entry. You can use any 
combination including the same arrow 
five times, but five characters must be 
used.. 

Press the arrow buttons in any order to 
set the password. Push the 

MENU


button


to exit the


dialog box. 

6.  

If the 

Security Lock

 is enabled, the 

user will be prompted to enter a 
password when the projector's power 
button is pressed. 
Enter the password in the order you 
set it on step 5. If you forget the 
password, please contact InFocus. 
Visit our website at 

www.infocus.com/support

 or call us. 


14 


Summary of Contents for IN8606HD

Page 1: ......

Page 2: ...he world HDMI the HDMI Logo and High Definition Multimedia Interface are trademarks or registered trademarks of HDMI Licensing LLC in the United States and other countries is a trademark of SRS Labs I...

Page 3: ...he unit Warning Alerts you to situations that may damage the unit create a hazardous environment or cause personal injury Throughout this manual component parts and items in the OSD menus are denoted...

Page 4: ...inch 19 69 inch 19 69 inch 3 94 inch 11 81 inch 19 69 inch Ensure that the intake vents do not recycle hot air from the exhaust vent When operating the projector in an enclosed space ensure that the s...

Page 5: ...t Recycle Instructions Hg Lamp s inside this product contain mercury This product may contain other electronic waste that can be hazardous if not disposed of properly Recycle or dispose in accordance...

Page 6: ...avigating the OSD 17 SETTING THE OSD LANGUAGE 18 OSD MENU OVERVIEW 19 IMAGE MENU 20 Computer Menu 21 Advanced Features 22 White Balance 23 Color Manager 24 SETTINGS 1 MENU 25 Audio 26 Advanced 1 Featu...

Page 7: ...ICATIONS 46 PROJECTION DISTANCE VS PROJECTION SIZE 47 Projection Distance and Size Table 47 TIMING MODE TABLE 48 PROJECTOR DIMENSIONS 50 REGULATORY COMPLIANCE 51 FCC WARNING 51 CANADA 51 SAFETY CERTIF...

Page 8: ...IS USER S MANUAL QUICK START GUIDE WARRANTY CARD Contact your dealer immediately if any items are missing appear damaged or if the unit does not work It is recommended that you keep the original packi...

Page 9: ...ge 4 Zoom ring Enlarges the projected image 16 5 Function keys See Top view On screen Display OSD buttons and LEDs 3 Important Do not block ventilation openings Locate the projector in a well ventilat...

Page 10: ...GE 1 Turns the projector On and Off Red Lamp Failure 2 LAMP LED Blinking Red Error code Blue Projector is in standby or is fully powered on lamp is lit 3 POWER LED Blinking Blue Projector is initializ...

Page 11: ...from a component device 9 USB POWER This USB Type A connector provides 5V DC power support 10 Kensington Lock Secure to a permanent object with a Kensington Lock system 40 11 VIDEO IN Connect a COMPO...

Page 12: ...rers Do not use this jack for anything other than intended use Connectivity Note If your video equipment has multiple connection options please note that HDMI provides the highest quality image follow...

Page 13: ...ector on a ceiling 2 Tilt adjustor Rotate adjuster lever to adjust angle position 15 Note If you are installing the projector on the ceiling we strongly recommend using InFocus approved ceiling mounts...

Page 14: ...eration 2 Be sure nothing obstructs the path between the remote control and the projector If the path between the remote control and the projector is obstructed you can bounce the signal off certain r...

Page 15: ...16 7 Mute Mutes the built in speaker 8 Freeze Freeze unfreezes the on screen picture 9 Source Selects the input device 10 Auto Auto adjustment for frequency tracking size position RGB only 11 Keyston...

Page 16: ...ng the remote perpendicular to the sides or the rear of the projector the remote will function well within a radius of about 7 meters 23 feet and 15 degrees above or below the projector level If the p...

Page 17: ...f the arrow A Pull out the cover B 2 Insert the battery with the positive side facing up 3 Replace the cover Caution 1 Only use a 3V lithium battery CR2025 2 Dispose of used batteries according to loc...

Page 18: ...jector splash screen displays and connected devices are detected See Setting an Access Password Security Lock on page 13 if the security lock is enabled 4 If more than one input device is connected pr...

Page 19: ...hen the Power Off Press Power again message appears press the POWER button The projector turns off Caution 1 Be sure to remove the lens cap before starting projector 2 Do not unplug the power cord unt...

Page 20: ...enus Important Keep the password in a safe place Without the password you will not be able to use the projector If you lose the password contact InFocus Support for information on clearing the passwor...

Page 21: ...st be used Press the arrow buttons in any order to set the password Push the MENU button to exit the dialog box 6 If the Security Lock is enabled the user will be prompted to enter a password when the...

Page 22: ...or The projector table or stand should be level and sturdy Position the projector so that it is perpendicular to the screen Ensure the cables are in a safe location You could trip over them To adjust...

Page 23: ...on the projector only to sharpen the projected image 3 Use the KEYSTONE buttons on the remote control to correct trapezoid image issues wider top or bottom 4 The keystone control appears on the displ...

Page 24: ...s the MENU button 2 There are three menus Press the buttons to move through the menus 3 Press the buttons to move up and down in a menu 4 Press the buttons to change setting values 5 Press the MENU bu...

Page 25: ...button Press the buttons to navigate to Settings 1 Press the buttons to move to the Advanced 1 menu 2 Press Enter or to enter the Advanced 1 sub menu Press the buttons until Language is highlighted 3...

Page 26: ...IN8606HD User s Manual OSD Menu Overview Use the following illustration to quickly find a setting or determine the range for a setting 19...

Page 27: ...cess the other Image menu items 2 ISF Day and ISF Night items only display when the ISF feature has been activated by your ISF technician Brightness Press the buttons to enter and adjust the display b...

Page 28: ...the buttons to move up and down in the Computer menu ITEM DESCRIPTION Horizontal Position Press the buttons to enter and adjust the display position to left or right Vertical Position Press the butto...

Page 29: ...s Press the buttons to enter and adjust the display sharpness Gamma Press the buttons to enter and adjust the gamma correction of the display Color Temperature Press the buttons to enter and adjust th...

Page 30: ...Balance menu ITEM DESCRIPTION R Gain Press the buttons to adjust the Red Gain G Gain Press the buttons to adjust the Green Gain B Gain Press the buttons to adjust the Blue Gain R Offset Press the butt...

Page 31: ...enter the Green Color Manager Press the buttons to adjust the Hue Saturation and Gain Blue Select to enter the Blue Color Manager Press the buttons to adjust the Hue Saturation and Gain Cyan Select to...

Page 32: ...ion Press the buttons to enter and choose from four projection methods Aspect Ratio Press the buttons to enter and adjust the video aspect ratio Keystone Press the buttons to enter and adjust the disp...

Page 33: ...e buttons to move to the Audio menu and then press Enter or Press the buttons to move up and down in the Audio menu ITEM DESCRIPTION Volume Press the buttons to enter and adjust the audio volume Mute...

Page 34: ...t a different localization Menu Security Lock Press the buttons to enter and enable or disable security lock function Blank Screen Press the buttons to enter and select different color to blank the sc...

Page 35: ...ailable for selection 3 Use 3D glasses to view a 3D image 4 You need 3D content from a 3D DVD or 3D media file 5 You need to enable the 3D source some 3D DVD content may have a 3D on off selection fea...

Page 36: ...ced 2 menu and then press Enter or Press the buttons to move up and down in the Advanced 2 menu Press the buttons to enter and change setting values ITEM DESCRIPTION Test Pattern Press the buttons to...

Page 37: ...when no signal is detected Auto Power On Press the buttons to enter and enable or disable automatic power On when AC power is supplied Lamp Mode Press the buttons to enter and select the lamp mode fo...

Page 38: ...ess Enter or to enter ITEM DESCRIPTION Active Source Displays the current active source type Video Information Displays resolution video information for RGB sources and color standard for Video source...

Page 39: ...translucent level Low Power Mode Press the buttons to enter and turn Low Power Mode on or off Fan Speed Press the buttons to enter and toggle between Normal and High fan speeds Note We recommend sele...

Page 40: ...IN8606HD User s Manual Lamp Hour Reset Please refer to Resetting the on page 38 to reset the lamp hour counter 33...

Page 41: ...press Enter or Press the buttons to move up and down in the Advanced 2 menu Press the buttons to enter and change setting values ITEM DESCRIPTION Sleep Timer Press the buttons to enter and set the Sle...

Page 42: ...the VGA1 source Component Video Press the buttons to enter and enable or disable the Component Video source Composite Video Press the buttons to enter and enable or disable the Composite Video source...

Page 43: ...cases the lamp bulb may burn out during normal operation and cause glass dust or shards to be discharged outward from the rear exhaust vent Do not inhale or touch glass dust or shards Doing so could r...

Page 44: ...ll firmly on the module handle to remove the lamp module 6 Reverse steps 1 to 5 to install the new lamp module While installing align the lamp module with the connector and ensure it is level to avoid...

Page 45: ...ENU button to open the OSD menu 2 Press the buttons to move to the Settings 2 menu Press the button to move down to Advanced 1 and press enter 3 Press the buttons to move down to Lamp Hour Reset 4 Pre...

Page 46: ...he projector serviced Cleaning the Lens You can purchase optic lens cleaner from most camera stores Refer to the following to clean the projector lens 1 Apply a little optic lens cleaner to a clean so...

Page 47: ...Refer to the information that comes with the lock for instructions on how to use it The security lock slot corresponds to Kensington s MicroSaver Security System If you have any comment contact Kensin...

Page 48: ...s are securely attached Ensure the attached device is turned on Ensure a connected PC is not in a suspended mode Ensure a connected notebook computer is configured for an external display This is usua...

Page 49: ...mal Eco mode 5 blinks 9 blinks Lamp ballast communication error 5 blinks 10 blinks Fan 1 error 6 blinks 1 blink Fan 2 error 6 blinks 2 blinks Fan 3 error 6 blinks 3 blinks The projector case is open 7...

Page 50: ...light from the projector 1 Check that the power cable is securely connected 2 Ensure the power source is good by testing with another electrical device 3 Restart the projector in the correct order and...

Page 51: ...with other speakers 5 Have the projector serviced Problem The sound is distorted 1 Check the audio cable connection 2 Test the source audio output with other speakers 3 Have the projector serviced Ha...

Page 52: ...HDMI cables longer than 10 meters 32 81ft There are many HDMI Adopters working on HDMI solutions that extend a cable s effective distance from the typical 10 meter 32 81ft range to much longer length...

Page 53: ...afety certification FCC B cUL UL CB CE C tick CCC PSB PCT TUV GS UL S Operation temperature 5 35 C 41 95 F Dimensions 285 1 mm W x 264 1 mm D x 130 4 mm H 11 22 x 10 40 x 5 13 AC Input AC Universal 10...

Page 54: ...134 5 5 3 2032 80 1771 1 69 73 996 2 39 22 2461 7 96 9 3701 5 145 7 149 4 5 9 2133 6 84 1859 5 73 21 1046 41 18 2584 8 101 8 3886 6 153 156 9 6 2 2286 90 1992 4 78 44 1120 6 44 12 2769 5 109 4164 2 1...

Page 55: ...00 x 600 35 2 56 3 800 x 600 37 9 60 3 800 x 600 46 9 75 800 x 600 48 1 72 2 800 x 600 53 7 85 1 800 x 600 76 3 120 1024 x 576 35 8 60 1024 x 600 37 3 60 1024 x 600 41 5 65 1024 x 768 48 4 60 1024 x 7...

Page 56: ...68 7 75 1 480i 15 734 60 SDTV 576i 15 625 50 576p 31 3 50 EDTV 480p 31 5 60 720p 37 5 50 720p 45 60 1080i 33 8 60 1080i 28 1 50 1080p 27 24 1080p 28 25 1080p 33 7 30 1080p 56 3 50 HDTV 1080p 67 5 60 O...

Page 57: ...IN8606HD User s Manual Projector Dimensions 264 1mm 10 40 285 1mm 11 22 130 4mm 5 13 122 3mm 4 81 50...

Page 58: ...nergy and if not installed and used in accordance with the instruction manual may cause harmful interference to radio communications Operation of this equipment in a residential area is likely to caus...

Page 59: ...PO RW 0 1 0 1 0 Disable 1 Enable 3V Aspect Ratio ARZ RW 0 5 0 1 0 Fill 1 4 3 2 16 9 3 Letterbox 4 Native 5 2 35 1 4V Auto Image AIM W n a 1 1 1 1 Enable 5V Auto Off Time AOT RW 0 36 6 1 0 Never 1 36 5...

Page 60: ...5 Over heating 8 DMD error 9 Color wheel 28V Factory Reset RST W n a 1 1 1 1 reset 32V Freeze Screen FRZ RW 0 1 0 1 0 Disable 34V Gamma GTB RW 0 5 Source Specific 1 Valid only when Display Mode User...

Page 61: ...ct Key 4 Left Key 5 Right Key 81V Menu Transparency TOE RW 0 4 0 5 0 0 1 20 2 40 3 60 4 80 91V Mute MTE RW 0 1 0 1 0 disable 1 enable 103 None Overscan OVS RW 0 1 0 1 0 disable 1 enable 104V Frequency...

Page 62: ...ng 1080p 121V Projector Total Hours LMT R 0 9999 1 123V Lamp Hour Reset LRT RW n a 1 n a 1 Reset Lamp Hour OSD Status 126V Search Screen DSU RW 0 4 0 1 0 Gray 1 Red 2 Black 3 Blue 4 White 130V Sharpne...

Reviews: