background image

Connection

15

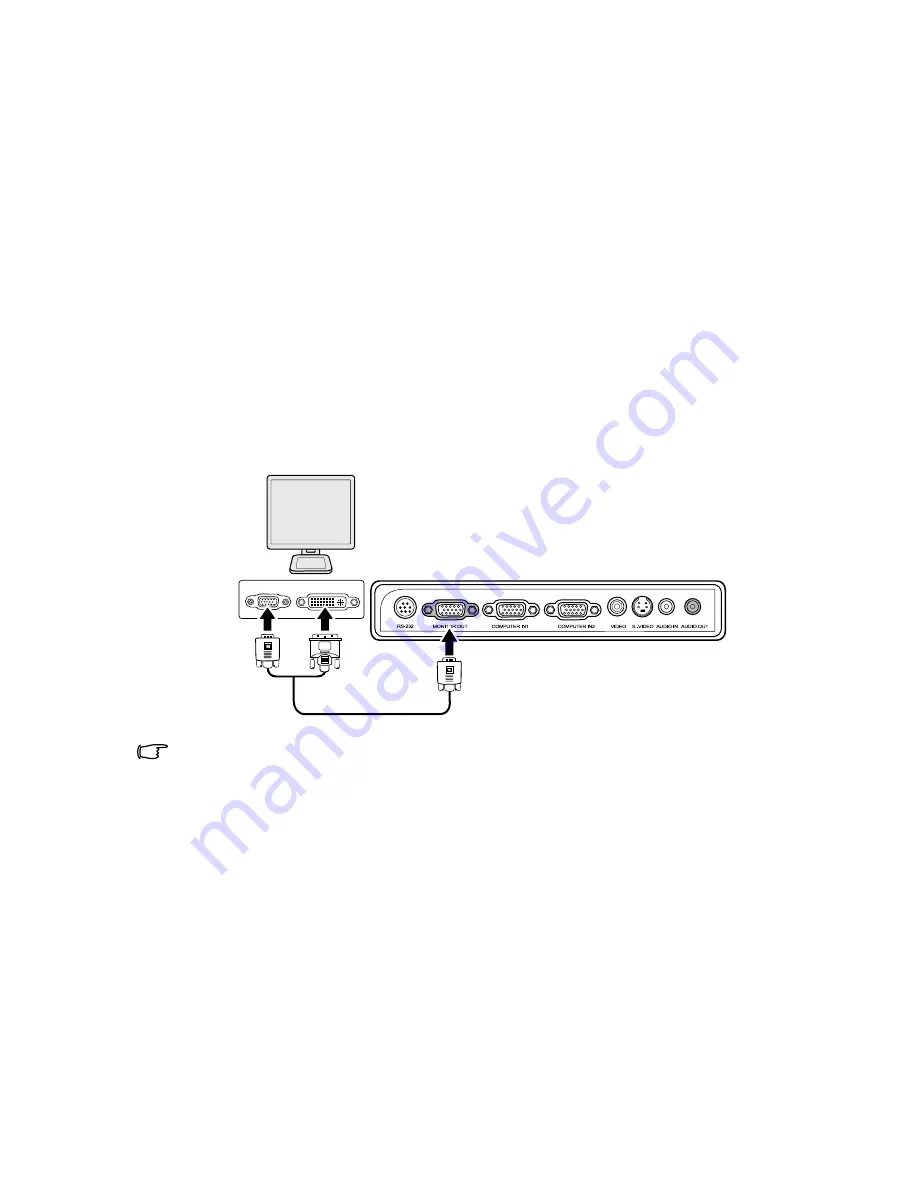
Connecting a monitor

If you want to view your presentation close-up on a monitor as well as on the 
screen, you can connect the 

MONITOR OUT

 signal output socket on the projector 

to an external monitor with a VGA cable following the instructions below:

To connect the projector to a monitor:

1.

Connect the projector to a computer as described in 

"Connecting a computer" 

on page 14

.

2.

Take a suitable VGA cable (only one supplied) and connect one end of the 
cable to the D-Sub input socket of the video monitor. 
Or if your monitor is equipped with a DVI input socket, take a VGA to DVI-A 
cable and connect the DVI end of the cable to the DVI input socket of the video 
monitor.

3.

Connect the other end of the cable to the 

MONITOR OUT

 socket on the 

projector.

The final connection path should be like that shown in the following diagram:

• The D-Sub output only works when an appropriate D-Sub input 

is made to the COMPUTER IN1 jack.

If you wish to use this connection method when the projector is in standby mode, make 
sure the VGA Out function is turned on in the SYSTEM SETUP: Advanced menu. See 

"VGA 

Out" on page 43

 for details.

Monitor

(VGA)

(DVI-A)

or

(VGA)

Summary of Contents for IN100 series

Page 1: ......

Page 2: ...rd function 22 Switching input signal 24 Adjusting the projected image 25 Magnifying and searching for details 27 Selecting the aspect ratio 27 Optimizing the image 29 Setting the presentation timer 3...

Page 3: ...time Presentation timer for better control of time during presentations One key auto adjustment to display the best picture quality Digital keystone correction to correct distorted images Adjustable...

Page 4: ...ffer from those illustrated Optional accessories 1 Ceiling mount wall mount 2 LiteShow II wireless presentation adaptor 3 Pull down and pull up 4 3 screens 4 Cables and adaptors 5 Replacement lamp 6 O...

Page 5: ...PC Component video YPbPr YCbCr signal input socket 12 Video input socket 13 S Video input socket 14 Audio signal input socket Audio signal output socket 15 Kensington anti theft lock slot 16 Quick re...

Page 6: ...e 50 for details 4 POWER indicator light Lights up or flashes when the projector is under operation See Indicators on page 50 for details 5 POWER Toggles the projector between standby mode and on See...

Page 7: ...for details 12 Right Activates panel key lock See Locking control keys on page 34 for details When the On Screen Display OSD menu is activated the 6 11 and 12 keys are used as directional arrows to se...

Page 8: ...ow the illustrated instructions Push and hold the locking arm while pulling out the battery holder 2 Insert the new battery Type CR 2025 in the holder Note the positive polarity should face outward 3...

Page 9: ...with the projector suspended upside down from the ceiling in front of the screen Purchase the InFocus ceiling mount SP CEIL UNIV from your dealer to mount your projector on the ceiling Set Front Ceili...

Page 10: ...igned to project at a slightly upward angle above the horizontal plane of the projector This is so that they can be readily placed on a table and will project forward and upwards onto a screen positio...

Page 11: ...e Keystone function to correct the distortion See Correcting keystone on page 26 for details How to determine the recommended screen size for a given distance This method can be used for situations wh...

Page 12: ...nches mm mm Inches mm Inches mm Inches mm Inches 4 48 1219 1829 72 1920 76 2011 79 37 1 4 59 1500 2250 89 2362 93 2475 97 45 1 8 5 60 1524 2286 90 2400 94 2514 99 46 1 8 6 72 1829 2743 108 2880 113 30...

Page 13: ...ections 2 Use the correct signal cables for each source 3 Ensure the cables are firmly inserted In the connections shown below some cables may not be included with the projector see Shipping contents...

Page 14: ...cket of the projector 4 If you wish you can use another suitable audio cable and connect one end of the cable to the AUDIO OUT jack of the projector and the other end to your external speakers not sup...

Page 15: ...e D Sub input socket of the video monitor Or if your monitor is equipped with a DVI input socket take a VGA to DVI A cable and connect the DVI end of the cable to the DVI input socket of the video mon...

Page 16: ...n your video source device you should elect to use the S Video option See Connecting an S Video source device on page 18 for how to connect the projector to an S Video device Good video quality Compos...

Page 17: ...audio output socket of the device and the other end to the AUDIO IN socket of the projector 4 If you wish you can use another suitable audio cable and connect one end of the cable to the AUDIO OUT ja...

Page 18: ...onnected the audio can be controlled by the projector On Screen Display OSD menus See Adjusting the sound on page 35 for details The built in speaker will be muted when the AUDIO OUT jack is connected...

Page 19: ...UT jack of the projector and the other end to your external speakers not supplied Once connected the audio can be controlled by the projector On Screen Display OSD menus See Adjusting the sound on pag...

Page 20: ...maintain the lamp life once you turn the projector on wait at least 5 minutes before turning it off 4 If you are prompted for a password press the arrow keys to enter a six digit password See Utilizin...

Page 21: ...nal Main menu icon Main menu Sub menu Highlight Press MENU EXIT to the previous page or to exit Status DISPLAY Wall Color Aspect Ratio Phase H Size Digital Zoom Off Auto 16 0 MENU Exit Analog RGB ENTE...

Page 22: ...ix digits for the password 4 Confirm the new password by re entering the new password Once the password is set the OSD menu returns to the Security Settings page The digits being input will display as...

Page 23: ...on screen Write your selected password down here in this reference guide in advance or right after the password is entered so that it is available to you should you ever forget it Password __ __ __ __...

Page 24: ...Once detected the selected source information will display on the screen for seconds If there is multiple equipment connected to the projector repeat steps 1 2 to search for another signal The brightn...

Page 25: ...screen and the projector are not perpendicular to each other the projected image becomes trapezoidal To correct this situation see Correcting keystone on page 26 for details Do not look into the lens...

Page 26: ...eight of the projector you may need to follow one of these steps Using the remote control Press on the projector control panel or remote control to display the Keystone correction page Press to correc...

Page 27: ...to magnify the picture to a desired size 5 To navigate the picture press MODE ENTER to switch to the paning mode and press the directional arrows to navigate the picture 6 Use the directional arrows...

Page 28: ...ut signals with lower resolutions the projected image will display smaller than if resized to full screen You could adjust the zoom setting or move the projector towards the screen to increase the ima...

Page 29: ...ting the User mode There are two user definable modes if the current available picture modes are not suitable for your need You can use one of the picture modes except the User as a starting point and...

Page 30: ...ere are some user definable functions available when User mode is selected You can make adjustments to these functions based on your needs Adjusting Brightness Highlight Brightness in the PICTURE menu...

Page 31: ...t colors in picture It enables a greater than 50 brightness increase in mid tone images which are common in video and natural scenes so the projector reproduces images in realistic and true colors If...

Page 32: ...s TVs projectors etc You can project any image from the disc on the screen and enter the 3D Color Management menu to make adjustments To adjust the settings 1 Go to the PICTURE menu and highlight 3D C...

Page 33: ...e timer position by pressing Top Left Bottom Left Top Right Bottom Right 5 Press to highlight Timer Counting Direction and select your desired counting direction by pressing 6 Press to highlight Sound...

Page 34: ...ON Do not block the projection lens from projecting as this could cause the blocking object to become heated and deformed or even cause a fire Locking control keys With the control keys on the project...

Page 35: ...ssage displays 3 Highlight Yes and press MODE ENTER Operation under High Altitude Mode may cause a higher decibel operating noise level because of increased fan speed necessary to improve overall syst...

Page 36: ...rt up Use to select a screen Shutting down the projector 1 Press POWER and a confirmation message displays prompting you If you don t respond in a few seconds the message will disappear 2 Press POWER...

Page 37: ...al 4 3 16 9 Keystone Position Phase H Size Digital Zoom 3D Sync On Off 3D Sync Invert Disable Invert 2 PICTURE Preset Mode Presentation Video Bright Whiteboard Blackboard Beige Wall User Brightness Co...

Page 38: ...Advanced Quick Cooling On Off High Altitude Mode On Off Audio Settings Mute On Off Volume Menu Settings Menu display time 5 sec 10 sec 15 sec 20 sec 25 sec 30 sec Menu position Center Top left Top rig...

Page 39: ...nction is only available when a PC signal analog RGB is selected Digital Zoom Magnifies or reduces the projected image See Magnifying and searching for details on page 27 for details 3D Sync This proj...

Page 40: ...page 31 for details Tint Adjusts the red and green color tones of the image See Adjusting Tint on page 31 for details The function is only available when Video or S Video with NTSC system is selected...

Page 41: ...after a set period of time See Setting Auto Power Off on page 45 for details Blank Timer Sets the image blank time when the Blank feature is activated once elapsed the image will return to the screen...

Page 42: ...Settings Menu display time Sets the length of time the OSD will remain active after your last key press The range is from 5 to 30 seconds in 5 second increments Menu position Sets the On Screen Displ...

Page 43: ...n how the total lamp hour is calculated Security Settings Change password You will be asked to enter the current password before changing to a new one Power on lock See Utilizing the password function...

Page 44: ...roper shutdown procedure as described in Shutting down the projector on page 36 and unplug the power cord To remove dirt or dust wipe the case with a soft lint free cloth To remove stubborn dirt or st...

Page 45: ...NFORMATION menu Extending lamp life The projection lamp is a consumable item To keep the lamp life as long as possible you can do the following settings via the OSD menu Setting Lamp mode as Economic...

Page 46: ...mally run with Economic selected See Setting Lamp mode as Economic on page 45 you may continue to operate the projector until the 3950 hour lamp warning appears The lamp has been in operation for 3950...

Page 47: ...n the lamp compartment and dispose of cleaning materials Be careful of sharp edges in the lamp compartment Wash hands after lamp replacement Only InFocus certified lamps are tested with this projector...

Page 48: ...ass in the projector Do not place the lamp in locations where water might splash on it children can reach it or near flammable materials Do not insert your hands into the projector after the lamp is r...

Page 49: ...mer Highlight Reset and press MODE ENTER The lamp time will be reset to 0 CAUTION Do not reset if the lamp is not new or replaced as this could cause damage 9 Tighten the screw that secures the lamp C...

Page 50: ...hutdown again Please contact your dealer for assistance Lamp events Orange Flashing Off Red The projector has shutdown automatically If you try to re start the projector it will shutdown again Please...

Page 51: ...ignal device Check the connection The input signal has not been correctly selected Select the correct input signal with the SOURCE key on the projector or remote control The lens cover is still closed...

Page 52: ...lbs Input terminal Computer input RGB input D Sub 15 pin female x 2 Video signal input S VIDEO Mini DIN 4 pin port x 1 VIDEO RCA jack x 1 SD HDTV signal input Analog D Sub Component RCA jack x 3 throu...

Page 53: ...VGA_85 720 x 400 31 469 59 940 720 x 400_60 37 927 85 039 720 x 400_85 720 x 480 31 469 59 940 720 x 480_60 800 x 600 35 156 56 25 SVGA_56 37 879 60 317 SVGA_60 48 077 72 188 SVGA_72 46 875 75 000 SV...

Page 54: ...024 x 768 75Hz 60 241 75 020 MAC19 1152 x 870 75Hz 68 68 75 06 MAC21 1152 x 900 66HZ 61 796 65 95 SUN1166X 1152 x 900 76HZ 71 713 76 047 SUN1176X 1024 x 576 60HZ 35 820 60 000 D1057660 1024 x 600 60HZ...

Page 55: ...of InFocus Corporation Disclaimer InFocus Corporation makes no representations or warranties either expressed or implied with respect to the contents hereof and specifically disclaims any warranties m...

Reviews: